And How it Can Change Your Life in 15 Minutes.
by Gavin Seim: Original article from Gavin’s f164 journal. (updated 11/15/11).
This may be the most valuable piece I’ve written on photography. In the last year, I’ve started working with 4×5 film and digital side by side. I’ve also explored extensive exercises in tonal control, truly learned to visualize, and implemented key parts of the Zone System that was developed by Ansel Adams and Fred Archer, both in my film and my digital work, in color and black and white.
The idea of visualizing and using Zones is not promoted heavily today. It seems much of the industry, including many of its educators, arrived at digital and decided that the past 150 years of photographic knowledge were somewhat irrelevant. What I’m about to show you is not taught much, but understanding it WILL change your photography forever. I’m not kidding; once you get this, you’ll never see light the same way again. And I hope you’ll share it with others.
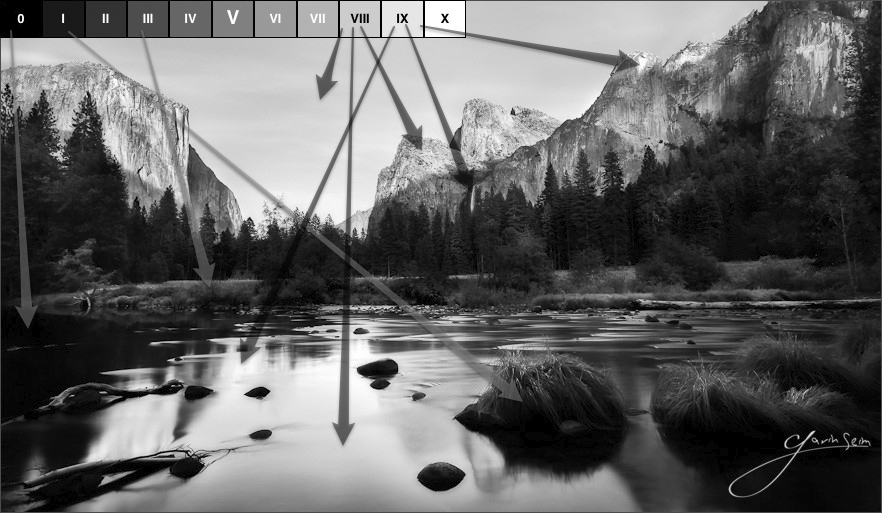
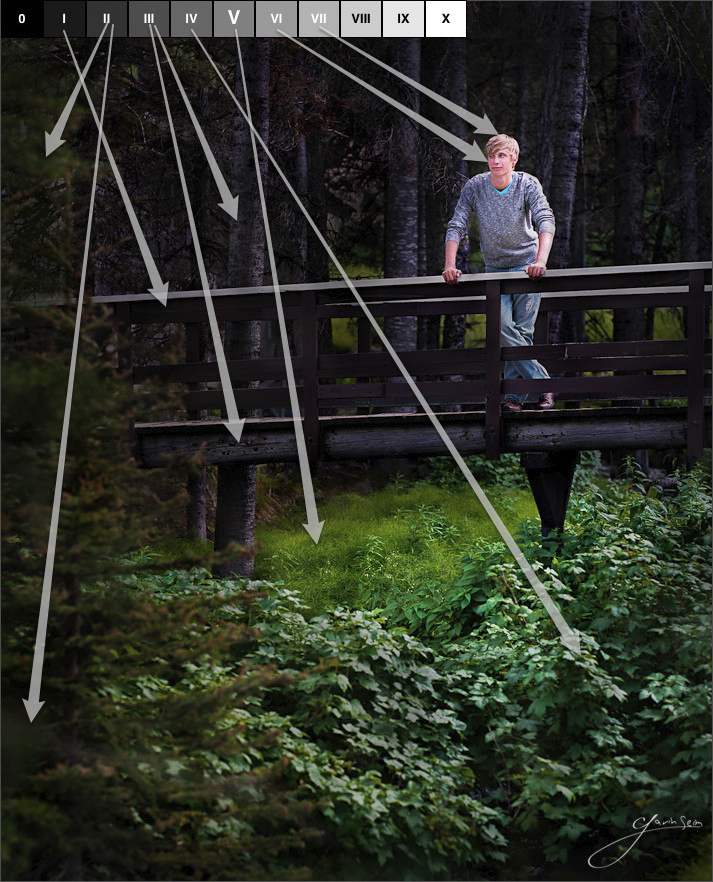
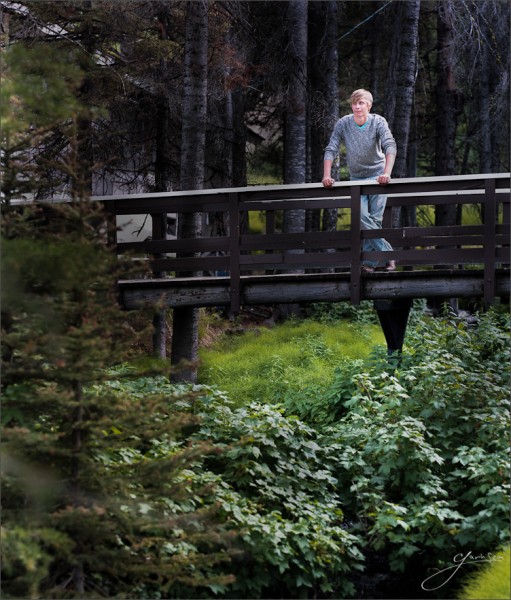
I’m going to stay simple because these concepts are essentially simple. I have not come up with a new digital based zone system, a stripped down version, or an article full of nerdy equations, white papers, or complex systems. This is not hard, and you can start putting it to use TODAY for film or digital. Since most of us are in the digital world, I’ll focus on that. I’m going to show you how to use the core of the Zone System to make you a vastly better photographer. I’ve also brought along some examples for analyzing the Zones.
To those of you who already know this, kudos. But I challenge you to review and analyze whether you’re really using it, or just buzzing along in digital bliss and fixing things later. Excuse my bluntness, but this is happening to the best of us. We need to get back to basics, visualize, control tone, dynamic range, and image quality.
Originally, the Zone System was a complete approach that included everything from the initial exposure to the final print. Now we don’t use darkrooms much these days, so I’ll focus on the pivot point of the Zone System: the Zones themselves. That said, I would encourage you to study the whole process even if you don’t use film. It will help you gain a better understanding of light and photography. Not only that, but old books like Fred Picker’s Zone VI workshop, deal with it quickly and effectively and can often be had for mere pennies.
1. The Zone Scale.
The Zone Scale lies at the core of the Zone System. It consists of eleven squares that span from clipped black (Zone 0) to clipped white (Zone X). Each square represents a change of one stop. The first part of using Zones starts before you release the shutter. Truly visualizing your image is like nothing else. Once you master it, you see the image you plan to make, including your edits and refinements, in your mind before you ever take the photo. It changes everything about how you photograph and how refined the resulting images become.

To begin, look at your scene. What’s outside your window right now? Visualize what zones in which the things around you fall. Then imagine you’re taking a photo. Imagine where the zones would be if the image came out exactly as you wanted. It does not have to be what you “see” but what you “visualize” for the finished image. How do YOU want to make it?
Think about what Zone levels on various objects in this scene would most complement your main subject as well as your supporting cast of elements. Sometimes it helps to begin by trying to visualize a scene in black and white, even if your final image is going to be color. Thinking in terms of only tones can be helpful, especially early on in the process.
2. Placing Those Zones.
OK, now you have a mental image for what your scene looks like. Let’s make it happen. You could choose any element as your basis. But let’s say you looked out your window, and the neighbor’s sports car is across the street. Set aside your annoyance for a moment that he has that sports car because he has a great paying job instead of being a photographer. Let’s say the car is a rich blue. Even though the color is dark, you imagined the car standing out and you placed it in Zone VI (6). Remember that just because something is dark, does not mean it always falls in a low zone. It’s all a question of the light and, more importantly, where you place it on the Zone Scale. And remember that while the Zones are shades of grey, they represent tonal value. Color or black and white, the zones are the same.
So for now lets meter that car using a spot meter, either spot mode on your camera, or a dedicated unit (I really like the Pentax Digital Spotmeter, as it reads in Exposure Values–very educational–and allows you to set Zones easily). You’re spot metering for the specific area you’re visualizing. Now there are some things to know about meters and we’ll talk more about them later. For now, let’s keep it simple and use that spot meter reading.
Say the meter tells us the blue of the awesome car is 1/200 at ISO100 and f8. Great, now here’s the catch. METERS METER TO MIDDLE GRAY (Zone V). Look at it on the scale above, then let me say it again: METERS READ BASED ON ZONE V. This means that your meter, in particularly a reflective meter like the one in your camera, is not really telling you what the best exposure is (*more on meters below). I know this may be surprising, but in general a meter is simply telling you what exposure will place the metered object at middle gray, Zone V. Not what is actually a good exposure. If you already know this then big props. Most people have no idea.
How can this be? I mean you’ve been working under the assumption that your meter is always right. Well, it probably is, at Zone V. So unless you want your subject middle grey, you need to compensate. We’ll get to that soon. Now if you’re in the default Averaging type mode of many modern cameras, it’s essentially reading from various parts of the scene and averaging a guess at proper overall exposure. This is a nice tool, but it’s often misguided and takes the control out of our hands. Yes, that’s probably why those lovely faces in your portraits come out too dark. So we’ll stick with spot mode for now.
What all this means is incredibly powerful. The meter is still brilliant. Knowing that it gives you a Zone V reading for the metered section of the scene, all you have to do is decide which Zone an element should fall in, then compensate accordingly. Remember that each Zone is one stop. The reflected meter gives you the exposure at Zone V. Let’s say you want the car at Zone VI (6). All you have to do is expose one stop above what your meter says, and that car will be placed at zone VI. It really is that simple. Let’s say in another scene you metered a dark section of foliage and imagined it at Zone III. Well, all you have to do is spot meter, then drop down 2 stops lower. Violà, you placed it at Zone III.
*Regarding meters (updated 11/15): Meters can vary and you need to know your tools so lets clarify them bit. A spot or in camera meter looks at your subject and reads based on “reflected light” (just as you and your camera see it). An incident meter (the kind you hold in front of your subject), reads the light being cast on it thru it’s translucent grey sphere.
Incident cannot see the reflectiveness of the subject (think snow vs. a dark red curtain). Now the idea is that an incident meter is reading the oncoming light and effectively placing it it’s sphere at Zone V (similar to if you spot metered on a grey card). Because of that, other tones “should” follow accurately (what you see is what you get). That said, it’s not quite that simple. While it should be close, certain tones may not render exactly as expected because while the incident meter has it’s standard (the sphere) to read from, it still can’t “see” the subject being metered.
So while both meters are effectively metering based on Zone V, an incident meter is a bit less specific in my view, because it’s only reading that oncoming light and you still may need to account for the reflectiveness of your subject. Some might argue that because incident ideally gives you what you see, that we don’t need the Zones. I beg to differ. In many non studio or close up situations, incident readings are not possible. Even when they are, what you see is not always what you want. Based on a natural incident reading that car may fall at Zone V, but you might still want to place it up to zone VI to achieve the visualization you want and properly convey your feeling of the scene.
This does not mean you can’t use incident readings in cooperation with the Zone approach. Just understand that incident and reflective read a bit differently. As a general a rule I would say that when you meter with incident, assume it’s reading is close to what you see. You can then compensate the Zones to place elements anywhere desired. If you like it as is that’s fine, but seeing your Zones will still help you plan a better image.
Reflective. Now I prefer the more absolute nature of the reflected reading (generally spot). One, because even if you don’t have a separate meter, your in camera meter will work the same. But more importantly, because a spot meter always gives you a fixed point to start from. It effectively places whatever object you point it at in Zone V. Then you compensate to place that object in whichever Zone you want. The reflected reading is absolute. For people who don’t understand their zones, everything they meter turns grey. But for those of us that use the Zones we’re discussing, it’s amazingly powerful and makes visualizing and seeing light a simple thing. And yes, you can spot flash meter with some meters, though probably not with your in-camera meter.
So whichever meter you use, with natural light or flash, you can apply the Zone techniques with great success. Just understand how your meter reads light. Also bear in mind that meters can vary slightly. For example your meter may not read exactly at the 18% gray reflectance standard that Zone V is based on. We’re not talking much difference, so don’t worry about it too much now, but you want to learn how “your” meter works and as you delve deeper you may want to nail down your calibration.
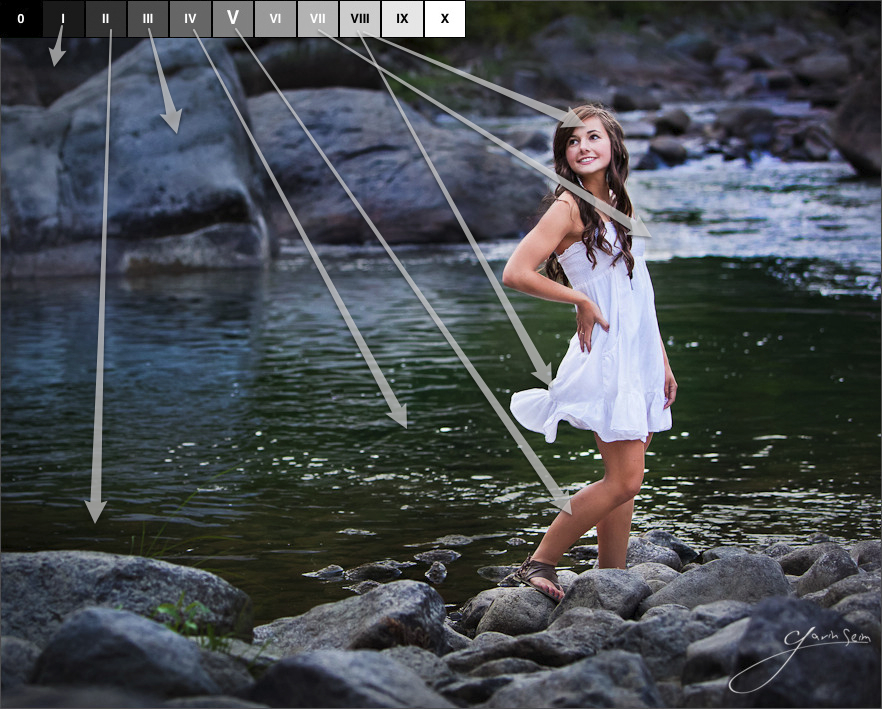
3. The Other Zones.
OK, great, you say. Now I can place any element in any Zone I want. The problem is that every other element of the scene is also exposed based on that part. Some might be lighter or darker than what I visualized.
Aha! I might say. This is what makes photography an art and a science. We need to consider what Zones low and high values will fall into. You’ve planned the exposure you want for your main subject. You just have to carry it through. Now in the days of film, the Zone System had lots of other relevant pieces based around the Zones. Those pertained to the way you processed the film, dynamic range, how you printed, and more. We just have to think of it terms of the medium being used. For most, that’s digital. Even when I use large format, I scan to digital for my final processing.
So let’s consider this. Our car is placed at Zone VI (6). But because of that, the bright sky might have come up Zone IV (9). That’s almost white. Yet you want a nice rich sky blue around Zone VII (7). You have a visualization. How can you make it happen? Clearly, we have to darken that sky as we develop. No, this is not something the latest PS pluguin automates for us. I would probably use a burn (darken) brush, or a dark gradient to bring down the tonal value of the sky. And since we know exactly what we’re visualizing, we can answer questions to make it happen perfectly.
We know the car is dead on in Zone VI. The question is, is the camera capturing the information we need in other areas? Digital is improving at this, but it still has less range than film. If the sky is clipping to white in the histogram, we probably need a darker frame. This isn’t a problem; make a separate exposure with the sky in the zone you want. Back in the digital darkroom, you could blend those. Maybe with HDR software and tone mapping, or more likely just with a simple layer blend in PS, mix the rich sky into the scene while retaining the car at Zone VI.
Maybe the camera has enough range. If you look at your histogram, and the highlights (right side) are not clipping, then you may just have all the info you need. The same goes for the darks. Visualize your darkest zones. Is the image capturing enough information to keep them where you want, using gradients, brushes, burning, dodging, etc. in post processing? These are questions I can’t answer, but now that you’re thinking this through, it’s not that hard. Plan where those zones should be placed to make a scene look great. Meter, then expose accordingly, and go to work on the finished product. Burn, dodge, blend layers, control tonal values, and make your visualization happen. Not so unlike Ansel did in his darkroom.
- For more specifics on controlling the tonal values, and finishing your zones after the image is captured, read my extended article: 3 Core Elements of Controlling Tonal Value.
4. Lets Recap.
1. Look at your scene and see in terms of Zones. What light do you have?
2. Analyze your subject. What zone do you want it placed in? There are no limits.
3. Consider other elements. What zone should they be to best complement the subject?
4. Meter your subject and determine what it’s exposure would be at Zone V. It’s also good to meter other areas in the scene to better understand how might range you’re dealing with.
5. Adjust. The meter gave you Zone V (5). Now adjust your exposure compensation (EV) up or down to put the metered subject in the zone you chose. Remember that each step on the Zone Scale is simply one stop, or EV
6. Consider if the camera can capture enough range to place all objects in the zones you visualized. If not, take extra frames as needed. Note that this is one reason why cameras average by default. Sometimes by adjusting the exposure to a happy medium you can get everything you need. Just keep your main Zone in mind. Everything has a cost, and the closer your subject is to dead on, the better. Just do your adjustments with a plan, knowing how it will affect your image.
7. Capture your frame according to what you found by metering and visualizing. Wait, did we actually plan before making our image?Yikes! that’s new. Seriously though, don’t be afraid to make a few test exposures along the way. But don’t trust what’s on the LCD. Use your metering and histogram to determine if you’re getting what you’re visualizing.
8. Develop that image that was perfectly exposed according to your visualization. Edit, apply corrections, presets, burn, dodge, tone mapping, blend layers, and whatever you need to make it match what you visualized.
9. There really is no nine. You’ve done it. Now go make that really amazing print.
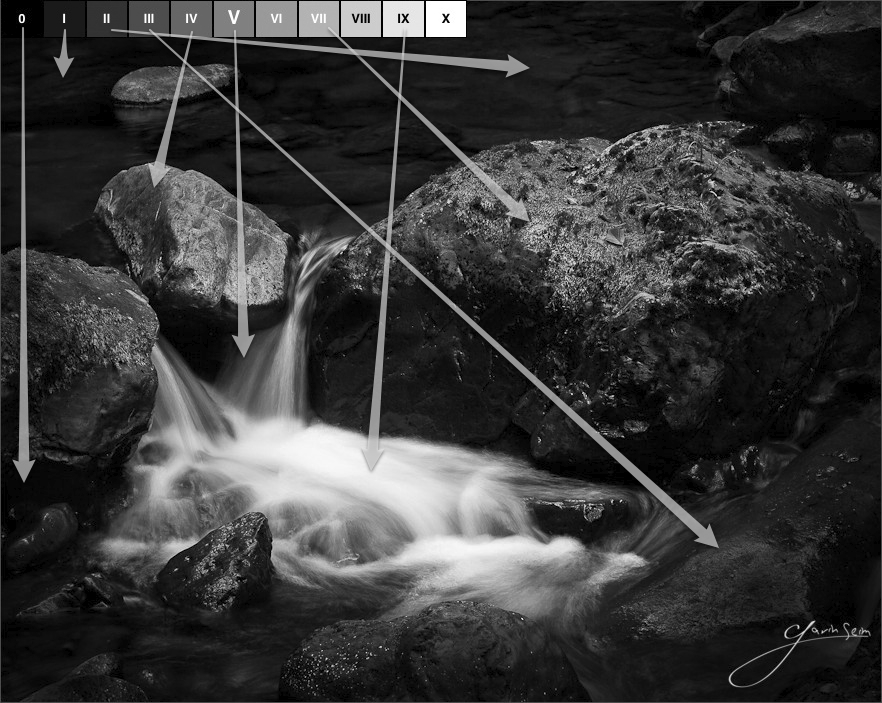
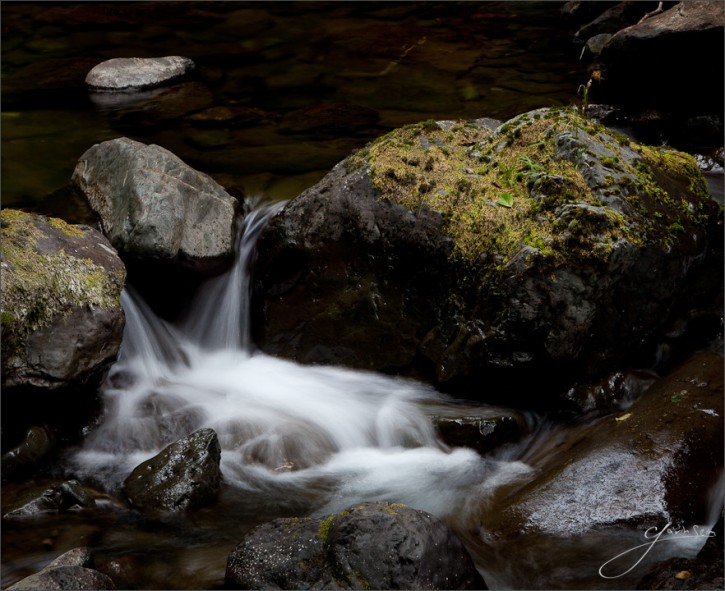
5. Wrapping Up.
OK, this is simple, but it was a lot of stuff. If you’re feeling confused, read it again, because once you really start to grasp it, it will come quickly. If you think you understand but don’t see the value, read it again because you have not really grasped how powerful it is. If you think you use this instinctively and you already knew it, even though you don’t really, read it again. This is the single most valuable, yet simple, bit of photographic knowledge I have learned in my nearly 15 years of photography.
I know I’m being a bit snarky there, but it’s only because some people (often the so-called experts) turn their nose up at this as if they already knew it and it’s no longer relevant. If you really know and truly use every step already, than huge props to you, because you are among the few. But if you think it’s no big deal, it’s time get back to basics. Because this is no less relevant than it has ever been. In fact, it may be more so.
That’s all for now. This can go deeper so I encourage you to look into these concepts further, but for now just start exposing in Zones. Before long, you will never see light, or make photos, the same way again. I know, sometimes you’ll be on the move, and you won’t have time to spot meter and plan every frame. That’s why today’s automated tools can be really useful. But if you slow down (check out The 111 Photo Project) and end the mindset of letting gear think for you and put visualization, Zones, and tonal control into practice at every chance, it will start affecting all your images, even the ones you have to do lightning quickly.
I hope you’ve enjoyed this. Please +Like, share, and tell the world as you learn how powerful this can be. Remember, it will take a little time and practice. I suggest you demand of yourself to start seeing in Zones, visualizing and planning your images. It will work. I plan to keep refining this as I improve my own skills and find to better ways explain this often neglected piece of our craft that has changed the way I make images. I’ll also be discussing it during my tours and workshops.
Now go. Apply this. Because it works so dang well, it’s almost unbelievable. Good luck!
Gav
- For a bit broader view that looks at using these ideas in collaboration with good scene planning, processing and more, read my extended article: 5 Essential Keys of Perfect Photographs.
- Also peek at the Zone System wiki entry for more general info like descriptions of each Zone.
- Read books. Like Ansel Adams, The Negative for in depth Zone system studios.


Great article, been a long time since I have heard the Zone system
mentioned. Back in my old darkroom days I never really got it a 100%. Your way of explaining it for digital seems more intuitive. Going to dig my old light meter out and try it again.
Awesome Steve. Head over to the forums once you dig in and show us what you’re getting from it…. prophotoshow.net/forum
I got this book ten years and found it helpful learning about the Zone System
The Confused Photographer’s Guide to Photographic Exposure and the Simplified Zone System
by Bahman Farzad
http://www.amazon.com/Confused-Photographers-Photographic-Exposure-Simplified/dp/0966081714/ref=pd_sim_b_1