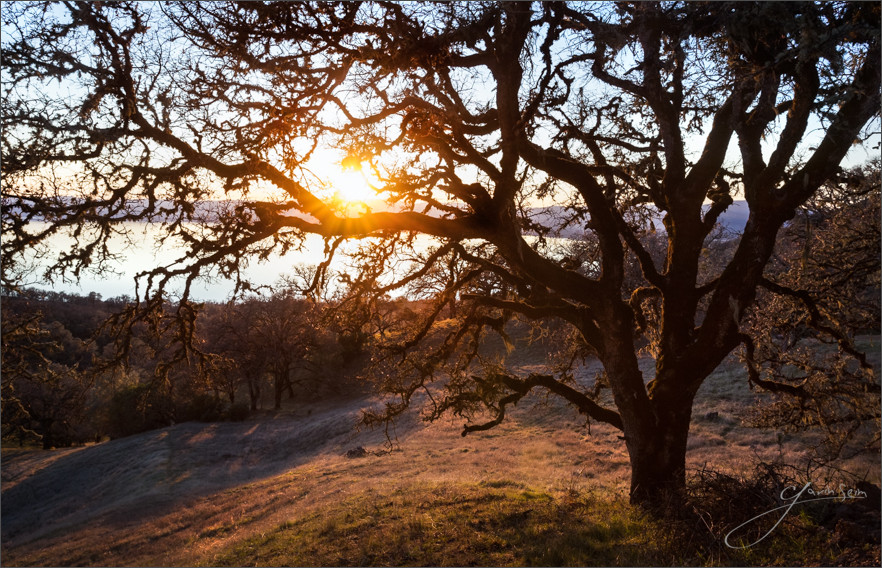
There is nothing quite like sunset in the forest above Clear Lake. Here lies small group of towns nestled around the water in the remote hills of California. There is nothing like it. Driving up into rolling high hills to camp, each sunset is a wounder of color and shadow, storybook trees and glowing foliage. Perhaps it’s partly the warn memories of camping here with my family combined with the fresh air and quiet atmosphere. Whatever it is, this place represents as perfect a sunset as I can imagine.
We’ve camped up here a few times and even did some scenes here for our new PHOTOGRAPHICS film. This beautiful view is actually just off the forest read leading up. Each night the sun falls behind the hills that circles the valley and fades into the magenta hues of rolling shadowy hills. I rarely shoot into the sun because it’s rare I find a situation that it really works in. But I timed this image just before sunset to maximize the glowing light and this is was it feels like to stand here and watch the sunset. It will make a beautiful print.
Release details: Prints Available. Order Open Edition originals above.. Master prints and Signature Limited Editions are listed below and can be ordered by contacting gallery.
Released prints….
- 55 inch Master Original on Canvas – Limited edition of, 1 (contact the gallery)
- 46 inch Signature Canvas – Limited Edition of, 50 (contact the gallery)
- 38 inch Signature Metal – Limited Edition of, 75 (contact the gallery)
- 24 inch open edition mounted print (order above)

For Photographers. How it was made… ![]()
![]()
![]()
![]()
Technical Notes: Canon MK2, 17-4oL @25mm, f14, 1/60, ISO400, Induro Tripod
Processing: Lightroom 5, Photoshop, Seim Effects tools.
This one is significant to me. As I said It’s rare that I photograph right into the sun, but using the branches of the tree and waiting till just when the sun was setting worked. I of course lost some contrast from the sun in the lens, but not so much that the finished work feels flat. It just feels right.
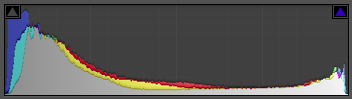
I think most would expect a bracketed HDR to have been used here. In truth it’s a single RAW image and in fact a tone mapped bracket would have likely ruined it by killing the rich contrasting near blacks. I say near because this image has virtually no clipping. It spans a 10 stop range from nearly pure black Zone zero all the way to nearly white Zone 10. I find being able to showcase this kind range without clipping gives very a rich depth and well exucitec exposure eliminated the need for a multi-image approach.

How only one frame? To start with I positioned the camera very carefully to get a view of the sun but hold back some of the light with tree branches. Next I used Zones and determined what my range was, exposing the frame so that I still had detail on the black of the tree trunk (Zone 1) and barley crossed into clipping the tone of the sun (Zone 10).
In post my first step was to apply the Super Tonal Range preset from Power Workflow. In essence leveraging the highlight and shadow control of LR5 which is quite impressive. The RAW file gave me the full range I wanted and then I went into Photoshop for careful burning and dodging of the kind we study in EXposed. This helped me control the specific contrast ranges of the foliage in relation to the surrounding areas.
A bit more detail work and the image was finished. It was quite beautiful right out of camera so I did not have to do much. The better I can make an image in camera the less post production I’ll have and the most effective that post production will be. The only wish I could have for this image is a bit more edge detail. I doubt you’ll see that here, but I could have gained a bit more on the edges had I used a 24MM TSe Prime. Still, the 17-40 is a worthy optic. I believe the finished print will really sing.
I’ve also included my histogram from the finished image here. For those that know what it means you’ll see how I pulled a full range of detail without losing the tone at either end.
Gavin