LR has changed up how Presets work in 7.4+. There’s a new preset manager that’s actually pretty good; you can finally hide the presets you don’t want and you can even use your presets in Lightroom Mobile. So I made you two videos to get you up to speed on installing and organizing presets in Lightroom including the latest versions. The changes in 2018 made presets a little confusing so I thought we should simplify.
This first video is a fast look at presets in Lightroom CC, Lightroom Classic CC, Lightroom mobile and even Camera Raw.
The longer video is the in-depth look at dealing with presets in all versions including pre CC for those who have held off to go to a subscription model. I get you, though if you never plan to go CC it might be time to look at something like Capture One because LR6 is getting older. We even have a preset pack for Capture One too. Anyways the longer video also covers installing all other kinds of presets like Local Adjustment Brushes.
This may not be terribly exciting, but over the years we’ve tried to make this is fast and simple as possible. Hope it helps — Gav
The quick video for LR CC users…
The more advanced video for power users of all versions…
Light in nature can be amazing and it can also be awful. Sometime it needs a bit of artificial adjustments, sometimes you just need to find the right shade. In this new upload to my channel we take a quick walk in the woods and talk about using the natural light and surroundings to our advantage.
Ever said to yourself… “What is the bleep wrong with my details.” — I sure have. So here’s what 20 years as a photographer has taught me about how to fix that annoying feeling of failure.
Detail comes in different ways; often combining sharpness and softness to get an image that brings everyone’s eyes to your subject. I trained in large wall prints and which meant people will see every detail when I screw up. I’ve written about image quality in articles like 5 Tips to Razor Sharp Images and the 6 Keys to Great Image Quality. Today we’re going a little deeper down this rabbit hole and look at what makes detail perfect.
1: 5 Detail Essentials: When neglected, these produce terrible results for even the most experienced photographers. They sometimes haunt me more when I’m in a hurry because of a hectic session, or light that is running away. But the more I think about what went wrong, the less I repeat those mistakes. My first 5 rules are Camera Stability, Optical Quality, Aperture, Sensor and Post Production. These always will be critical. A camera on a tripod, a stabilized lens, a firm hold when you make the shot.
Lens quality, many new photographers get images with fuzzy detail not realizing that they need better glass. Ditto for aperture. Too shallow and your scene and things you want sharp get blurry. Stop down too much however and diffraction will reduce the quality of your glass. Sensor settings and knowing what your gear can handle, how you post process and manage those details. All of these things are important. But there’s more.
Let’s go deeper.
2: Motion or Not: Stability is always critical. Movement ties directly into shutter speed in order to overcome that movement. But sometimes we want the movement. Blurred water, a running horse or amber waves of grain streaking across the frame. The key is to remember that we need zero motion on subjects we want sharp. I know you’re thinking, “hey captain obvious, we know.” But consider this. In traditional images, you want the whole frame frozen. A tripod offers the most freeze, Camera or lens image stabilization can help a lot. Even pressing the camera against your cheek. It’s a question of shutter speed vs motion. If the shutter is fast enough, it freezes everything.
There’s more too this. If you handhold a landscape at 100mm the rule of them says you should be at least 1/100 of a second (a tripod still gives you a better result). But what if that’s a portrait? I can end up with more blur because of the micro-movements of a living subject. Sexy people waving in the breeze as they pose or a wild kid who can’t hold still. Not only might my camera be moving, but so is my subject as they shift weight, change poses or their hair blows. I see that extra blur in portraits a lot because of body movement. We’re talking deep details, sharp eyes, beautiful skin and in focus parts. In reality, I should double my shutter for a living subject. I tripod eliminates one movement, but my subject is alive and the most natural poses don’t come from telling them to stand stiff. So in a lot of cases by doubling the ISO, I can double the shutter speed and the pay off is more detail.
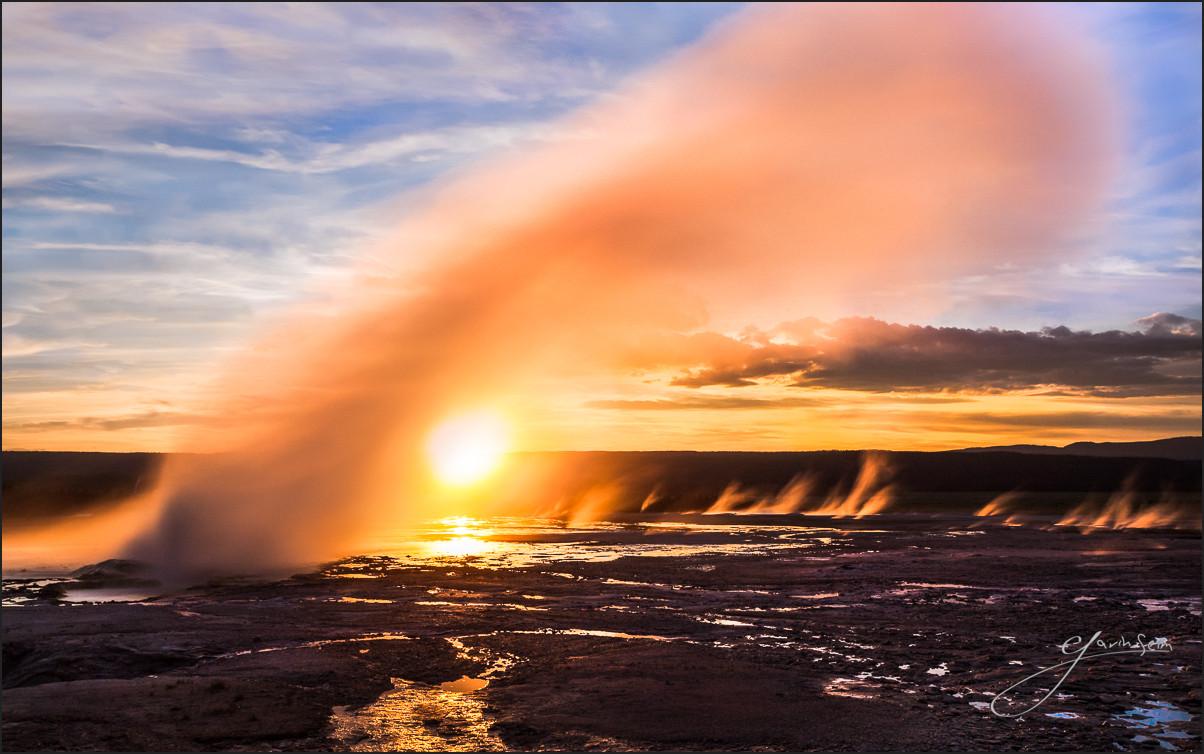
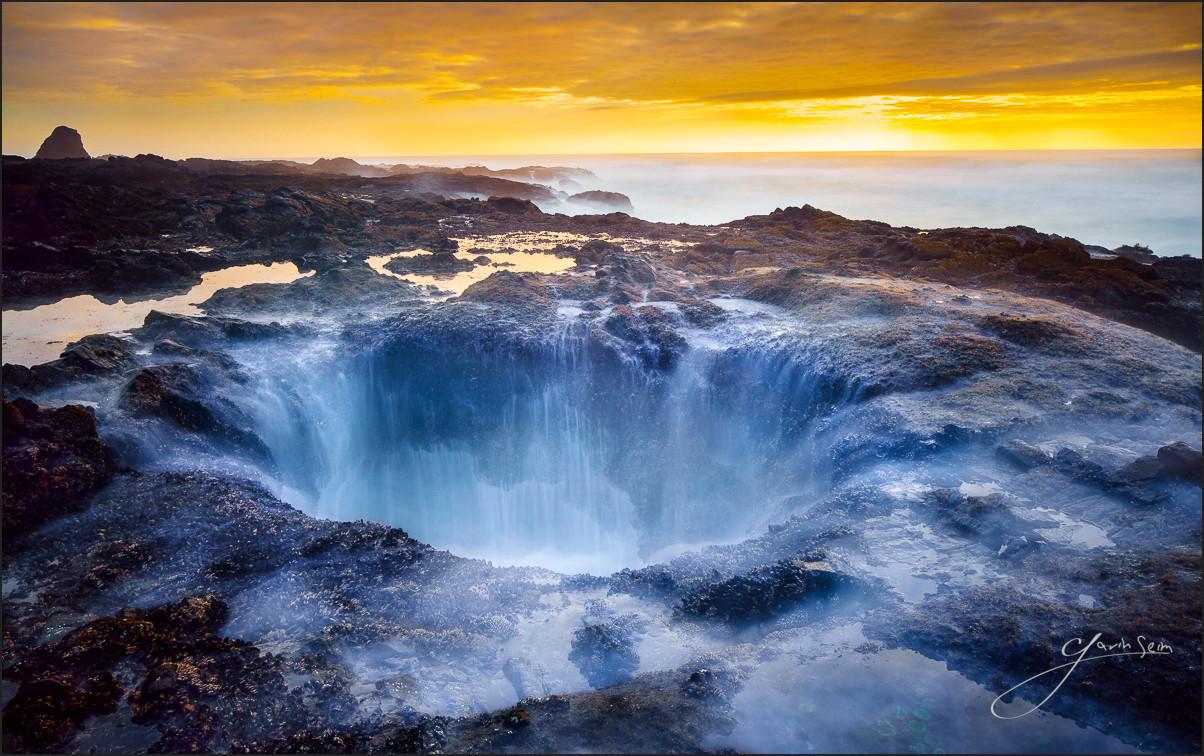
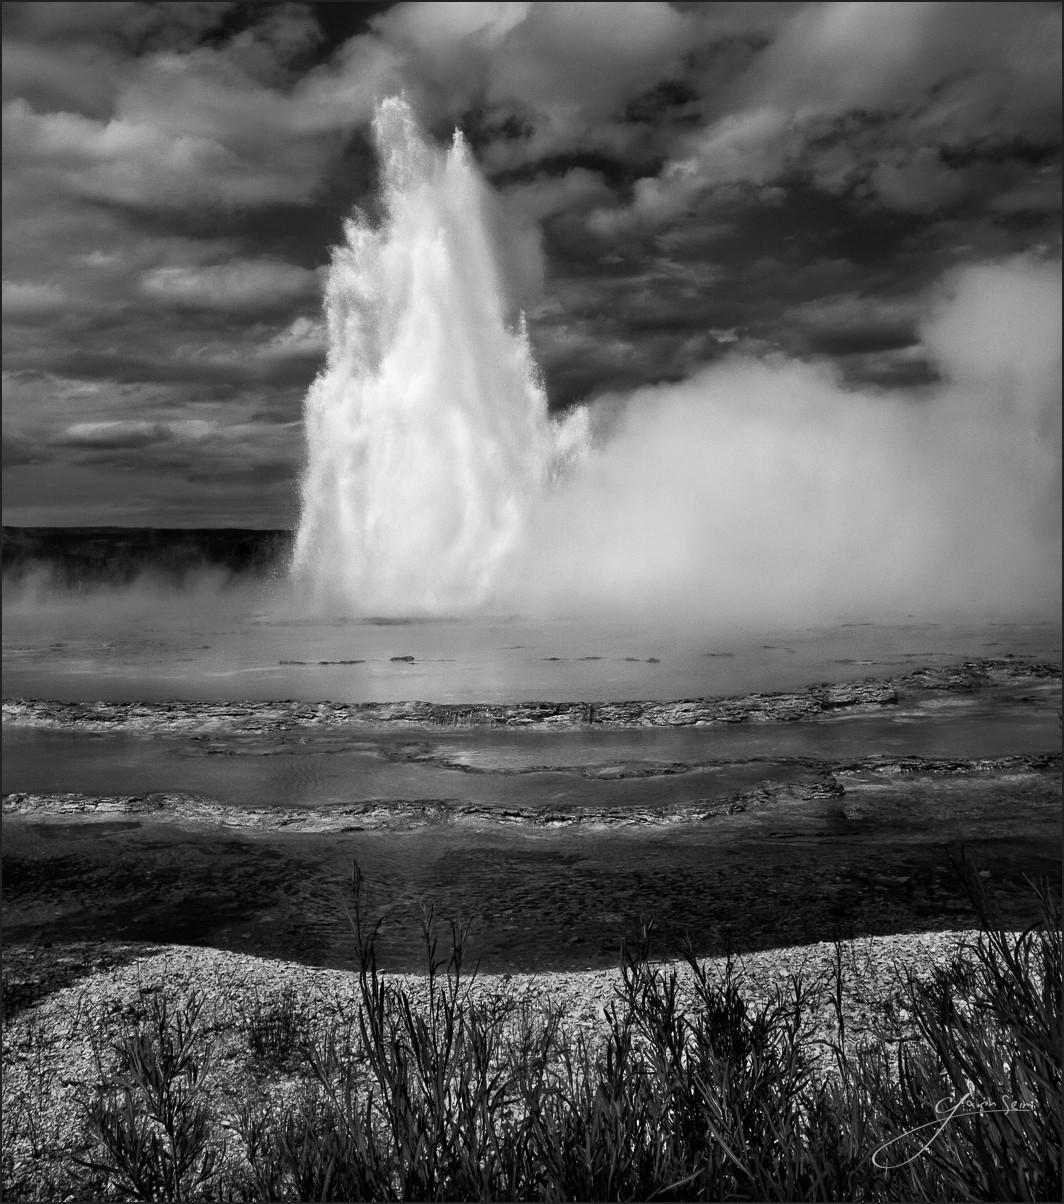
I also want detailed motion. The slow shutter is amazing but tricky and tripod is the key to winning here. Maybe I want blurry water like in this image of Thors Well on Oregon. Slow shutter does not excuse poor detail so if I’m hand holding, those barnacles will be soft. If I make my camera rock solid, my the water is detailed even in motion and the rest is as if we used fast shutter speed. Look at the geysers in my image Yellowstone and detail front to back while the steam turns to silk in the 10-second exposure. Motion is a kind of detail and how much motion is now a question of me using as slow a shutter as I need, using ND filters if needed to slow it further. I’ve done exposures over 2 hours this way and still had sharp details in the stationary objects of the scene.
3: Light and lens: A quality lens is a give. But that does not always mean sharpness. There are many factors affecting how much detail a lens can capture and you want to know them. The depth of field is important and that means knowing aperture you need to keep everything you want in focus. But don’t hop on a tripod go down to f22 and think everything will be sharp. Each lens has ideal settings. For most 35mm lenses the sharpest point will be f8 to f11. That’s not to say you can’t go past that, but doing so will often start to cost you detail. Take your favorite lens and shoot a photo at F8. Then do the same at f22 and compare the detail. The same goes the other way. Most lenses are not quite as sharp wide open as they are stopped down. Everything is a trade-off. Don’t push the limit just because you can. Learn the limits and use only what you need.
The same goes for how light is hitting our lens. If you’re getting a flare or haze fee, that means a loss of detail in that area. Sometimes is beautiful and it can look great; just remember you can’t restore detail that was never there. If you don’t want a hazey flare, then use your hood, your hand or change positions relative to incoming light. How the light strike the lens effects how an image passes thru it. In this portrait, we see a natural haze created by the light hitting the lens. Notice how the detail is softened. It works great here, but not everywhere.
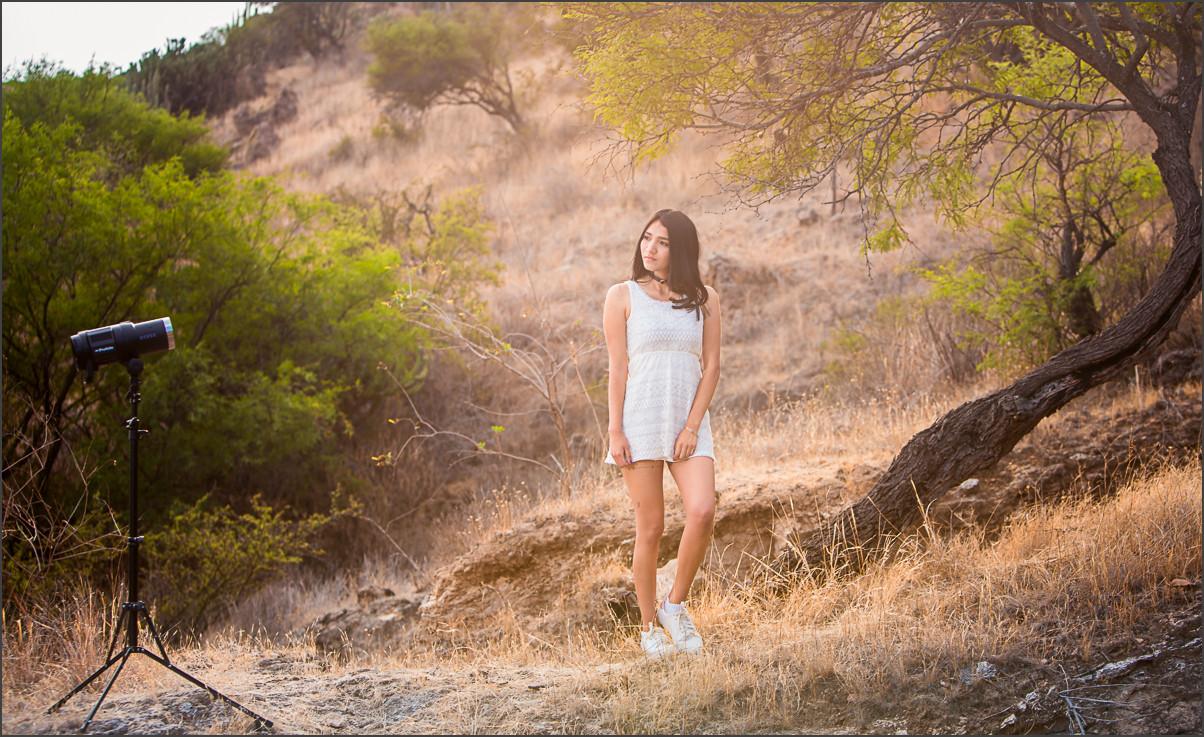
4: Getting Perfect Focus: AF has become amazing in recent years, but only you can truly know what your focus is. Sime camera focus on eyes, this is usually good for portrait. But what about that wide open aperture for a great bokeh. This means SHALLOW depth of field. So who’s eye is in focus. Say I you a couples portrait or a family, even an inch or two can change your focus. I just had this happen recently at the bus stop shoot. 90mm, f3.5, autofocus. It looks like our focus gravitated towards the overhang on the bus stop. On the left, our man still has usable detail, though not perfect. Notice how his head is further forward. Our lady is a tad further back and that’s all it took. The lack of detail on her face makes the image trash for any serious presentation.
I should have watched closer what I was focusing on. It was dark, I was losing light, I didn’t stop to examine it. Thankfully I nailed other great images for this session. How do we avoid this?
I love switching to manual focus and zooming in the live view to check that my focus is just right. I usually do this with landscapes and sometimes with portraits. But the bottom line is we have to watch for what could go wrong. It does not take much to throw the eyes or face our of focus or to have the camera see the rock instead of the tree in our landscape. Take as much time as you can to check every detail and take a few test frames to review on the screen at full zoom before you walk away. That’s the beauty of digital. It prompts us to rush, but it’s amazing if we slow down.
5: Framing Details: In the end detail is more than pixels. You can get all the above right and still have a bad photo. Great detail also tells a story. Its sharpness is mixed with bokeh or how tones are used to highlight or subdue parts of the image. It’s whether you frame the shot with the foliage sharp in the foreground os bowing in the breeze. It’s whether you took the time to move the dead cat from the frame and straight a girls hair. It’s the art of details that’s the hardest. Detail and sharpness are not simply about focus and noise. When you think about detail, think about what you want in the photo and what you don’t. Think about how using details (or lack of them) can draw your viewers eye and tell a story. Make the technical aspects a natural response so that the artistic concepts can drive your image making. See my recent video about where the frame stops.
6: Process more Detail: You can’t restore information that was never there, but you can use your tools better. All digital images have noise, this changes from camera to camera and with different settings. Most RAW processors remove some noise by default. Sometimes your camera removes noise as well and has settings you can play with. Defaults usually work well but don’t be afraid to experiment. Think about when you apply settings too. If I have a RAW file I’ll start with a basic noise reduction as needed; just don’t turn it into pasty smoothness.
I usually leave sharpness low or default on a RAW file if going into Photoshop. Too much can grow into messy artifacts. Process your details in a balanced way and then apply more at as the last step if needed. That way you’re not creating detail artifacts as you apply other looks, layers, actions etc. At the end I’ll usually apply a final sharpening and a little grain for a natural filmic look. We have some presets for this in PW6 and as well as actions for more advanced retouching and sharpening.
Let me know in the comments what you think.
A great image is about balance and it’s freaking hard sometimes. But that’s what makes it so fun. These more advanced tips go beyond the fundamentals we talked about in step one and are here to make us think harder about what’s in our image and visualize how we want it to look so we can nail it in the camera. I hope this gives you some things to think about. The more our skills become second nature, the less of a burden they become. Exercise yourself in the details and soon you will apply them easily.
Never stop asking yourself. How can this be better?
Here are some things we make to help you master what we talked about today…
Have you ever lost photos? Maybe from a drive crash, or maybe because your drives are such a hot mess you have no idea where anything is.
In this months Photo School we talk about not only having a good backup in place for your photos but how to organize your files, folders and data to stay sane. For lots more videos sub our YouTube Channel.
People have asked me about being able to do this for a long time. Now with Lightroom 7.3 and the latest version of Camera Raw the, updated presets format allows you to use your Lightroom presets in Photoshop and Camera Raw and you can start now. In today’s video, I’ll show you how.
All of our current preset collections have been updated so if you’re ready to use the likes of Natural HDR, Belladonna,Silver or our other presets in Photoshop and Camera Raw, now you can. If you like this video subscribe to my YouTube channel. Also if you installed the presets in LR 7.3 or above they should automatically appear in PS/Camera Raw. But if you don’t use Lightroom you’ll need to install the presets first into Camera Raw. Here’s a video about that.
Also if you order 2 collections you can save 15% with code: BUNDLE. Or you can go here for more bundle deals.