March 16, 2013

The 40x40 master of Sliver Moon Blues on display at an exhibit last year.
The 40×40 master of Sliver Moon Blues on display at an exhibit last year.

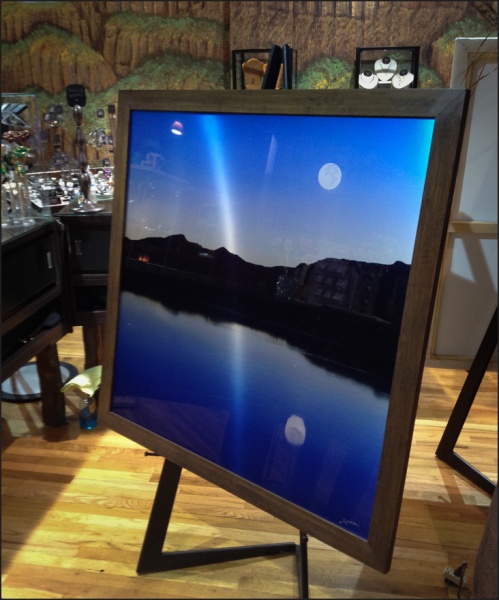
by Gavin Seim: It’s now year 5 of a 10 year plan to build my American Pictorialist brand one day at a time. I thought I was setting out to take photos. Turns out there was much more I was after. I discovered what I really wanted was not pictures, but furniture. Grand prints that convey the majesty of creation. That’s easier said that done, but I feel Chroma and Silver galleries look better each year.

I got my first camera about 20 years ago now. It’s been a long road. But I may see a speck of light in the tunnel. It took mew a decade or so just realize that what I’m making is not pictures but fine furniture. To begin to really find my style. Something I hope to have mostly nailed down in the next three years both in my pictorials and my American Portraits which are something I don’t intend to give up. They are separate brands, but both have similar goals. Both are furniture for the wall.

The goals are starting to become more clear thanks to teachers like Ken Whitmire, painters of the past, history itself and many others who have shared their experience along the way. I’m learning that I have to focus. I have to remember what I’m trying to produce.

There’s lots of images being made and I don’t need to compete with that. I just need to make work I release as breathtaking as is possible. I’m getting to the stage where I know if the image is Signature worthy or just a nice snapshot before I press the shutter. Understanding that line has tuned out to be critical to my process.

Teaching has pushed me as well. Producing workshops like EXposed helped me see much better. What’s next is further refinement. Being more picky in the image making process as well as in the presentation. I’ve been focusing on slowing down for a few years now. I got into film and large format. I stopped making so many images and learned to focus on one whether it was a pictorial or a portrait.

But I think it’s time to take that further. By focusing on only releasing only 6-12 new pieces each year, the time spent on each will become flexible. Refinement and stunning presentation will be my focus and it takes a great deal of time to do that to my satisfaction – If I intend to stay sane I have to release less to make them more.

In recording the new Photographics Film I have been reminded that the elements that make a great photograph are not bound by one most import, but by a series of many including space, position, line, tone and presentation. If any one of these fails the image will often fail to be a stunning work of art and simply be a photo. I won’t forget that.

I am blessed and thankful that I can take my time. I just keep trying to move forward. In doing so I believe it will be better than I ever imagined when I picked up my first camera nearly 20 years ago. I had no idea where this would lead. Perhaps I still don’t. I still have 5 years to nail down the the American Pictorial. And if I don’t make that deadline, I’ll keep working.

Gavin Seim

Read More

March 4, 2012

The Skinny Kid by Gavin Seim. Joshua Tree NP, Feb 2012

The family and I camped down on the flatland’s and took a nice drive into Joshua Tree that day. It was warm, but got cooler in the highlands and the choice to wear shorts turned out less than ideal. So the family was back in the car warming up after hiking and I ventured out near Skull Rock, finding this skinny little Joshua Tree standing alone, everyone ignoring it’s simplicity.

The Skinny Kid grew on me and soon I was experimenting with angles and ideas for how to best showcase what he had to offer. In the end this simple black and white scene struck me. A starkness of line. A cast shadow showing that his reach extends beyond his size. This tree has a perfect vantage. He gets to watch over this rocky landscape without distraction and reign as King of it’s trees.

Release details: Prints available. Contact the gallery. Learn more about prices. Available prints…


For Photographers. How it was made…

Read More

December 10, 2010

Tufa Sunrise. Mono Lake CA. 15×34.5 True Metal – Read Journal Entry.
25 print Limited Edition. $329, including US Shipping.

[EJUNKIE_ADD2CART item=”p11104″] [EJUNKIE_VIEWCART]

<<<<<<>>>>>

Read More

October 9, 2010

Tufa Sunrise. Mono Lake CA, Fall 2010, by Gavin Seim.

Gavin’s Journal Entry, 10/2010.

We camped overlooking Mono lake last night. I think it’s rather a bad name for a lake, but it’s no less beautiful for that. I got there early, before the light. But the stone sang when the rays of first dawn hit the limestone Tufa Towers that grace the these muddy banks.

I won’t try to explain how they’re formed (there is some info on the Mono Lake website) but I can say is that creation is indeed breathtaking. Now that I have time to stop and look at this sunrise, it seems even more so. This may be the only great image I took home from Mono Lake, but it’s just what I wanted and I’m really excited about it.

Release details: Prints available. Contact the gallery. Learn more about prices. Available prints…

[EXPAND SEE the details up close. Click to expand…]

These are not separately available images. They are detail cuts from the above work, to show the detail and most notible elements that will stand out in the finished print.

Tufa Sunrise - Detail1
The central display of Tufa Towers, revealed in a fleeting moment of morning light just as the sun crosses the horizon.


Tufa Sunrise - Detail2
Sharp from edge to edge. The rocks point to the snow capped mountains, revealing the coming Winter.
Tufa Sunrise - Detail3
The superb detail in the flowing grasses reflects the golden light and is spectacular, especially in larger sizes.
Tufa Sunrise - Detail4
The morning light shows a supporting cast of towers in various stages of illumination.

[/EXPAND]


For Photographers. How it was made…

Read More

August 31, 2010

By Gavin Seim: Last year I posted a collection of LR2 print layouts for making page designs in Lightroom. With LR3, things have changed a bit and we now use the Custom Package option to make layouts. It’s more powerful and has more features. For that reason however the old layouts no longer work correctly. If your using an older LR, you’ll want the old layouts. If you have LR3 download these new ones for more variety and cool new stuff like controlling background color and drag and drop simplicity.

While there’s some album design style features I would like to see added, LR3 is defiantly coming along in allowing you to make layouts. Once you have these installed (see here for LR preset install video) you select the layout you want in the print module. Then simply drag and drop images from the filmstrip into the cells. When you done you can print or print to file to save as a JPEG.

Now in my opinion these do not replace a tool like In Design for doing full on album design (weddings for example). It has far less features and there’s really no ability to save a project with its layouts. That said, these can be great for quick layouts, folios or album pages. This download has 9 different 10×10 layouts, with both black and white background. If you like them and want more I may consider a complete set in the future. Enjoy… Gav

Download LR Page Layout Templates II ZIP

UPDATE: Using The Template Presets:

Once installed (see link above), go to the print module and select the layout you want. You can mouse over presets to get a layout preview (top left). Once you have the desired layout, simply Drag in images from the filmstrip into the open spaces.

Images will fill the cell irrelevant of aspect ratio. If the cell crop of the image is not the way you want, hold the CMD key (CNTRL on PC) and drag the image inside the cell to the crop that works. Also don’t hesitate to play with the settings and make your own layouts (changing border styles etc).

Exporting & Printing:
Once you have the desired look you can print it out directly. More often however you’ll probably want to export them to send to a lab or make a book. While export does not actually work from the print module, you can quickly achieve the same result by printing to JPEG.

To export the layout just use “Print To JPEG” from the “Print Job” menu in the right side (see image below). Click the “Print To File” button and the file will save out as high res JPEG file ready to be used. Repeat for each layout and Presto you have your ready to upload or save for later.

Read More