August 13, 2012

New download /DVD workshop takes photographers on a cinematic journey across America and passionately teaches how to see and photograph light like never before.

Soap Lake, WA (August 14, 2012) – Seim Effects Photo Tools announces today the release of the new workshop by award-winning photographer Gavin Seim – EXposed, a film about seeing and photographing light. Produced over months, while traveling across America. EXposed documents experience and techniques inspired by the masters and refined for the digital age.

DOWNLOAD PRESS KIT
Includes full release, image samples and review information.

EXposed teaches photographers how to not only photograph light, but how to truly see it. EXposed is an informative entertaining 4-hour journey following Gavin as he travels around the United States of America with a Camper and a passion for light, hunting perfection and showcasing the importance of understanding the quality, range and tones of light and its impact on our photography. Gavin has compiled 15 years of study into what has become a simple and breathtaking study of light.

Weddings, Portraits, Landscape, Digital, Film. It doesn’t matter. EXposed is not a workshop about the latest fads or gadgets. It’s a workshop about light. Because that’s what really counts. EXposed is a cinematic journey that will teach photographers how to make better exposures. A completely unique workshop about exposure, light, the power of the Zone System, dynamic range and perfect tone control.
“My heart went into creating this workshop and I can’t express how proud I am of the outcome. With all the discussions in photography today, it’s surprising how little we talk about the art and science of exposure and proper tone control,” said Gavin Seim, photographer and owner of Seim Effects. “Making great photographs involves more than just clicking, buying new software, or pushing buttons. It’s something that goes deeper and mastering it requires practice and understanding of light and tone in subtle ways.”

Through 4 hours of educational materials about using light contained in 14 organized chapters that photographers can view and review at their own pace, EXposed teaches:

  • Core concepts to understanding exposure
  • Using the Zone System
  • Visualizing: Really seeing light
  • Dynamic Range and what it means for every image
  • Long Exposure and the secrets to hidden beauty
  • Finishing images, Burning, Dodging
  • Metering and tone placement
  • Seeing and directing light
  • Ratios and lighting tools

EXposed is available now. And until August 31, 2012 the instant HD digital download price is just $89 (a $10 discount) and the DVD plus instant digital download price is just $99 (a $20 discount). For more information and the trailer please visit:  www.exposedworkshop.com.

About Seim Effects Photo Tools
Gavin Seim, owner of Seim Effects Photo Tools, is an internationally recognized photographer, renowned for his experience with creative workflow, the digital darkroom and time tested techniques. He has a passion for creating easy-to-use software tools and educating photographers of all skill levels to be more efficient, creative and profitable.

Gavin Seim’s software presets for Lightroom include the new Silver Shadows 2, Power Workflow 3, and Color Fantasies. His Photoshop tools include Hollywood Effects 2, Creative Essentials, and Naked Elements. Also available is LightFlow, a powerful Aperture Presets collection.

For more information on Seim Effects Photo Tools visit:  https://seimeffects.com

#   #  #

Note: Press materials and image samples can be downloaded from the Seim Effects website:  https://seimeffects.com/press . For editorial review copies please contact: effects@seimstudios.com

Contact:

Gavin Seim or Nathan Seim
Seim Studios LLC.
PH: 509-754-5255, Email: effects@seimstudios.com

Steve Rosenbaum or Leigh Nofi
S.I.R. Marketing Communications, Inc.
PH: 631-757-5665, Email: sir@sironline.com, leighnofi@sironline.com

Read More

January 13, 2012

A photo of Tanguy's motion control rig. More below.

by Gavin Seim: As an HDR nerd and teacher I’m not easy to impress. But this did it. Tanguy Louvigny. did this really stunning sequence of HDR time lapses and really nailed it on various levels. First, as an dynamic range guy, I really admire how the process he used in Photomatix is balanced and didn’t go for that way over the top tonemap process.

Next he managed the motion using his own rig made with Tetrix robotics, and controlled it with Mindstorms Brick (actually a Lego product), then programmed it in Robot C. Impressive indeed. You can see more photos of his rig here.

His result for all this was a really stunning body of time lapse work. I hope to look closer at the system that he used for his rig. It seems there’s some possibilities there. You can also read a bit more on picturecorrect as they did a little interview asking Tanguy some detail questions.

All in all it’s quite impressive. Watch the video below and check out his site. And since we’re on the HDR topic, I’ll throw in a shameless plug  and add that if you want to learn more about capturing and processing HDR, check out my HDR Magic video training series... Gav

Here’s a forest series he did using the same setup.

Read More

October 24, 2011

And How it Can Change Your Life in 30 Minutes.

By Gavin Seim (updated 01/13) – This may be the most important piece I’ve written on photographics. Because no matter what you photograph, once you see in Zones, you’ll never see the same again. You’re on your way to truly mastering light.

I started photographic study when I was twelve. But in recent years I’ve started working with 4×5 large format film and digital side by side. I’ve explored endless exercises in tonal control, “truly” learned to visualize, and implemented the Zone System that was developed by Ansel Adams and Fred Archer, both in my film and my digital work, in color and black and white. Zones are the language of light and they’ve changed everything about how I see.

Master Zones & Exposure Dynamics – Get Gavin’s Workshop Series.

The idea of visualizing and using Zones is not promoted much today. It seems much of the industry arrived at digital and decided that the past 150 years of photographic knowledge were somewhat irrelevant. Maybe it’s that many never took the time to understand Zones to begin with. Which is a shame because it’s so brilliant. What I’m about to show you is not taught much, but understanding it WILL change your image making forever. I’m not kidding; once you grasp this, you’ll never see light the same again. You’ll probably want more after this, so check out the links at the bottom for further reading. Also you can get hands on in my annual 3 day Lights & Shadows workshop. And check out my video series, EXposed which gets deep into Zones. OK lets dig in.

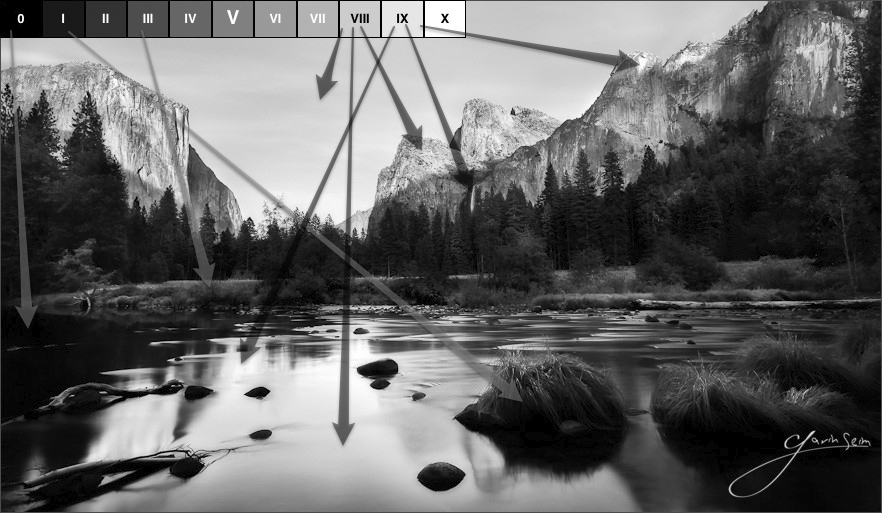
Sunsets Hidden Falls. Yosemite, 2010 – A general look at where I placed the scene elements in relation to the Zones. Each arrow leads to what I see as the zone on the scale.

I’m going to stay simple because these concepts are simple. I’ve not come up with a new digital based zone system, a stripped down version, or an article filled with nerdy equations, white papers, or complex charts. This is not hard and you can start putting it to use TODAY. Since most of us are in the digital world, I’ll focus on that. I’m going to show you how to use the core of the Zone System to make you a vastly better photographer. I’ve also brought along some examples for analyzing said Zones.

To those of you who already know this, kudos. But I challenge you to consider whether you’re really using it, or just buzzing along in digital bliss and fixing things later. Excuse my bluntness, but this is happening to the best of us. We need to get back to basics and visualize, control tone, dynamic range, image quality and presentation

The Zone System was a complete approach that included everything from the initial exposure to the final print. Now we don’t use darkrooms much these days, so I’ll focus on the pivot point of the Zone System: the Zones themselves. That said, I would encourage you to study the whole process even if you don’t use film. It will help you gain a better understanding of photographics. Not only that, but old books like Fred Picker’s Zone VI workshop deal with it quickly and effectively and can often be had for mere pennies.

1. The Zone Scale.

The Zone Scale lies at the core of the Zone System. It consists of eleven squares that span from clipped black (Zone 0) to clipped white (Zone X). Each square represents a change of one stop. The first part of using Zones starts before you release the shutter. Truly visualizing your image is like nothing else. Once you master it, you see the image you plan to make (including your edits and refinements) in your mind before you ever take the photo. It changes how you photograph and how refined the resulting images become.

Brilliantly simple, the Zone scale allows us to visualize all our light from complete black to complete white in clear one stop increments.

To begin with look at the Zone scale. Now look at your scene. Now back to me 😉 What’s outside your window right now? Visualize what Zones the things around you fall within. Then imagine you’re taking a photo. Imagine where the Zones “would” fall if the image came out exactly as you wanted. It does not have to be what you “see” but what you “visualize” for the finished image. How do YOU want to make it?

Think about how Zone levels on various objects in this scene would complement your primary subject as well as your supporting cast of elements. Sometimes it helps to begin by visualizing a scene in black and white even if your final image is going to be color. Thinking in terms of tones can be helpful, especially early in the process.

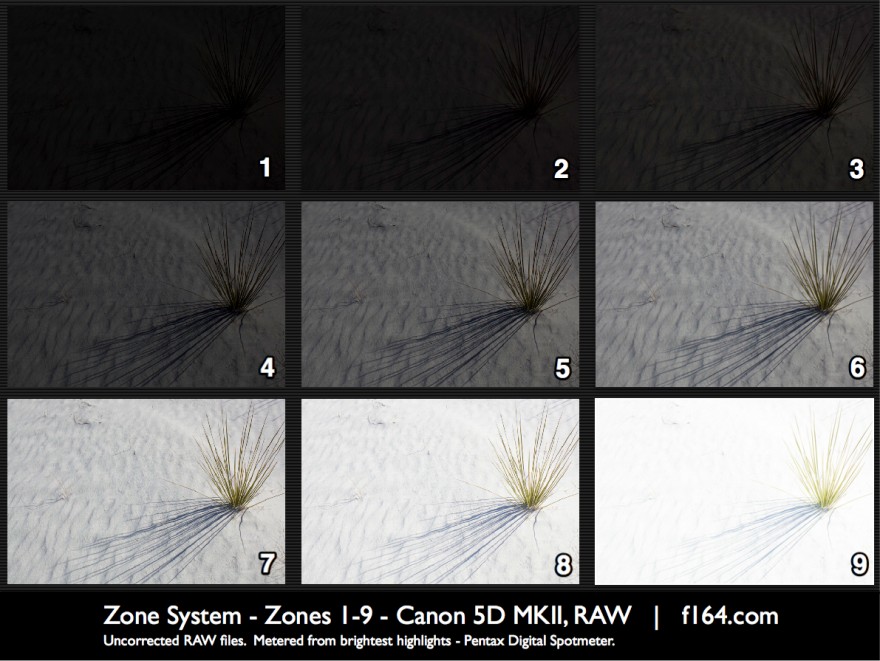
All nine detail Zones photographed with digital. Metering was based on the brightest area here, but we could have metered meter any element and uses the system to place that element in any of the time values but simply moving exposure up or down (click for larger view).
Read More

October 10, 2011

By Gavin Seim

I’m amazed how often the control of light and dark is ignored in today’s photography. Our tools are more powerful than ever, but most images lack the subtle tonal control that made photographers like Ansel so famous. Such control is essential to making an image look as good as it can.

“Tone” may be the least understood and least utilized factor in composing and finishing images.” That’s a quote from master photographer, Ken Whitmire. He’s eighty-two and one of the world’s most renowned pioneers of wall portraiture.

I wrote an article called 5 Essential Keys to Photographic Perfection on Pro Photo Show. One of these keys is arguably the most important, and that is tonal control. Lights and shadows and how they look in the final image are critical. To best achieve them, you should have a “visualization” for your final image and be a master of essential tone control elements.

Morgan's Song, 2011 - This is an environmental scene so we have a lot of "supporting cast" to deal with. By placing the subject at Zones 6-8 in the final process and the supporting cast mostly in Zones 2-4, I was able to keep the subject dominant and show the scene I had envisioned.

An image can look good with just a quick global correction process, but not nearly as good as it could be with proper tonal control. It starts in camera as you see the scene in your mind’s eye . The way you expose and set up your image can control those values. The best way I have found to see this in my mind is by using the Zone Scale (see Fig. 1).

For example, a perfect light is splitting through the clouds and shining on your subject. You expose for the subject’s skin, visualizing it for Zone 6. Perhaps that bumps the foliage and other elements (the supporting cast) of your scene down to Zone 4. That could be perfect because it makes your subject dominant. Perhaps the light is more even, however, and to achieve that visualization, you need to do tonal corrections later to bring that foliage down to Zone 4. It could be done in many other ways, but you get the initial idea. For an in depth look at Zones check out, Why You Need the Zone System for Digital.

Following are three things to watch for when visualizing and mastering an image to control tonal values. If you understand and apply these principles at every step, your images will improve by giant leaps. Follow through on tonal values and your images will sing.

Figure 1: The Zone scale from 1-10. Middle grey is Zone V (5). This shows the darkest dark to the lightest light and is invaluable for simple visualizing and exposing a scene. Each step represents a stop, making it easy to move your exposure up or down and place an element in a given zone.

Read More

October 10, 2011

By Gavin Seim

Simplicity is key to a great photograph. It turns even complex scenes into stunning beauty by controlling elements, light, and tone.

It’s not about how much is in a photograph. It’s about how we showcase our subject in relation to that supporting cast of elements. Now I’m not suggesting the images I show are “perfect.” It’s rare that I get everything dead on, and I can always find something I should have done better. But truly understanding and mastering these elements WILL raise the bar on our images and allow us to see in a new way.

1. Visualize.
Everyone says they’re doing it, but few actually are. You should truly “see” the scene in your mind’s eye; not what’s in the viewfinder but the finished image after the exposure, even after editing. You should see the image you want after the process is finished. It’s fairly simple, but in the rush we often fail to slow down and think carefully about the lines, elements, and tones in our scene. That’s one reason why I love working with a tripod. It takes my focus away from holding a camera and puts it on the scene in front of me.

Ansel Adams said, “The whole key lies very specifically in seeing it in the mind’s eye which we call visualization.”

Sunsets Hidden Falls, Yosemite 2010, Gavin Seim - I used a layer based HDR process on this, processing my light and dark frames as silver and layer blending in Photoshop. I spent a good deal of time on the composition and tonal control to try and keep the scene simple while still showing all the elements. You can see the stone faces on Zones 6-7, with the foreground elements falling drastically all the way down to Zone 1, keeping them as supporting cast from becoming too distracting.


2. The Light & The Zones.

Expose for what you want in your image, not what the camera sees. This goes right along with visualization, and the Zone scale is the best way I know of, both to visualize and to control values. It allows us to see in our mind’s eye the Zones in a scene and place them where we want, using exposure, and finally tonal edits. For more on detailed tonal value control, see the counter article to this one, 3 Critical Elements of Controlling Tonal Values.

The Zone scale from 1-10. Middle grey is Zone V (5). This shows the darkest dark to the lightest light and is invaluable for simple visualizing and exposing a scene. Each step represents a stop, making it easy to move your exposure up or down and place an element in a given zone.


Read More