It was night. Obviously… But it was more than that. There were a few stars, but more than that, there was this orange glow hitting the sky from the city as we camped in the hills, enjoying the warm weather and the desert views.
Just above camp there were these neat looking Sugaro’s that seemed to be watching us from the horizon. We came home late one night and frankly, I just wanted to go to bed. But I kept looking up at the stoic cactus, filled up with character and history.
I broke down. I had to. I pulled out the gear thinking I would just do it quick. But in truth I spent at least the next hour setting up, planning and exposing. The final result after some detailed artwork was Midnight Orange Sugaro. It’s a bit more painterly and textured than many of my pieces. But there’s something about it’s color and the subtle details that keeps me coming back.
Release details: Prints available. Contact the gallery. Learn more about prices. Available prints…
Today I’ll share all my best tips for star trail photography.
I remember when I was starting in Photography, I had a book from the film days called DayBreak 2000. One of the photographers took an ultra-long exposure of the stars as the new millennium entered.
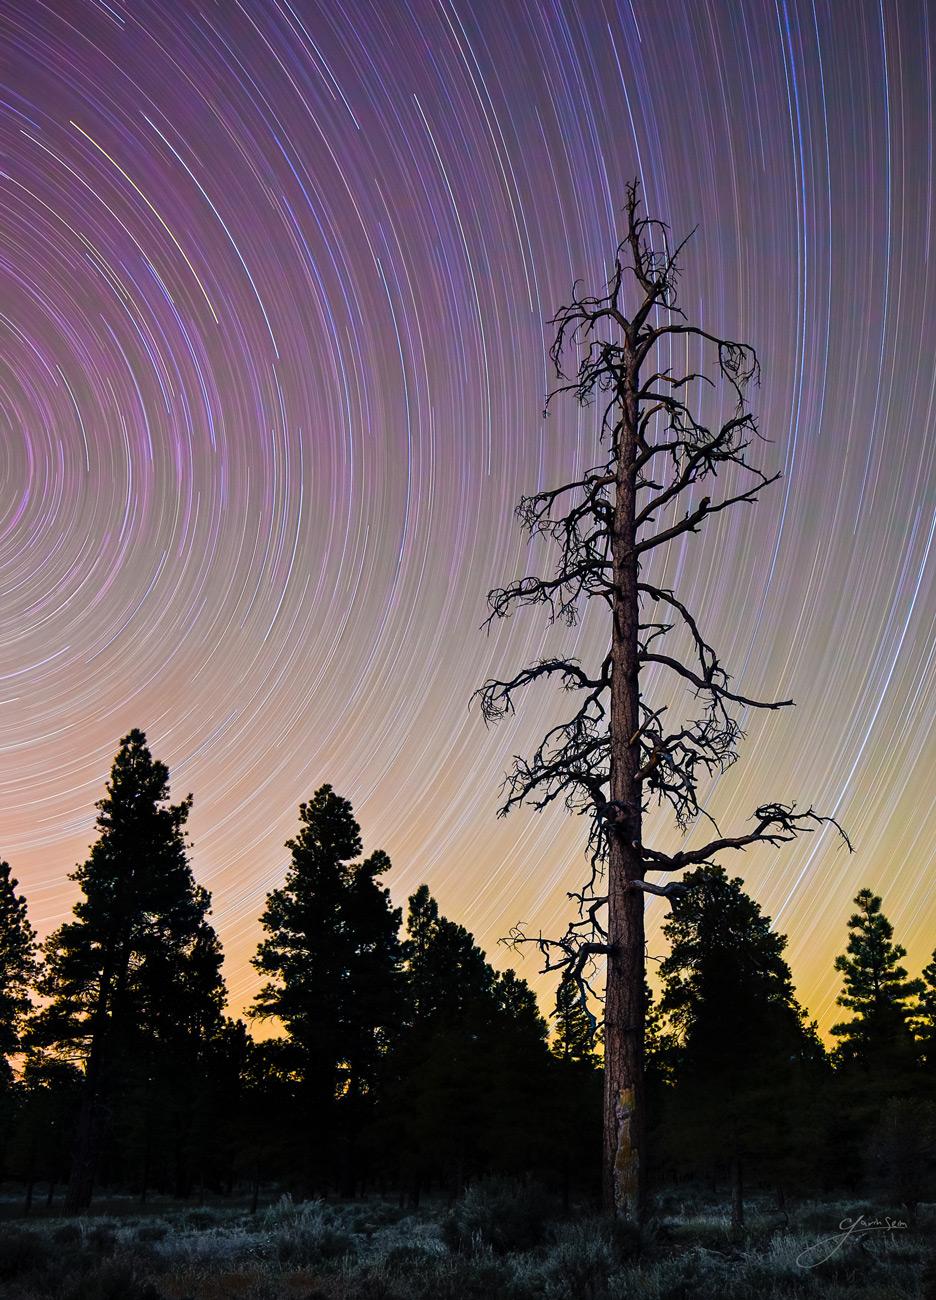
A decade later, I saw an old tree in the forest outskirts of the Grand Canyon, dwarfed by the vast sky. My mind came back to that photo I saw as a teenage photographer with a 35mm camera.
At 2 hours and 20 minutes, this is my longest exposure. We were in the hills near Grand Canyon NP, an area known for its views of the night sky. We set up camp in the open woods about a hundred yards from this tree and I had been eyeing it for a couple of days.
How it was made and how to photograph stars.
I used Canon 5D MK2, 24mm TS-e II, f8, ISO100, exposure 140 min main exposure.
The 5D2 was a great camera. But in 2011 sensors were not as good, and high ISO or long exposures, and the sensor heated up after about 5 minutes and produced artifacts. Some of these steps would be easier on today’s modern sensors.
Setting up before was key here. This was not a quick shoot and go project. There’s no redo if I fail. I have this rather bad video of the setup, so you can see the content here and why I did what I was about to share with you about how to photograph stars.
I spent over an hour walking around the tree and testing angles, focus, and composition. I also tried various shift settings with my 24mm tilt shift lens to control perspective until I found the one that I felt the most natural, shifting just a bit up to reduce the distortion of the tree.
Setting up for star trail photography.
Some might say there’s no way I could spend so long and still be improving it, but that’s wrong. Taking the time on this was, in my opinion, one of the most important factors in this image. Thinking an image thru always makes a difference.
This is not street photography or a wedding. In mastering night landscapes, I learned that pre-planning and setup is perhaps our most valuable tool. More on that below.
“Pre-planning and shot is perhaps our most valuable tool. “
When I finally decided on a spot, I kept tweaking and focusing, then going in the camper to analyze it on the laptop. My planning was purposeful because my exposure was so long and I had one shot. I would be shooting in the dark so I set up the camera exactly where it would be and left it until that time came. This paid off, giving me far more control than a last-minute night composition using the high ISO long exposure test technique.
A few hours later, the sun was gone, and true night had set in. I already had an idea what exposure I would need from the previous night’s work, but I had done a few test shots to verify that I wanted about 2 hours.
But to decide on a long digital exposure, you can’t just meter. So set the ISO to a high level. Say 52,000. While I would rarely settle on an ISO this high due to its ultra-high noise, it’s invaluable for seeing better in the dark.
With high-sensitivity exposure, you can check composition, light pollution, etc in moments. I can also get an idea if my focus and other settings look correct by zooming in on the preview. Doing this extra step will let you hack your shadows and control the light.
Let’s say I determined that at ISO 12,800 I would need a bit over 1 minute to capture the stars silhouetting the trees. At that point, I doubled that minute for each full ISO stop (doubles and halves from Shadow Hackers). Say I want at least a 30-minute exposure. I’m going down now on ISO based on this test shot.
ISO 6400 = 2 minutes, 3200 = 4 minutes, 1600 = 8 minutes, 800, 16 minutes, ISO 400, 32 minutes etc. I can use this test frame not only to review my setup but to see how much light I will capture (only with less noise in my final) and then adjust the aperture etc, accordingly.
In a talk of how to photograph stars, this is a powerful tool. I rarely use an ND filter. Those are for daytime long exposure or cities. For dark landscape night scenes I will use ISO and aperture in these ways to decide how to expose.
Test shot I did of my setup at ISO 25,600 to see if everything was working.
How to photograph stars and get it natural.
A lot of folks in the digital world use a trendy stacking technique. They take a lot shorter exposures of the night sky and then blend them in post using stacking software. This can produce beautiful results, and there is nothing wrong with that method.
But in a new AI world where everything feels fake and people are tired of fake. Stacked stars in no way produce the same look, and I prefer the in-camera approach of long methodical exposures like we did with film.
Not all star trail photography has to be this long. But I wanted something special tonight.
I started the exposure, locking it into the bulb using my cable release. Then I returned to the camper, and my alarm went off 2 hours and 15 minutes later. I went out, being very careful not to shine a flashlight near the scene or lens which would ruin my image in an instant.
Also, photograph stars in shorter long-exposures.
Not all night scenes need to be stars and not all star trails need to be this long.
What I’m telling you applies to many long exposure scenes. But when I do stars I want them as part of a landscape. It’s not a Hubble photo.
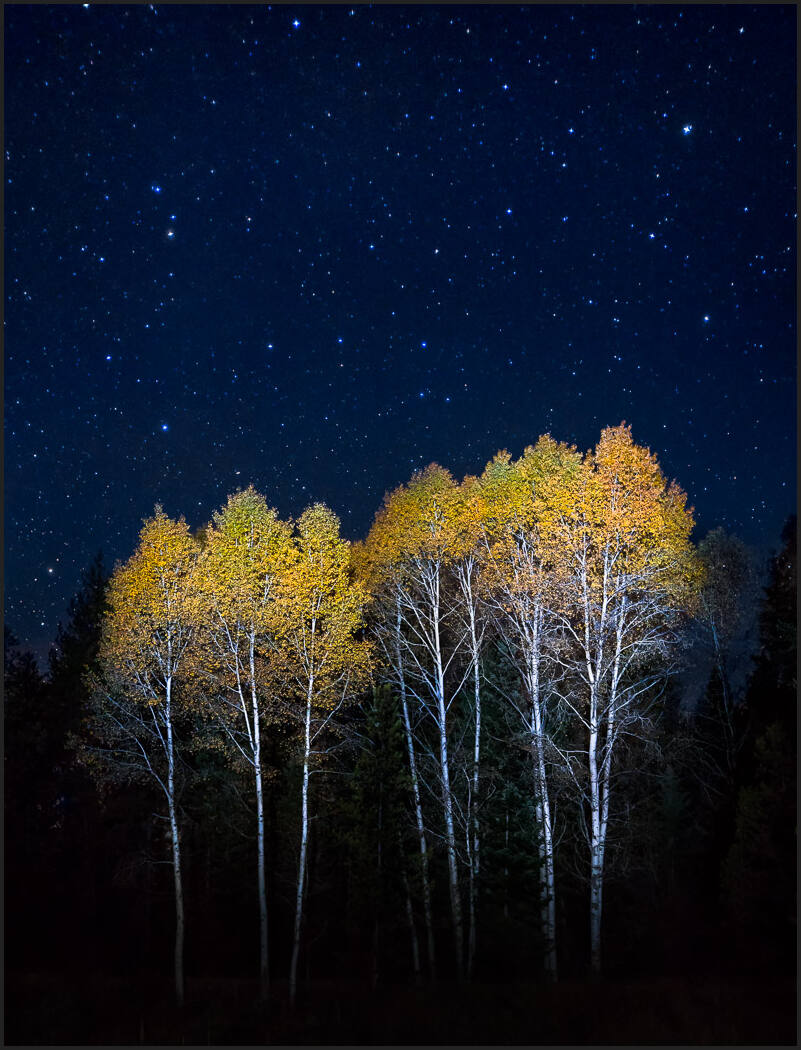
With newer cameras, we can do higher ISO deep field photos. Like my light-painted photo – Night in the Aspens of North Washington State. It took only 13 seconds to about the stars from blurring.
DEEP field star landscapes. Star trail landscapes
These are the two main categories in this. The 3rd is stacking star photos which we don’t cover here today. Whether to go long or short (in your long exposure) is up to you, your time, your gear, etc. Both styles are stunning.
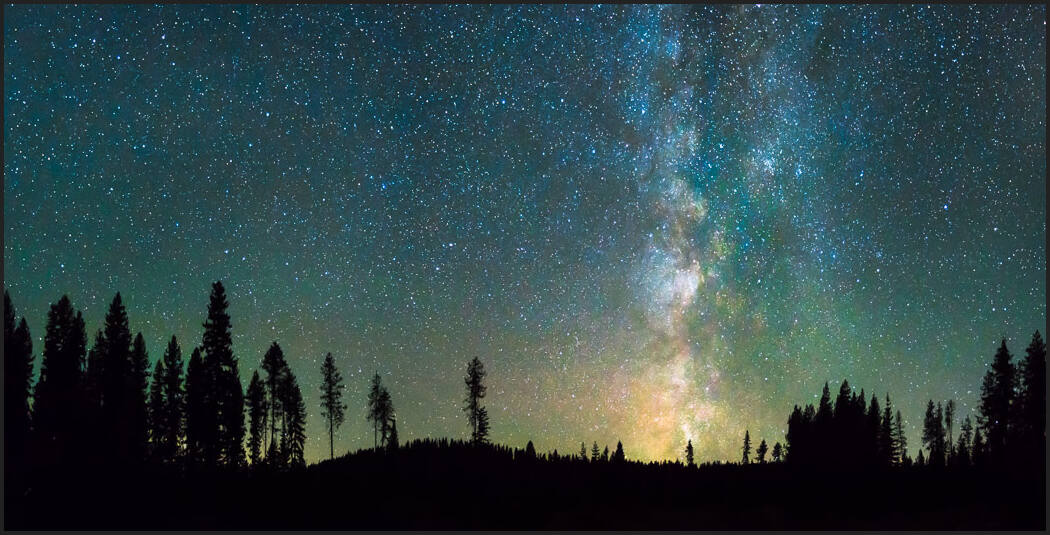
If you want stars to be deep field points of light, you can’t go much past 15 seconds. Whereas if you want stars to be trails, you don’t want to go much below 30 minutes because you will get small trail lines.
Star Trail photography is all about LONG. So low ISO. Deep field like this is a long exposure, but not too long. So to capture the deep field, use a camera that can handle higher ISO and get deep detail in a few dark seconds.
13 seconds at ISO 6400 on a Sony A7R MK2. Trees painted with an LED flashlight.
Tips to make a 140-minute star trail photo work
I had black frame noise reduction set to auto. Essentially, it takes an equal-length exposure with the lens blacked out to capture hot pixels on the sensor against black, allowing them to be mapped and removed.
On my 5D MK2, it didn’t seem to work and the camera did not do the auto dark frame. The camera did not count that high and maybe it lost track of how long the exposure was. It seems to stop counting at about 3o minutes, but the image did not stop 3exposing, just the metadata.
“A flashlight near the scene would ruin my photo in an instant.”
After the exposure, I went into the camper for review. It looked good, and the regular ISO noise was not bad at all, thanks to ISO 100. What I thought were hot pixels, however, were BAD and LR could not take those out. That said, it could have been worse. It was cool outside and the higher the outside temperature, the more the sensor heats up and produces this type of artifact.
I immediately decided to make a dark frame manually. This is a common approach done by setting the camera in the same conditions and taking an equal-length exposure with the lens cap on. It was late, so I set an alarm and set the camera outside starting the exposure, and went to bed, bringing it in and stopping the exposure when the alarm expired. Another 140-minute black exposure in the same conditions as my reference for later.
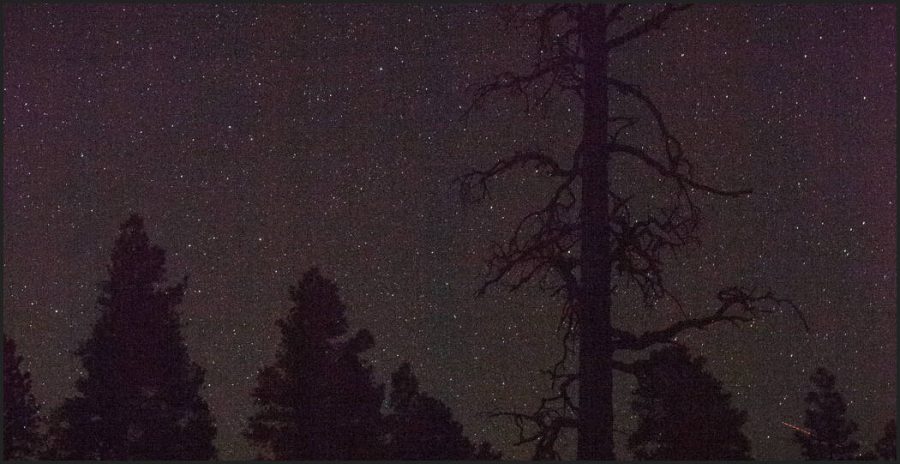
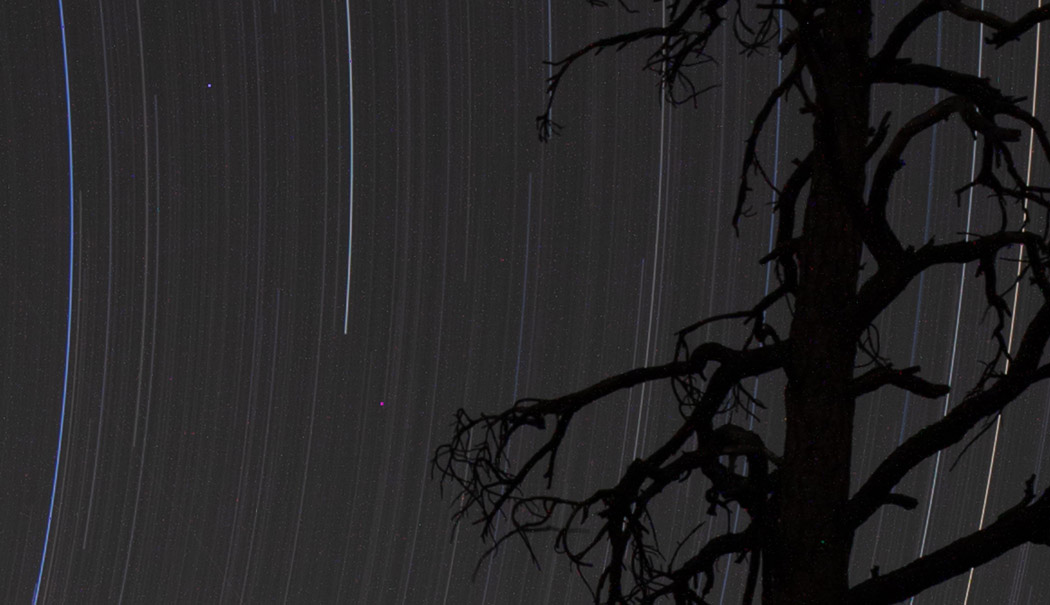
The twilight image for detail along with the RAW of the 140-minute exposure next to the final process.
After a base edit I went into the sliders, working the color, noise, and detail carefully to get everything as good as I could before going to Photoshop.
Understand that most night images that the night is dark. Cameras like film are made to see best in the light. As often happens with night images and RAW files the light and color were flat. I had to boost the highlight a lot to bring out the separation of stars. Ditto for other settings.
This is something you have to expect. The sky is deep with stars and even the one you can’t see backlight that sky. That means to make the stars stand out that separation has to be defined and this is especially true with digital raw files since they shoot flat giving us lots of information to work with.
Don’t shoot the night in JPEG. You may get a bit more content but it will fall apart with the amount of boosting you typically need to do. After RAW processing, I went into PS with the main image and added the twilight image. I very gently masked the area around the trees, bringing in detail to prevent the foreground from being black, but not so much as to become a distraction. The silhouetted tree is still my subject.
10 Seconds at ISO 12,800 – I could not have captured a shorter long exposure deep field scene like this with the 5D MK2. But new sensors can let you see amazing things if you set them up well.
Long star trail night exposures and noise problems.
These are two exposures. The secondary is just my pre-night reference frame for detail and manually blended. I took a frame of the final composition just as the sunset. But that frame retained detail in the foreground so I painted a little of it in since it lined up perfectly. I did not try and blend HDR or anything like that. It was just used to restore texture to really dark areas.
Noise or rather heat artifacts on this era camera were a big problem. Long exposure like this won’t damage your camera, but it can result in artifacts. NOTE that I’ve noticed this problem far less on newer mirrorless cameras. I think it’s because they have to manage heat better. After all, they are also designed for video. But even on newer cameras, the following tips may help.
I set to work trying to get rid of those pesky artifacts that you can see in the example below. I started with basic black frame reduction. Bringing my dark frame of equal exposure into PS, I laid it over the image, then set its blending mode to difference. The goal here is to take the spots of the image and effectively subtract them from the ones mapped on the black frame. I tweaked the opacity to avoid them appearing as darker dots, and that was the process.
It worked. But not enough. I continued to use variations of the black frame with different settings, using the same approach but hoping to target pixels differently. It’s normal to use multiple layers when doing this manually, and, again, this helped, but I was not home-free; I wanted a large wall print of this. I may have been better off making two or three dark frames to get slightly differing, hot pixel patterns, though that would have taken most of the night.
After this, I then used Topaz De-Noise on a copied layer of the main image. Even though this is not normal noise, it did help out. But to avoid killing the detail from aggressive noise reductions I could not apply the Topaz too heavily. I was getting closer, but there were still dots.
See the dots. The stars are trails, those are not part of the sky but sensor artifacts. Since no one I knew even did exposure this long I had no data on how to handle them back in 2011.
Fixing heat spots and artifacts from long star exposures.
This part is nerdy and in the AI noise reduction world with the better sensors we have today, you will probably have to do as much as I did even for a 2-hour-long exposure. But keep these techniques in mind.
After hours of working with this image, researching alternate ideas, and trying in various ways to destroy the dots, I was closer but not as close as I wanted. I won’t go into all my tests, but using everything I described above, I finally added a merged copy of the main image layer group with all the previous corrections combined into it. I then used the de-speckle tool in PS, and this helped a lot but left the image with a huge loss of detail.
So I made a copy of the layer and boosted up its contrast with curves and levels to the point at which it was way overdone and had ultra-hard edges. Then hit select all on the contrasting layer, copy that layer, and turn it off.
I added a mask to the de-speckled layer, and, instead of mask painting with a brush, I Opt (Alt) clicked the mask icon to bring it into mask view mode. Then I posted the actual contrasted image over it as a mask (cmd + v), which made a grayscale mask that matched the contrasted image. This masked away hard edges and detail on the de-specked image, revealing the more detailed layers below.
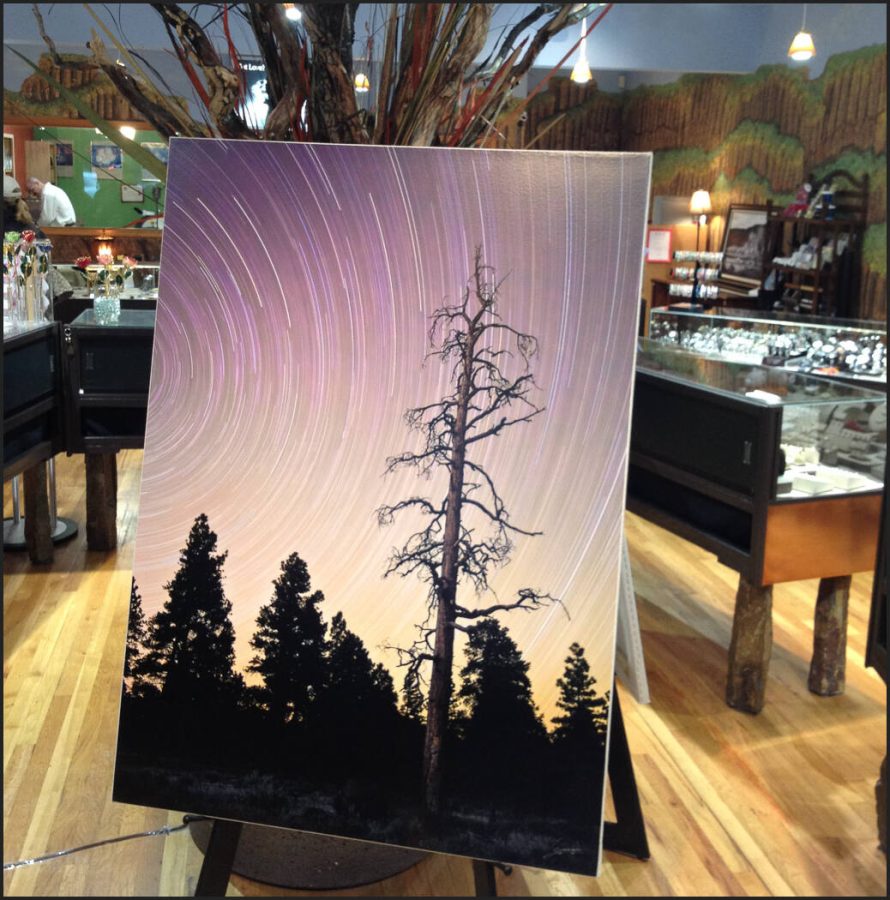
Star trails that printed perfectly.
Doing star trail photography right is hard and slow. But the work paid off and I had the detail, the sharpness, and the quality. My master print was this 50-inch on bonded canvas.
Cameras have come a long way since this exposure was made, but sensors still face similar problems at times. Taking the time to set up, plan, review, and process this carefully gave me an image I can be proud of and one that looks great on the wall.
These are my thoughts on how to photograph the night and what I did here. Keep experimenting and leave your comments with your own tips.
Three Pines. Kaibab National Forest, near the Grand Canyon. Spring 2011.
The night is intriguing to me as a photographer. Stars trail through the heavens, and branches rustle as winds sift through the darkness. The world turns unnoticed by most of its occupants, and yet it is not still at all.
Night photography is a challenge; I have to go against my natural preference to be relaxed comfortably in a warm house or trailer rather than standing in darkness often cold, wondering what made that cracking sound I just heard behind me. The next challenge is the technical difficulty of making the image and composition in darkness and having the patience for an ultra long exposure. This one was over 45 minutes.
At times like this one, I can set up the image and go back to said warm camper and family, as the faint light works its magic. At times, my night exposures do not come out as I expect, and some never see the pages of this journal, but as I further explore the darker side my craft, I find moments like this when the simplicity and natural beauty of the elements draw my eye and make me smile at the wonder of creation.
This image is not perfect, and I’m undecided as to whether it will make the signature collection, but I do enjoy it, and it has taught me much about light and shadow…
Welcome to my living room. We’re back home and while I still have more from our trip coming, I decided to take a short sidetrack. This image is quite different from the serene landscapes I generally do. It was really an experiment of light and shadow. It’s late Saturday night. We went to a local square dance earlier and someone gave Cyrus a couple of those stringy glow sticks. A few hours later, home and family asleep, the sticks are still glowing. I pick them up and start playing, soon considering how I could paint with their light.
The end result after quite a bit of work is this self portrait taken in a darkened room. I’ll confess that I was a tad creeped out as I made this image, childrens toys around the dark room, something happening in the space behind and empty floor occupied by a faceless fire winged man. It may not be creepy in the light of day, but I had fun making it.
What kid doesn’t love a holiday where exploding things is OK. I guess I’m still a kid in that sense, because 4th of July is still a favorite of mine. The independence of our nation celebrated by family, fireworks and banners. Once every few years my family pitches in and we have a big get together with a great DIY fireworks show. This was one not one of those years however, so I decided to help out on the crew of Orion Pyrotechnics for a show they were doing in Ephrata. It was neat to work on a professional show, and something that’s been on my todo list.
Technique: This image was a favorite because it’s different than most. It was made using a sigma 15mm fisheye, making it appear even lower to the ground and subtly showing the surrounding area. I applied a slight color tone from one of my presets and then did a few manual tweaks. The exposure was —-