Use these 3 New Lightroom Curves Features now!

Lightroom Curves are super powerful and often confusing to new users. But this year’s updates have made them better and easier than ever to use in both manual edits and as presets.

How to use the new Lightroom Curves and why they are so great.

Curves in any photo editing app are always powerful. You’ve seen me use them in Lightroom, Capture One, and extensively in my PS action packs like Lumist and Blackroom. But in today’s video, I’ll show you the 3 latest Lightroom curve features and why they will make your edits better.

If you’ve not seen my video about how to make an F-Curve watch it here. Get My Elegance presets here to have your curves pre built into layers with a click.

With curves, you have nuanced control. Now in layers.

It’s simple to use some examples as I show you here or in my presets and you’ll see how that light touch makes a massive difference.

All 3 of the new Lightroom Curves features I show today are useful. But the biggest is how we can use the curves directly in Ai masks and layers. Even the color curves.

Using the latest curve feature I can add a film preset like Agfa RSK from Filmist, then simple control tone and fallout with an F-Curve, the new saturation sliders, and the new preset save features.

This means as a layer level as I show in the video you can instantly refine a background or subject like you never could before. And you can even build that into a preset as I do in my Elegance Speed Masks pack.

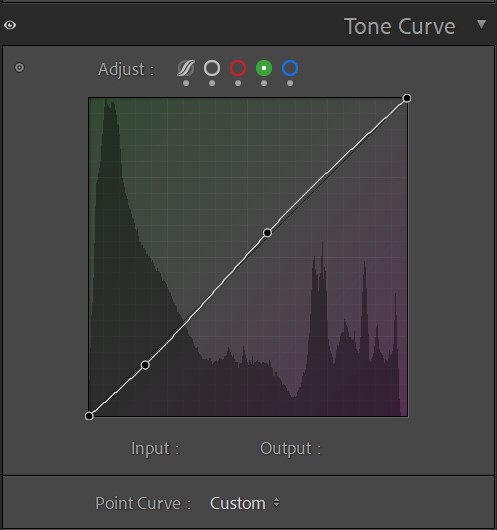
You see how I’ll often roll down the highlights a bit ( the right side of the curve) and then mix the shadows until it feels right. You can mix this will all other sliders, and if you use curves in a preset as I showed you in the video you can get a great curve and keep coming back.

Why do I use Lightroom curves more than Levels?

Curves offer more granular control. Sometimes a point curve like I showed here seems more complex. But once you understand that you are just nudging things around from shadows to highlights, you can quickly resolve problems like harch specular highlights or shadows falling too deep.

A little shadow lift or highlight drop can go a long way. Use my F curve examples as a starter and ten just have fun. Soon you’ll be a master of Lightroom Curves

The new ability to add these curves in layers I actually huge, in this case letting us fad the background as I showed you in the video.

Related Posts...

New Fuji Pro 160 preset for FIlmist 2 is beautiful. But teaches us something about color.

New Fuji Pro 160 preset for FIlmist 2 is beautiful. But teaches us something about color.

The truth about the Exposure slider and how to use the Alternative to make perfect contrast.

The truth about the Exposure slider and how to use the Alternative to make perfect contrast.

Secrets of film color and the best way to scan 35mm Film in 2024

Secrets of film color and the best way to scan 35mm Film in 2024

Inspire your photography using modern pictorialism instead of high-tech!

Inspire your photography using modern pictorialism instead of high-tech!

Tell me your thoughts....

Leave a Reply


Your email address will not be published. Required fields are marked

{"email":"Email address invalid","url":"Website address invalid","required":"Required field missing"}

About the Author

Glad you're here.

I'm from WA State USA and started studying photography in 97. I started work as a pro (using that word loosely because I sucked) using film at age 16. I learned fast but was not as easy to find training then. Sometimes I beat my head against the wall until I figured stuff out.

As digital dawned I went all in and got to study with masters like Ken Whitmire. In 09 I founded the Pro Photo Show podcast. I started promoting tone-focused editing. When Lightroom arrived, I started developing tools to make editing and workflow better.

20 years of study and photography around the country earned me a Master of Photography (M.Photog) from PPA. I got to see my workshops and tools featured in publications across the industry. Once I even won the prestigious HotOne award for my "EXposed" light and tone workshop.

Wanting something calmer, I moved to Mexico in 2017. It's a land of magical light. I'm here now exploring light and trying to master my weak areas. I make videos of that for my Youtube channel, sharing what I learn. I hope you'll stick around and be part of Light Hunters Tribe... Gavin

Gavin Seim

>