How to Install Lightroom Presets + Install your Capture One Styles, Photoshop Actions and more!
Do you need a fresh Seim product download?
Access your purchases by logging in here with your purchase email. If you have any problems just email us, effects@seimstudios.com
How to Install Presets for Lightroom 2022:
Installing presets for Photoshop/Camera Raw
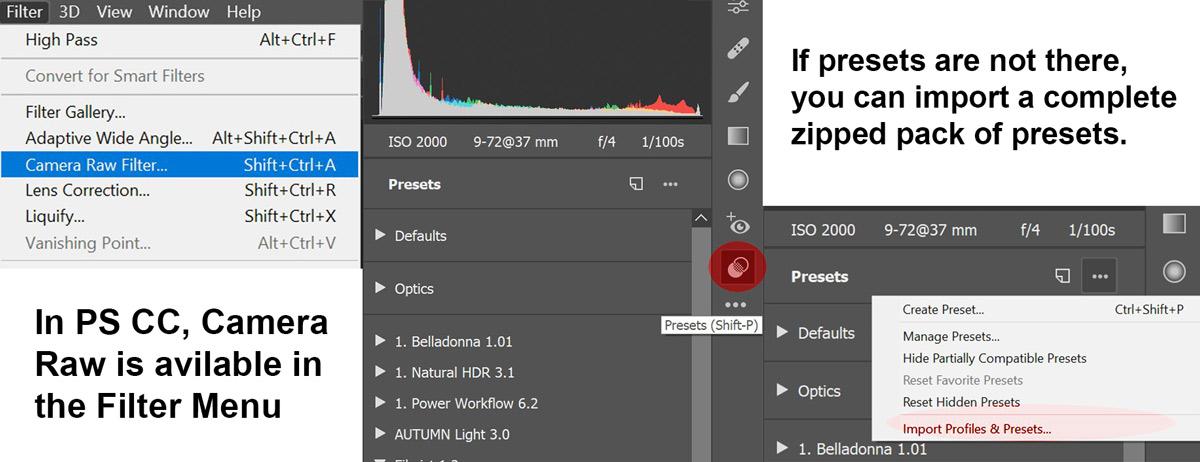
If you’ve installed the presets in Lightroom CC 7.3 or later using the method above for LR, they “should” show up in Camera Raw automatically. In Photoshop presets are used from the Camera Raw filter, not from the action panel. If you have never used presets in Camera Raw I made a video about that here.
If you do not have Lightroom and only use Camera RAW/Photoshop or if they are not showing up, its’ easy to install them manually. Either import the entire ZIP file with the presets via the options in Camera Raw (see image below) or copy the folder of XMP presets LR/Camera Raw into the Camera Raw settings folder to the path below. (For CS6 and older, copy XMP files directly and not the folder into “Settings” as older versions of Camera raw does support separate folders inside.
- Mac: User / Library / Application Support / Adobe / Camera Raw / Settings
- Win: Users \ UserName \ App Data \ Roaming \ Adobe \ CameraRaw \ Settings
Greyed out presets or missing presets in-camera RAW:
VIDEO on this here. Some users have reported that some presets are being hidden. This should not be on my default but could be. Sometimes presets that have options that don’t match the image type you’re using will show as incompatible even though it has no effects on whether they are functional. To fix this you need to right-click in the presets window and make sure Show Partially Compatible Presets is active. See this screenshot.
Presets in Pre-CC Photoshop.
The presets will work in older versions of Photoshop like CS6 and can be installed at the same path. It is possible to open RAW files in Camera Raw from Photoshop using the Open menu command (Camera RAW is not part of the filter menu on old versions). If you want a good RAW workflow on these older versions of PS or have non-RAW files, use Adobe Bridge. In bridge you can browse files and open single or groups of images in camera RAW and apply the presets. When done you can open them in Photoshop from within the Camera Raw window.
_________________________
Installing Styles for Capture One Pro:
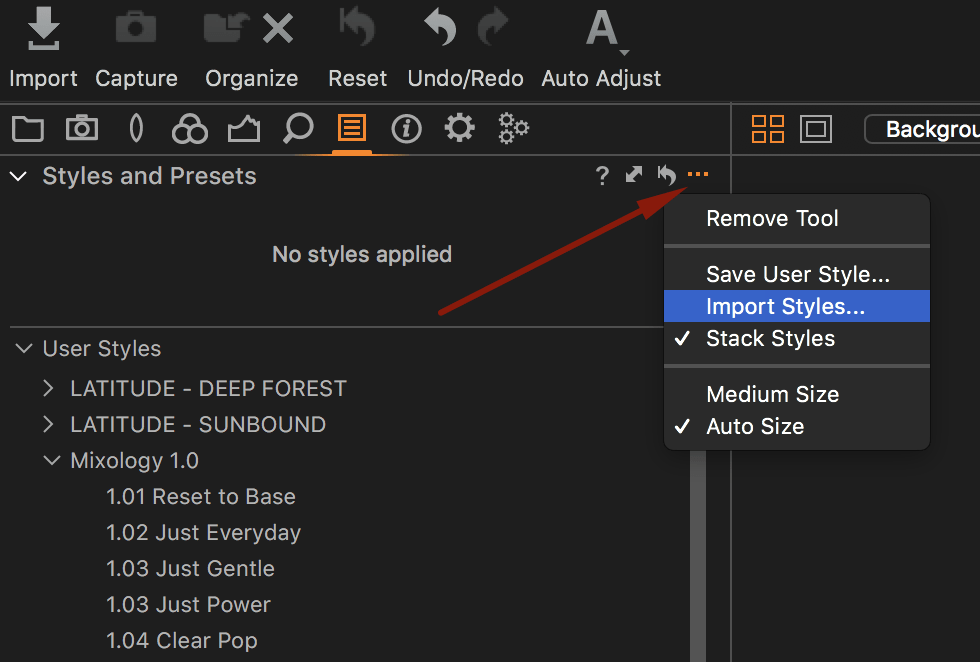
In most cases installing styles is as easy as double-clicking the styles pack that you unzip in your download or importing the pack directly from the presets panel in C1, which is also where you’ll apply presets to your images. See the image below. If you’re new to Capture One you should check out Phase One’s extensive C1 learning hub here.
If you need to rearrange or delete compete for sets of style (for example you installed duplicates) C1 has not yet included that feature (I did ask them to( so you need to go directly to the folder where C1 stores the styles.
- On Mac: User: Library > Application Support > Capture One > Styles
- On Windows: X:\Users\username\AppData\Local\CaptureOne\Styles50
Installing Actions for Photoshop All Versions:
Using Filmist and other LUT’s in Affinity Photo
Affinity support LUTs and any Seim LUTS can be loaded via the LUT’s windows in the adjustments panel. They can also be saved as a LUT presets so that you get a preview and don’t have to manually load the LUT each time. There are very limited management tools however. As of affinity 1.8 there’s no way to group, import or export LUT presets in batches or folders like other Pro editing apps. Other than this, you have to load a LUT from the .cube file each time you want to use it. If there’s ongoing interest on this I’ll start making some videos for the channel.
You CAN manually backup or copy the file that contains ALL LUT presets you’ve saved as presets however. These are the paths…
Affinity Presets and saved LUT’s location: The path to the file that contains your LUT presets is as follows.
- WINDOWS: Users\USERNAME\AppData\Roaming\Affinity\Photo\1.0\user\adjustments.propcol
- Mac: Users\USERNAME\Application Support\Affinity Photo\user\adjustments.propcol
Using LUT’s in DaVinci resolve Photo
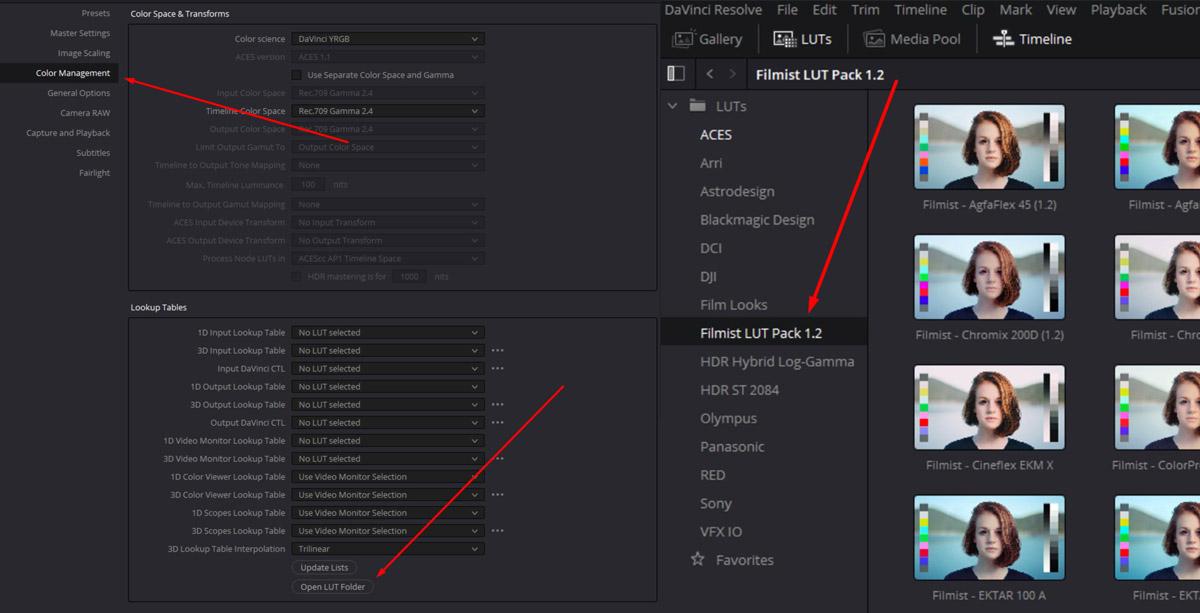
Once unzipped can copy the entire Lut pack folder into the LUTS location in Resolve. The easiest way to find this is to to to the Color module, click the gear icon at the bottom and go to Color management. Then click open LUTS folde rto get quick access to the LUT location. Copy the folder and restart Resolve. Your LUT pack should appear in the LUTS tab of the Color module.
Updating to the latest version of your presets.
Updating your presets or actions!
If you are updating to a newer version there is no need to keep the existing version. New versions, including minor updates, include the current complete collection of effects. The easiest way is to simply delete the old set and load the new.
RESET Buttons: Reset Presets are buttons that do just what the name implies. Each category header that includes the term RESET will offer this feature. This means is always easily accessible. Use reset’s liberaly. Sometimes when you start blending various effects things will go the wrong direction. The general rule is if something starts looking bad. Simply reset and try something new. Reset Presets reset all settings “except” Crop – Lens Corrections – Brushes. This allows you to reset effects on an image without changing trimming and lens profiles. If you want to truly fully reset “everything” just use the built-in LR shortcut – SHIFT+CMD (CNTRL) +R.
General Troubleshooting…
The file won’t Unzip Or Gives An Error:
A small percentage of users experience a problem unzipping the downloaded file. This appears to be due to an issue with their unzip utility and generally occurs only on Windows Vista or XP. Following the instructions below should resolve the issue.
- 1: Delete all partially unzipped or error files and re-download the package.
- 2: Download Zipeg Unzip Utility. It’s totally free for Mac or WIN:
- 3. Unzip the downloaded file using Zipeg rather than your built-in zip utility.
This usually resolves any issues and your effects will unzip correctly.
Some Photoshop Actions Give Errors:
This is usually because you’re working with a 16bit file instead of an 8bit. Some PS tools (Diffuse Glow for example) will not work on 16bit files and you’ll receive action errors. To correct this you can go to the menu under Image/Mode and convert to 8 bits before running the desired action. Also if editing from Lightroom you can set preferences to open files in 8bit instead of 16. I’ll often use 16bit to bring out dynamic range, but then go to 8bit for final edits because it’s much faster and avoids errors.
Windows is blocking the download:
This can occur on older machines when Windows detects a file type that raises a flag. The fix can be found on this Microsoft Help page. I’ve noted the primary resolve below.
“You can open a blocked file from a known source if you want to. To open a blocked file, follow these steps”
- 1. Right-click the blocked file, and then click Properties.
- 2. In the General tab, click Unblock.
If you have any issues you don’t see an answer to, don’t hesitate to contact us. Seriously we are here to help.


