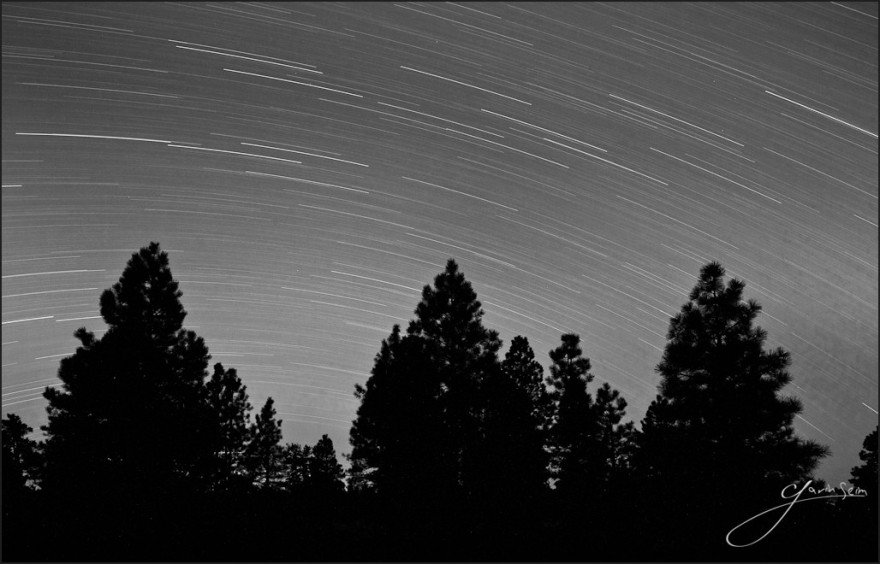
The night is intriguing to me as a photographer. Stars trail through the heavens, and branches rustle as winds sift through the darkness. The world turns unnoticed by most of its occupants, and yet it is not still at all.
Night photography is a challenge; I have to go against my natural preference to be relaxed comfortably in a warm house or trailer rather than standing in darkness often cold, wondering what made that cracking sound I just heard behind me. The next challenge is the technical difficulty of making the image and composition in darkness and having the patience for an ultra long exposure. This one was over 45 minutes.
At times like this one, I can set up the image and go back to said warm camper and family, as the faint light works its magic. At times, my night exposures do not come out as I expect, and some never see the pages of this journal, but as I further explore the darker side my craft, I find moments like this when the simplicity and natural beauty of the elements draw my eye and make me smile at the wonder of creation.
This image is not perfect, and I’m undecided as to whether it will make the signature collection, but I do enjoy it, and it has taught me much about light and shadow…
Gav
For photographers. How it was made…
Canon 5D MK2, 24mm TS-e II, f8, ISO200, 45.6min
Long exposures at night are very interesting but, as mentioned above, often challenging. Composition is an issue, and in many situations, auto focus does not work, and manual focus is blind. For a landscape scene, we can use the infinity indicator on the focus, but there can be variables associated with it, so beware.
I find it quite useful to set the ISO to a high level. Say 25,000. While I would rarely settle on an ISO this high due to its high noise, I still find it invaluable for seeing better in the dark. With the high sensitivity exposure, I can check my composition in seconds rather than minutes. I can also get an idea if my focus and other settings look correct by zooming in on the preview. It was very dark here, and, in this case, I set my composition and focus using just this method.
I will describe my less than scientific approach for determining my ultra long exposures. I don’t say it’s the best, and I’m always experimenting, but in the field, I prefer things I can work out quickly in my head. I’m sure I will refine this process going forward, but I love experimenting with the long exposure, and, for now, I find the analytical method I use instead of charts and graphs gives me a deeper understand for the image I’m capturing.
I determined that at ISO6400 I would need a bit over 1 minute to capture the stars silhouetting the trees. At that point, I multiplied that minute for each full ISO stop I planned to go down. I.e., 3200 = 2 minutes, 1600 = 4 minutes, 800 = 8 minutes, and so on, till I reached ISO 200 which would be thirty-two minutes.
Added to this was my knowledge that my one minute exposure was a bit dark (I used the whole number for easy multiplication). I determined that around forty minutes should be close, but I find these types of exposures often come out too dark so I added a bit of time. Remember that adding a few minutes to an exposure this long is small compared to the whole length. I’m finding that adding a few extra minutes for good measure often gives me a better frame. Even this came out a bit darker than I would have preferred, and I had to compensate for it in post processing.
On a side note, the wind was very calm, though I’m certain the branches moved a little. On an exposure this long, the space that the branches and needles occupy will most often be the one of most impact. In practice, this means that even though the branches may have been moving slightly, the detail remains appealing. Shutter speeds are very relevant to detail. A slow speed often gives an ugly blur, while a slower speed can give a ghostly beauty. An extra slow speed can actually bring detail back in, but in its own unique way.
The post production work was reasonably simple. To me, the heart of the image was its light and lines, and so, black and white was my approach of choice. I worked in Lightroom applying some of my presets and then further adjustments for noise and detail. There is noise due to the length, but at ISO200, it was not bad.
In the end, I like the result. I plan to further experiment in print and see how it looks on paper, but the simple balance of the trees, coupled with the star trails, pleases my eyes.
I should also add that my recent fascination of large format film has got me thinking “how can I do with with 4×5.” I plan to experiment, but with the lack of instant feedback when using film, it would seem that the best approach would be to set up while it is still light, locking focus and composition tightly until darkness and the final exposure. Once again, film requires more planning but its rewards can be remarkable.
Gavin Seim

