October 18, 2015

DSC00483-2-Edit

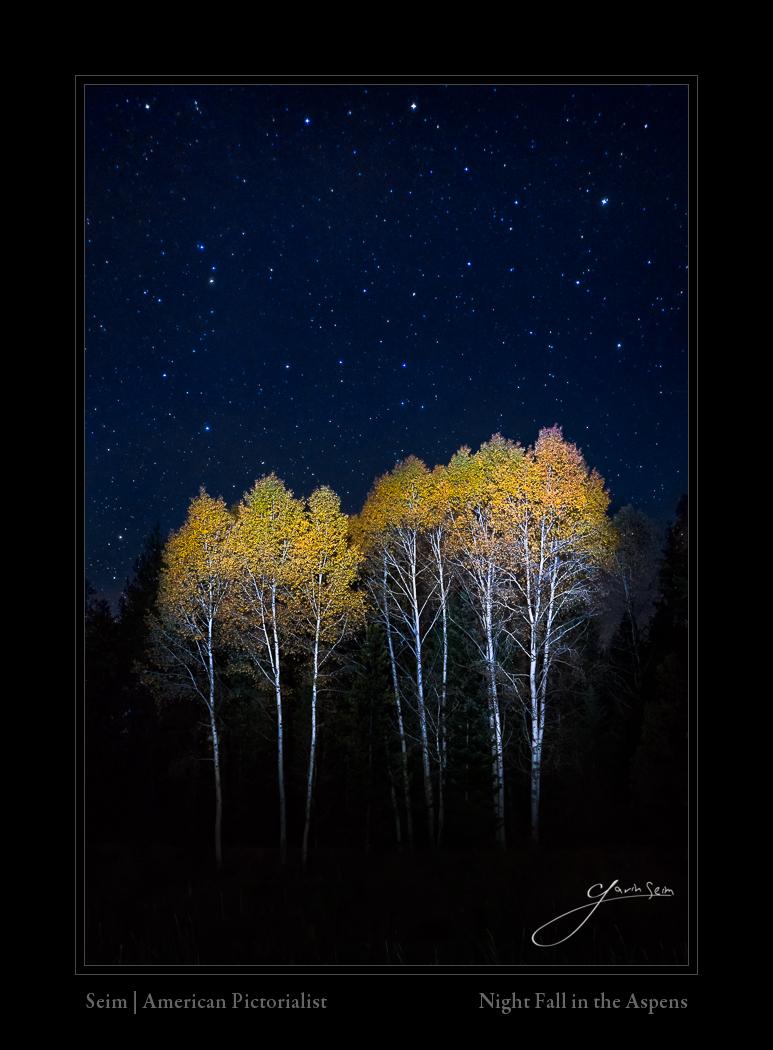
Deep night sky and Autumn Aspens lit with a flashlight. Sony A7R II, ISO 6400, 13 sec, f3.5, Canon 24mm TSe II. Power Workflow 5 Presets.

My top night photography tips:

  • Setup slowly and carefully on tripod before you shoot. In daylight if possible.
  • With stars decide on deep field or star trails, then visualize everything else.
  • Use a timer or cable release so as not to have any camera shale from button pressing.
  • Long exposure noise reduction generally helps your final image.
  • When light painting run some test shots and plant your best light strokes.
  • Metering is hard at night, but use your histogram to make sure you’re using the tonal range well.

I found this spot up in North Washington. In the day it was a plain aspen grove that was a bit weak. But I thought, this will all change under the stars. So I used a basic LED flashlight with a zoom head. That way I could get a bit of focus on the light. I have much bigger lights but at this ISO they washed out the Aspens as I wanted to gear the light towards the top.

Initial setup is important. You’ll likely have to experiment to get the flashlight just right and you don’t want to hassle with comp or focus at that point. Get that first. I setup neat camp before it was dark and then left the camera waiting. It can be done in full dark with high ISO test images, but setting up in the light make things much easier and you can really think about your composition and visualize.

If I want deep field like this, rather than star trails, I try to keep exposure 8-16 sec. If going for Star trails I want to extend out to 30 minutes or more. A camera that can handle high ISO is important for the shorter exposures. If you are doing longer star trails, you can dial back to ISO 200 or so and open up the shutter in bulb for 30 minutes or more like I did in 140 Minutes of Night. Of course everything changes if you have bright moonlight.

The key here was a balance between the trees and sky. I wanted the Aspens at Zone 6-7, but metering under these conditions is not so easy so I made a visualization in my head and then used histogram and previews to dial in the result (see the EXposed workshop for more on light).

Night exposes different from day. Post processing needs to be deliberate. I stay with the RAW file until the end. In night scene I’ll usually have to dial up the lights and white, but have to be careful not to blow anything out. I’ll generally start with presets and then dial it in. At the end I’ll do details in Photoshop.

There’s nothing like the Autumn; all of nature pauses, shining in all it’s radiance to give glory to God. The detail is great and this will print beautifully for gallery.

— Seim

Read More

April 4, 2013

Sedona Nights, Sedona AZ just after sunset – Gavin Seim, Spring 2013

We spend a good four or five days in Sedona before moving down the road. I must admit it’s a strange town, but it’s bedrock beauty is nothing to sneeze at. Breathtaking canyons and spires of rock inspire the artists and are at the same time a challenge to photograph really well as they are heavily photographer. Only the best light will do.

We went to the popular airport view for Sunset one night. I’m not sure I’ve even found a crowd so large to watch a sunset. There much have been 200 people there snapping away. I however just stood around with my view camera and chatted because the sunset was a bit flat. It was pretty and all, but to make a wall print we need something breathing.

The sun set and the crowds washed away. We loaded up and headed down the hill, But halfway down I look at the light of the city coming on and turned around, realizing I had just left the best behind me. I went back to the now empty viewing lot and had my pick of vantage points as the last light faded in the sky and Sedona Night came on.

Release details: Prints Available.. Order Open Edition originals above.. Master prints and Signature Limited Editions are listed below and can be ordered by contacting gallery.

Limited Release Prints….

  • Coming Soon.

For Photographers. How it was made…

Read More

August 10, 2012

Here’s a quick video from the night of mt recent gallery opening after things quieted down. We had a great turnout and a good time. Just a peek inside my studio/gallery and a look at some of the new work. Gav

Read More

April 23, 2012

The Night Watcher by Gavin Seim - Near White Sands New Mexico, March 2012

An open New Mexico sky and a gentle foreground glow from the lights of a distant military base. This tree stands alone on a dusty patch of earth. In the daytime you might not think much of him. But as he watches over the trailing stars of night his delicate majesty is revealed in full.

I made this just outside the camper in the same spot near White Sands where I made Sliver Moon Blues. A seemingly barren patch of earth, that in three days offered me two new images. But I had to work for it and I was up until the middle of the night making it happen. It took well over an hour for each exposure and that adds up fast. It was worth the effort however and the Night Watcher is the result.

Release details: Prints Coming Soon.

For Photographers. How it was made…

Read More

April 6, 2012

A study image only. Canon 5D MK2, 50mm 1.4 @f5.6, 1 hour, ISO160. Bright rock light from the moonlight

An image study for photographers.


Star trails, turning night to day, midnight landscapes. There is amazing image potential for the photographer willing to do their homework and pre-plan setups to take those grand steps into the dark of night.

This photo is lacking. What it shows me is not. I was in the New Mexico highlands. The sun has long set and the light is only from moon and stars in this one hour long exposure. This image is not fully up to my standards and hence may never make it into my Signature Collection. That said there’s something to be learned from it.

I’m trying to develop some baselines and ideas for working what I call ULE’s (Ultra Long Exposures) and I wanted to share some of those here. This image represents the first time I used “only” past experience to determine exposure time, running a single one hour exposure at 5.6, ISO160.

Read More