Filmic Lightroom Presets and Film Styles Reboot your editing. Start grounding your edits and see.

Ever feel your editing is messy, or you need a reboot?

Grounding changes your editing and improves your style. es, Filmic Lightroom presets and styles help a lot. But your style can still be whatever you want. Stay with me till the end and I will make this easy.

Why do most in-camera profiles look so bad? Why do I come back to an edit I liked and it seems gross? It’s because digital edits lack a reference point.

This is a Level 1 Filmic Lightroom preset from Natural HDR. That is it’s using film tone and color inspiration but not trying to be a specific film. I use these liberally but not as my grounding point.

Here are some free Filmic Lightroom presets.

I’ll also add some videos today showing how I create and use Filmist Lightroom and Capture One presets and some of the things I learned along the way.

To get staretd you can download my free packs…
Download my Free FIlmist Film presets sampler pack from the filmist page. Your grounding.
Download the Free Silver 5 free presets pack here which is Filmic black and white.
Get my Natural HDR free presets. Non-film edits, but grounded by filmic style.

I’ve made many videos over the years as I explored film stocks and created the Gen.2 looks of my film presets like Portra, Ektar, and Classic Negative which have become the go-to styles for many.

OK, let’s get started…

1. Grounding works because we exist in analog!

Ever come back to an edit the next day or week and thought? What was I thinking? I sure have.

You lacked a baseline and went too far. It happens to all of us. Filmic Lightroom presets and styles are not just a hipster fad, and if you’re still not using them you are missing out. So first we’re going the base our edits as close to real analog film as possible. Don’t worry you don’t have to stay there.

Much like Shadow Hacking, which brings you back to in-camera thinking. Filmic Lightroom Presets presets and styles seem simple but are not. I was a skeptic. But today Filmic Lightroom presets are my go-to for every session and for the past 5 years I’ve been developing better film and filmic presets to improve this process.

Here’s a video I did recently to explain how I use film presets overall in my work.

A film preset edit gives you a wide range of colors and tones but with a more subdued look that lets the truth of your photo come through so you can decide. When you add Shadow Hacking as I teach in my live workshop, you get photos that print nearly indistinguishable from film prints.

Level 2 filmic lightroom presets. This film style is the Ektar 100 like and
There is a shadow atmosphere happening here even though the EKtar 100-like. A level 2 film preset in Filmist is not super intense it constantly works and is a grounding development process.

There are two levels of Filmic Lightroom presets.

Both are important but you should know the difference between them because the second is better for rebooting and a lot harder to make. So much so that most presets sold don’t qualify.

The first is basic Filmic presets. Level 1:

These are most Filmic Lightroom Presets and Filmic styles in Capture One LUTS, etc. They have a film-inspired tone and look. What’s that mean when you are making them?

Usually, it means darker more obscured greens, and deeper shadows but not overdriving contrast and color using what we learned from over a hundred years of Darkroom to effect digital edits.

Filmic Lightroom presets and styles that are just inspired by the film are the easiest way to make your own. I use them all the time. But I don’t use them for a grounding base film process reboot my edits and they can quickly grow back into over-driven digital edits.

Street photography with level 1 filmic lightroom presets and styles
Street air is a prestige from Street’ist. This level one filmic preset has a lot of color and nuance like a chemical film, but does not try to be any specific film.

The second is true Film like presets, Level 2:

Film Lightroom presets, capture one style, LUTS etc. represent a much more complex edit. You could spend a week making a look like the Portra 400 presets from Filmist.

A Film preset is not just influenced by analog styles. It’s tested and refined to look like the film. That’s what I did with Filmist which is why it’s taken me 5 years and improves with every version. I watch the reviews and look for more information all the time. Real films reset your editing brain more because they ground you.

When I started trying to create film presets I was thinking more of filmic. Make looks that were inspired by my film. But it was not enough so I started digger deeper and studying the nuance of individual stocks to get a true-to-life representation of those films.

A level 2 film preset is about a specific film like the creamy shadows of this Delta 3200-like. You can mod or turn these presets up to enhance the effect. But I start simple and natural to get a good grounding.

2. This editing theory will reset your editing brain.

You might be thinking… Nothing new here. But the more you use this process in your edits. Level 2’s especially. The more you realize that these film stocks lasted decades for a reason. They seem simple at first you soon you realize well they are grounded and complicated.

Apply a film you like to every photo. Do your quick exposure adjustments and get the session looking balanced. When you edit with film-like presets and filmic styles you get perspective.

You might turn a filmic lightroom preset up or down. You might mod for contrast or transition totally different look. But your perceptions are grounded in the analog that is proven to withstand the test of time.

If you look at this session you can see the edit from when I first shot the session was ok. But it felt burned and it was inconsistent across poses and lighting.

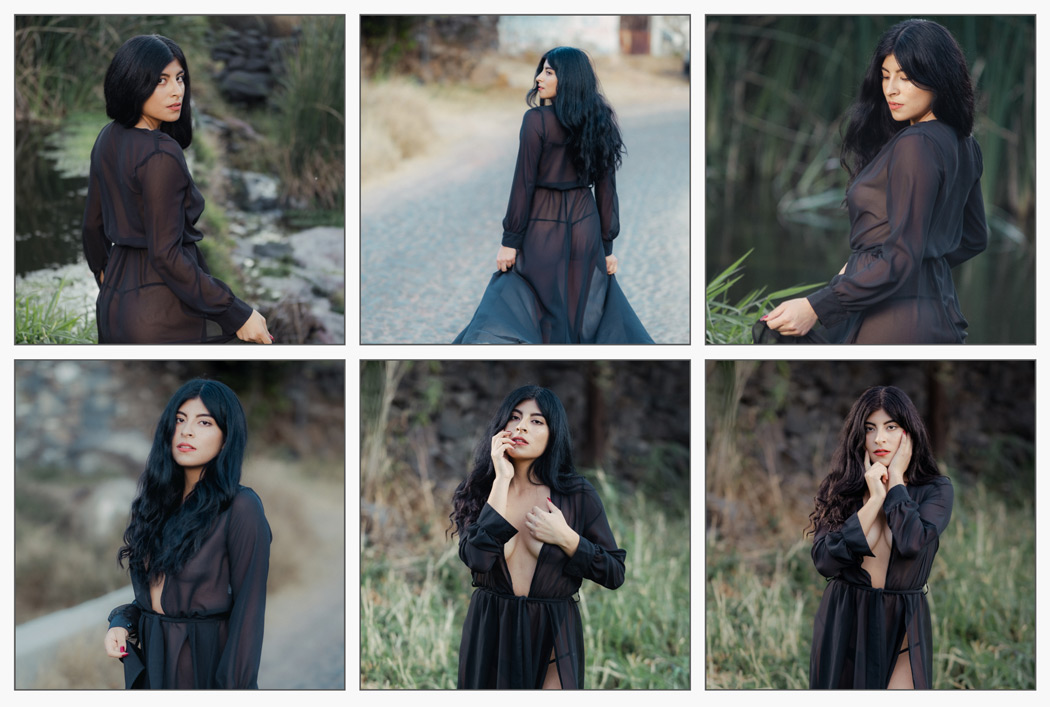
Look how I came back and re-edited the session with Portra 160-like film preset and a few mods. Each pose is slightly different, but they all have a constant feel. I like them gentle like this but my old self would want to add more mods, saturation, etc. That’s fine, as long as you have grounding to keep you on point.

Soon you’ll find yourself going back to old edits and now they seem strange and overcooked. You reboot your brain in terms of editing. It does not mean other filters and edits are not important anymore. I still use Natural HDR or Bella 2 which are not specifically filmic.

How the session looks now after a more refined film edit and a good grounding from analog.

In this AI World, real things are gaining value.

And so we relate to and believe in analog things. Especially in this new AI-driven world where sometimes everything feels fake. This level of photography is going to become more important every year and Filmic Lightroom Presets help me stay focused.

Yes, there’s a level 3. Shooting digital side by side with the real film and using that as your grouping for shadow, color, and editing. I do this to practice and further refine Filmist for example but it gives you even more grounding and perspective.

Even the way we adjust exposure changes with analog. Pushing the exposure slider is not the same as pushing film and as I’ve become more advanced in my Film presets, even the mod presets, curves, and exposure settings have improved.

See this video from my channel after I created the Gen.2 the Portra-like pushed film style.

Creating pushed filmic looks in digital and why it matters.

You Ground with real film presets, then find YOUR STYLE!

Yes, editing with filmic styles and Filmic Lightroom Presets makes you edit everything better. Much like shooting film improves your understanding of shadow and creativity by resetting your brain to an analog state that lets you see your digital work from a new perspective.

But it’s important you ground to something solid. That means don’t just edit your first photo of the day and use that as your baseline edit. Start with an edit you know the analog human brain accepts. Film is a great start.

Start with a level 2 film preset. Not just a filmic look. That means using well-researched presets or spending the days of research you need to create one yourself that is accurately representative of a real film. Or download the free or complete filmist and that will get you started.

filmic styles and wet plate platinum in photoshop
It does not always stop at a preset. Sometimes I take go further into Photoshop and use chemical-based edits like this cyan plate platinum mix from Emulsion 4 actions. Analog just keeps giving.

3. Filmic Lightroom Presets and film styles. Then move outward.

The grounding keeps you constant even when you’re not doing the filmic style.

So for example I will go to Filmist and use Potra Ektar-like film lightroom presets. Maybe Fuji 400h. I know these analog looks withstood the test of time and that our minds relate to them.

I don’t have to stop there and I may not even stay with a film look. Grounding your edits sounds boring, but it actually makes you flexible and creative and keeps you out of a rut. So even when I go to HDR, that grounding is affecting my edit.

So I look at the mood and shadows of my shoot. I may decide to veer from film and use other effects, actions, edits, or presets. But now can really feel where I am in the edit better.

It’s about rebooting the brain to see past the temporary creative blindness that the ever-changing sliders and tools can give us so that we use those tools better with each unique photo session.

At least grab the free Filmic Lightroom presets, film styles, and LUTS I linked above and try them for a while. If they seem not intense enough that’s normal. Your editing brain will soon reboot and you will open up a totally new horizon.

So Let’s Recap…

  1. Ground the baseline of your edits with edits as close to real analog film as possible. Use Filmic Lightroom presets and film styles, or even create your own.
  2. Edit photos with favorite films and use that as your grounded starting point. I will often start with Portra 400 or Ektar as my baseline because these films work on anything and I can apply them to an entire session.
  3. You can expand out with mods, other filters, presets, actions etc., and the final look for your project. Use your first edits as a reference to not edit too far. Staying with the film is also fine. I often stay with the film look/

I hope this helps you refine your edit process as much as it did for me. Let me know in the comments and if needed I’ll do more videos on this. Gavin Seim

portra 400 as a filmic style is amazing and changes how you see tone rolloff on digital
With Filmic Lightroom Presets like Portra 400-like, you almost can’t fail. It was not until I discovered these processes for grounding that I realized the nuance of highlight roll-off and how we lost it in digital. Look at the before and after of this edit on the filmist page and you’ll see what I mean.
Expanding into level 2 filmic styles like Velvia 100 like let you stay creative and still know you’re on point.

Related Posts...

New Fuji Pro 160 preset for FIlmist 2 is beautiful. But teaches us something about color.

New Fuji Pro 160 preset for FIlmist 2 is beautiful. But teaches us something about color.

The truth about the Exposure slider and how to use the Alternative to make perfect contrast.

The truth about the Exposure slider and how to use the Alternative to make perfect contrast.

Secrets of film color and the best way to scan 35mm Film in 2024

Secrets of film color and the best way to scan 35mm Film in 2024

Inspire your photography using modern pictorialism instead of high-tech!

Inspire your photography using modern pictorialism instead of high-tech!

Tell me your thoughts....

Leave a Reply


Your email address will not be published. Required fields are marked

{"email":"Email address invalid","url":"Website address invalid","required":"Required field missing"}

About the Author

Glad you're here.

I'm from WA State USA and started studying photography in 97. I started work as a pro (using that word loosely because I sucked) using film at age 16. I learned fast but was not as easy to find training then. Sometimes I beat my head against the wall until I figured stuff out.

As digital dawned I went all in and got to study with masters like Ken Whitmire. In 09 I founded the Pro Photo Show podcast. I started promoting tone-focused editing. When Lightroom arrived, I started developing tools to make editing and workflow better.

20 years of study and photography around the country earned me a Master of Photography (M.Photog) from PPA. I got to see my workshops and tools featured in publications across the industry. Once I even won the prestigious HotOne award for my "EXposed" light and tone workshop.

Wanting something calmer, I moved to Mexico in 2017. It's a land of magical light. I'm here now exploring light and trying to master my weak areas. I make videos of that for my Youtube channel, sharing what I learn. I hope you'll stick around and be part of Light Hunters Tribe... Gavin

Gavin Seim

>