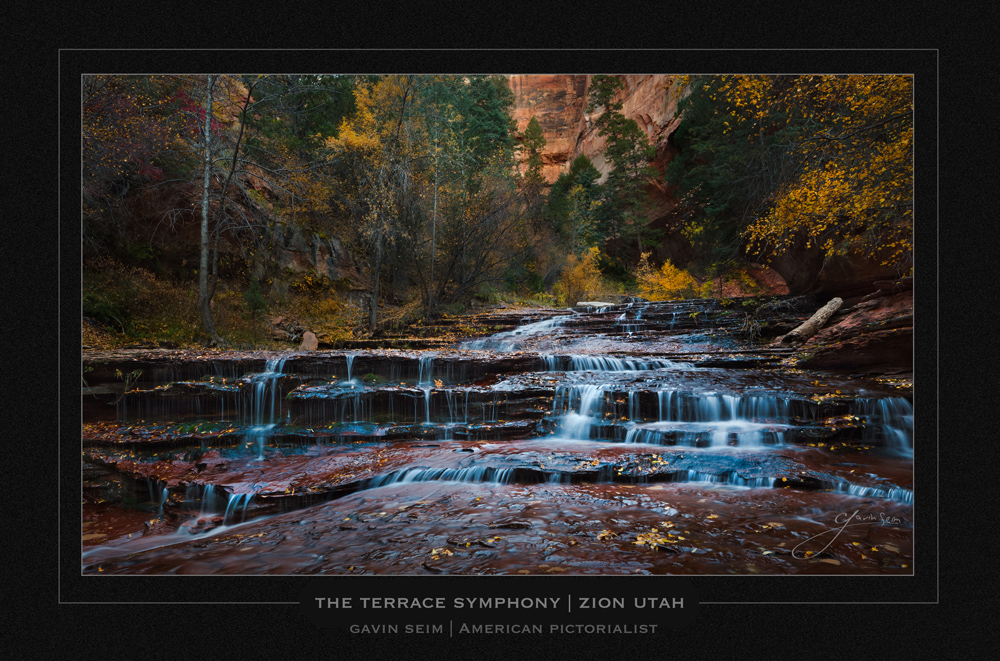
We hiked miles and miles over rocks and boulders up towards the Subway in Zion National Park to get this one. It was a long trek with all the gear, but when we rounded the bend and I saw the most stunning of terraces I ever had seen, I knew it was worth it. The endless cascading water and fall color made a view that took my breath away. I cannot adequately convey the awe that I felt. But this print on the wall will help me.
The most amazing part is there was more up ahead. I also photographed Autumns Secret in this same hike. Two images in a day is rare for me. But if any location could pull it off, this would be it. It was the most remarkable trek I’ve hoked and we’ll look at it more closely in the new PHOTOGRAPHICS film that’s about to release.
Release details: Prints Available.. Order Open Edition originals above.. Master prints and Signature Limited Editions are listed below and can be ordered by contacting gallery.
Released prints….
58 inch Master Original on Metal – Limited edition of, 1 (contact the gallery)
44 inch Signature Canvas – Limited Edition of, 50 (contact the gallery)
36 inch Signature Metal – Limited Edition of, 100 (contact the gallery)
This is an article I was originally asked to write for Professional Photographer Magazine, a good read – The problem was that editing department hacked it up so badly that it was barley even my words anymore. Such is life, but I opted to not have it published. Below is the full version of the article with a few extras since I didn’t have a word limit here. Enjoy – Gavin Seim
____
I’m going to share a few things that can fundamentally change how we make images. NONE of them are new – Sometimes it seems we arrived at digital and left behind a hundred and fifty years of photographic knowledge. I spend a lot of time studying classic techniques. Why? Because it’s not new – It’s time tested. It works. In this digital age we can get so caught up in gadgets, software and tools that we neglect how to make images beautiful from the start. I’m from the digital generation – So while I fully relate, I’ve learned to stop looking for buttons and start looking for light.
1. The Tones:
Ken Whitmire once taught me that “Tone” may be the least understood and least utilized factor in composing and finishing images.” He was right. With digital it’s easy to think “that’s easy”. But as a lover of film and digital, I’ve learned they’re not so different. A great photograph is light and shadows – We must see in terms of tone and how it relates to what we want to capture. Exposure, burning, dodging, finishing – Proper use of tone can literally take the viewer anywhere we want them to go. Now that’s power.
Ken Whitmire on the Oregon coast – I photographed this portrait of him while he was photographing a family. The Tone is essential here. Control of the dynamic range while retaining rich blacks gives balance to the scene.
2. The Zones:
The Zone Scale – A representation from black to white in one stop increments. The language of light.
I’ve been trying to decide how to discuss Ansel Adam’s Zone System in few words. Zones may be the most neglected tool in photography today. They offer a core to how we communicate and photograph light. Zones are not just for film or black and white. Once you truly understand them you never see the same again. The Zone System is broad reaching. But it’s core is the beautify simple Zone Scale, a representation from black to white. Combine Zones with a simple understanding of metering and there is no over, or under exposure. There’s only your exposure. Your intent. I can’t explain it all here, but there’s a free video covering the basics that I posted over at exposedworkshop.com. It’s an excerpt from my EXposed series and will get you started. Don’t ignore Zones because they will change your photography. You can also read my article on using Zones here.
Lost Oasis – I was using large format film here and took advantage of camera movements. Line, tone, space and position were all critical and while in retrospect there’s things I could have improved, taking my time paid off. I took in the full tonal range from black (Zone 0) to just shy of clipping (Zone 10). More on this image here.The Zone System – Here is an exposure sequence metered on the highlights from Zone 1 to Zone 9. More on this in the Zone System discussions on my site.
3. Space, Position, Line:
Ken Whitemire, the pioneer and master of the wall portrait, showed me the value of tones in relation to space, position and line. He has an amazing lecture he gives about this at the Wall Portrait Conference each year – Essentially we need to think about the aesthetics of our image. For this reason I love studying masters like Bierstadt, Sargent and others. We must start by truly seeing our scenes. Think about the subject. How lines lead. Where are they positioned? Why? Is anything distracting? Should it be lighter, darker? Really – Truly – See!
Morgan’s Song – I had a lot of things happening in this riverside portrait. Controlling the aspects of the scene, the position and the tone allowed me to show a beautiful scene while still keeping the viewers eyes on Morgan.
4. Visualize – Again:
Are you really “seeing” in the minds eye? It’s easy to let this slide in an age of instant previews and post production fixes. But nothing replaces visualizing. Ansel reminds us that “The whole key lies very specifically in seeing it in the mind’s eye”. Regardless of our subject, we must stop, if only for a moment. See what’s in front the lens and decide what the subject needs. Then use space, position, line and tone to make that happen.
This was my turning point in visualizing. I used 4×5 film for this wall portrait that we printed at 40 inches. I needed to keep away the distractions in the space. I only used one frame of color film, but I took a breath first. I truly saw the portrait in my mind before I released the shutter. I’ve added a zone scale for the purpose of tone study.
5. Finishing:
The image is captured. Win lose or draw we’ve done it. I’ve learned that slowing down throughout the entire process makes me a far better craftsman. That includes finishing. It’s easy to raise the bar in post if we stop worrying about making countless “decent” images and start thinking about how to take the “best” and make them sing. Fulfill that visualization, right up until the print is on the wall. That is mastering the photograph.
Until next time… Gavin Seim
This image was a PPA Loan Collection print in 2011. It’s actually a tone-mapped piece, but more importantly, it had careful attention to detail. Focus on line, tone values and finishing made it work. Planning and execution.
The Night Watcher by Gavin Seim - Near White Sands New Mexico, March 2012
An open New Mexico sky and a gentle foreground glow from the lights of a distant military base. This tree stands alone on a dusty patch of earth. In the daytime you might not think much of him. But as he watches over the trailing stars of night his delicate majesty is revealed in full.
I made this just outside the camper in the same spot near White Sands where I made Sliver Moon Blues. A seemingly barren patch of earth, that in three days offered me two new images. But I had to work for it and I was up until the middle of the night making it happen. It took well over an hour for each exposure and that adds up fast. It was worth the effort however and the Night Watcher is the result.
Artists Sunset – Ken Whitmire in Pacific City Oregon. Fall 2011 by Gavin Seim.
It was one of those Sunsets. The ones with stunning clouds and radiant colors that seem to last forever. Like a great song that keeps on playing. I was on a road trip to the Oregon Coast with Ken Whitmire, the renown portraitist. Ken was working with a family on the beach in Pacific City and I assisted, while getting images and video for a project we were working on.
About halfway through Ken was on his ladder, having this family of five walk down the beach. I just stood back and watched. A bit envious of the amazing portraits he was going to take home. It was a stunning evening. I took in the incredible ocean landscape with some awe. In between video clips, I decided to go vertical and try to illustrate Ken as the working professional in his environment. I hoped for a sort of memorable feel that that artists and photographers could relate to.
This has been really well received. I admit, I did not realize it would strike such a chord, but I’m glad it did. To me this says something about creative craftsmanship and taking your time. It reminds us to take the extra steps up that ladder to make an image Great. That’s what Ken Whitmire has done for over fifty years and I’m glad I got to be a small part of that.
Our road trip was a memorable one in more ways than one. In fact by brother and I wrote a short short story about this trip. You can read that here on the Brothers Seim blog.
Release details: Prints available. Contact the studio. Learn more about prices. Available prints…
This may be the most valuable piece I’ve written on photography. In the last year, I’ve started working with 4×5 film and digital side by side. I’ve also explored extensive exercises in tonal control, truly learned to visualize, and implemented key parts of the Zone System that was developed by Ansel Adams and Fred Archer, both in my film and my digital work, in color and black and white.
The idea of visualizing and using Zones is not promoted heavily today. It seems much of the industry, including many of its educators, arrived at digital and decided that the past 150 years of photographic knowledge were somewhat irrelevant. What I’m about to show you is not taught much, but understanding it WILL change your photography forever. I’m not kidding; once you get this, you’ll never see light the same way again. And I hope you’ll share it with others.
Sunsets Hidden Falls. Yosemite, 2010 - A general look at where I placed the scene elements in relation to the Zones. Each arrow leads to what I see as the zone on the scale.
I’m going to stay simple because these concepts are essentially simple. I have not come up with a new digital based zone system, a stripped down version, or an article full of nerdy equations, white papers, or complex systems. This is not hard, and you can start putting it to use TODAY for film or digital. Since most of us are in the digital world, I’ll focus on that. I’m going to show you how to use the core of the Zone System to make you a vastly better photographer. I’ve also brought along some examples for analyzing the Zones.
To those of you who already know this, kudos. But I challenge you to review and analyze whether you’re really using it, or just buzzing along in digital bliss and fixing things later. Excuse my bluntness, but this is happening to the best of us. We need to get back to basics, visualize, control tone, dynamic range, and image quality.
Originally, the Zone System was a complete approach that included everything from the initial exposure to the final print. Now we don’t use darkrooms much these days, so I’ll focus on the pivot point of the Zone System: the Zones themselves. That said, I would encourage you to study the whole process even if you don’t use film. It will help you gain a better understanding of light and photography. Not only that, but old books like Fred Picker’s Zone VI workshop, deal with it quickly and effectively and can often be had for mere pennies.
1. The Zone Scale.
The Zone Scale lies at the core of the Zone System. It consists of eleven squares that span from clipped black (Zone 0) to clipped white (Zone X). Each square represents a change of one stop. The first part of using Zones starts before you release the shutter. Truly visualizing your image is like nothing else. Once you master it, you see the image you plan to make, including your edits and refinements, in your mind before you ever take the photo. It changes everything about how you photograph and how refined the resulting images become.
Brilliantly simple, the Zone scale allows us to visualize all our light from complete black to complete white in one stop increments.
To begin, look at your scene. What’s outside your window right now? Visualize what zones in which the things around you fall. Then imagine you’re taking a photo. Imagine where the zones would be if the image came out exactly as you wanted. It does not have to be what you “see” but what you “visualize” for the finished image. How do YOU want to make it?
Think about what Zone levels on various objects in this scene would most complement your main subject as well as your supporting cast of elements. Sometimes it helps to begin by trying to visualize a scene in black and white, even if your final image is going to be color. Thinking in terms of only tones can be helpful, especially early on in the process.