Today Gavin goes in depth on light, zones, meters and making images come out the way we want them, every time. Foregoing long errata and going straight to analysis of using light and Zone to control the results of our images. Lets jump in.
By Gavin Seim (updated 01/13) – This may be the most important piece I’ve written on photographics. Because no matter what you photograph, once you see in Zones, you’ll never see the same again. You’re on your way to truly mastering light.
I started photographic study when I was twelve. But in recent years I’ve started working with 4×5 large format film and digital side by side. I’ve explored endless exercises in tonal control, “truly” learned to visualize, and implemented the Zone System that was developed by Ansel Adams and Fred Archer, both in my film and my digital work, in color and black and white. Zones are the language of light and they’ve changed everything about how I see.
Master Zones & Exposure Dynamics – Get Gavin’s Workshop Series.
The idea of visualizing and using Zones is not promoted much today. It seems much of the industry arrived at digital and decided that the past 150 years of photographic knowledge were somewhat irrelevant. Maybe it’s that many never took the time to understand Zones to begin with. Which is a shame because it’s so brilliant. What I’m about to show you is not taught much, but understanding it WILL change your image making forever. I’m not kidding; once you grasp this, you’ll never see light the same again. You’ll probably want more after this, so check out the links at the bottom for further reading. Also you can get hands on in my annual 3 day Lights & Shadows workshop. And check out my video series, EXposed which gets deep into Zones. OK lets dig in.
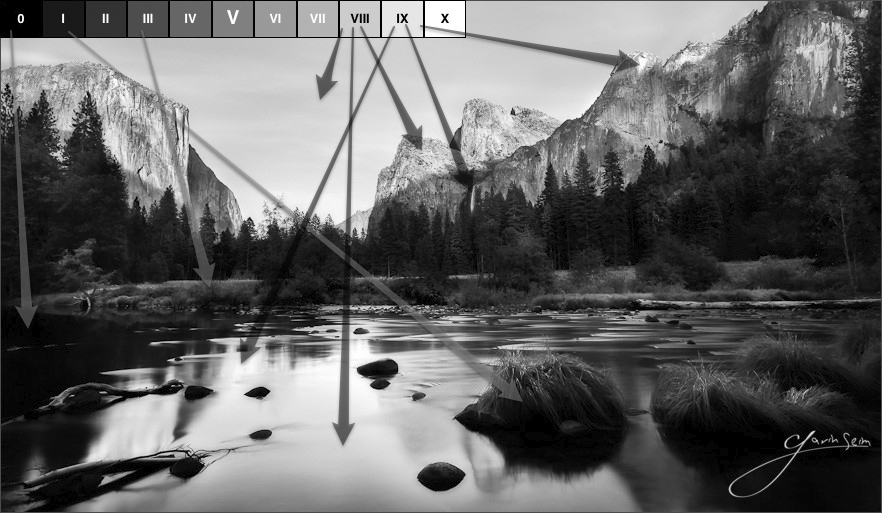
Sunsets Hidden Falls. Yosemite, 2010 – A general look at where I placed the scene elements in relation to the Zones. Each arrow leads to what I see as the zone on the scale.
I’m going to stay simple because these concepts are simple. I’ve not come up with a new digital based zone system, a stripped down version, or an article filled with nerdy equations, white papers, or complex charts. This is not hard and you can start putting it to use TODAY. Since most of us are in the digital world, I’ll focus on that. I’m going to show you how to use the core of the Zone System to make you a vastly better photographer. I’ve also brought along some examples for analyzing said Zones.
To those of you who already know this, kudos. But I challenge you to consider whether you’re really using it, or just buzzing along in digital bliss and fixing things later. Excuse my bluntness, but this is happening to the best of us. We need to get back to basics and visualize, control tone, dynamic range, image quality and presentation
The Zone System was a complete approach that included everything from the initial exposure to the final print. Now we don’t use darkrooms much these days, so I’ll focus on the pivot point of the Zone System: the Zones themselves. That said, I would encourage you to study the whole process even if you don’t use film. It will help you gain a better understanding of photographics. Not only that, but old books like Fred Picker’s Zone VI workshop deal with it quickly and effectively and can often be had for mere pennies.
1. The Zone Scale.
The Zone Scale lies at the core of the Zone System. It consists of eleven squares that span from clipped black (Zone 0) to clipped white (Zone X). Each square represents a change of one stop. The first part of using Zones starts before you release the shutter. Truly visualizing your image is like nothing else. Once you master it, you see the image you plan to make (including your edits and refinements) in your mind before you ever take the photo. It changes how you photograph and how refined the resulting images become.
Brilliantly simple, the Zone scale allows us to visualize all our light from complete black to complete white in clear one stop increments.
To begin with look at the Zone scale. Now look at your scene. Now back to me 😉 What’s outside your window right now? Visualize what Zones the things around you fall within. Then imagine you’re taking a photo. Imagine where the Zones “would” fall if the image came out exactly as you wanted. It does not have to be what you “see” but what you “visualize” for the finished image. How do YOU want to make it?
Think about how Zone levels on various objects in this scene would complement your primary subject as well as your supporting cast of elements. Sometimes it helps to begin by visualizing a scene in black and white even if your final image is going to be color. Thinking in terms of tones can be helpful, especially early in the process.
All nine detail Zones photographed with digital. Metering was based on the brightest area here, but we could have metered meter any element and uses the system to place that element in any of the time values but simply moving exposure up or down (click for larger view).
Simplicity is key to a great photograph. It turns even complex scenes into stunning beauty by controlling elements, light, and tone.
It’s not about how much is in a photograph. It’s about how we showcase our subject in relation to that supporting cast of elements. Now I’m not suggesting the images I show are “perfect.” It’s rare that I get everything dead on, and I can always find something I should have done better. But truly understanding and mastering these elements WILL raise the bar on our images and allow us to see in a new way.
1. Visualize.
Everyone says they’re doing it, but few actually are. You should truly “see” the scene in your mind’s eye; not what’s in the viewfinder but the finished image after the exposure, even after editing. You should see the image you want after the process is finished. It’s fairly simple, but in the rush we often fail to slow down and think carefully about the lines, elements, and tones in our scene. That’s one reason why I love working with a tripod. It takes my focus away from holding a camera and puts it on the scene in front of me.
Ansel Adams said, “The whole key lies very specifically in seeing it in the mind’s eye which we call visualization.”
Sunsets Hidden Falls, Yosemite 2010, Gavin Seim - I used a layer based HDR process on this, processing my light and dark frames as silver and layer blending in Photoshop. I spent a good deal of time on the composition and tonal control to try and keep the scene simple while still showing all the elements. You can see the stone faces on Zones 6-7, with the foreground elements falling drastically all the way down to Zone 1, keeping them as supporting cast from becoming too distracting.
2. The Light & The Zones.
Expose for what you want in your image, not what the camera sees. This goes right along with visualization, and the Zone scale is the best way I know of, both to visualize and to control values. It allows us to see in our mind’s eye the Zones in a scene and place them where we want, using exposure, and finally tonal edits. For more on detailed tonal value control, see the counter article to this one, 3 Critical Elements of Controlling Tonal Values.
The Zone scale from 1-10. Middle grey is Zone V (5). This shows the darkest dark to the lightest light and is invaluable for simple visualizing and exposing a scene. Each step represents a stop, making it easy to move your exposure up or down and place an element in a given zone.
by Gavin Seim. So I’ve planned another road trip, along with Spring workshops. I’m hitting the road early April with my little family and heading to SF area for two workshops in Oakland. I’m stoked. We plan to spend about a month on the road in the RV. After the workshops, we may head up towards the Grand Canyon as I hunt for stock and landscape images, then who knows. Here’s the workshop lineup. I hope you’ll help me spread the word and I hope to see you there.
April 16-17 is my Lights and Shadows workshop. This is a fresh 2 day event that covers HDR and beyond. It’s an intimate workshop limited to about 20 people. We’ll be doing work in the field and editing back at the home base. More info here. There’s also a Facebook event page.
On April 18th is the Lightroom Power workshop. This has something for everyone. We’ll cover basics, but also get deep into power user stuff. It’s another fun hands on workshop, so bring your laptops with LR and prepare to think differently about your editing. More info here, and the Facebook event page here.
I’m also working on setting up something for Fresno. Still working on the details of that, but stay tuned to this post or the Seim Effects FB page for details. I’ll also update the workshop pages if a new location is added. Hope to see some of you there… Gav
Welcome to my living room. We’re back home and while I still have more from our trip coming, I decided to take a short sidetrack. This image is quite different from the serene landscapes I generally do. It was really an experiment of light and shadow. It’s late Saturday night. We went to a local square dance earlier and someone gave Cyrus a couple of those stringy glow sticks. A few hours later, home and family asleep, the sticks are still glowing. I pick them up and start playing, soon considering how I could paint with their light.
The end result after quite a bit of work is this self portrait taken in a darkened room. I’ll confess that I was a tad creeped out as I made this image, childrens toys around the dark room, something happening in the space behind and empty floor occupied by a faceless fire winged man. It may not be creepy in the light of day, but I had fun making it.