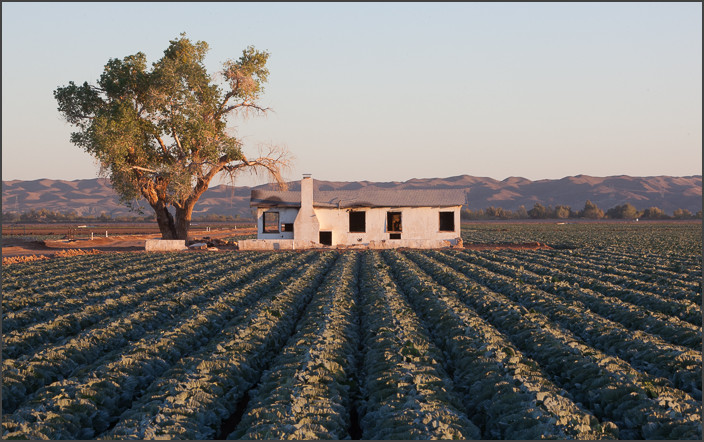
Lets talk quality. Great editing starts in the camera as you visualize and plan the image. The better you start, the more effective post production will become. This is something we discuss extensively in EXposed and in PHOTOGRAPHICS video workshops.
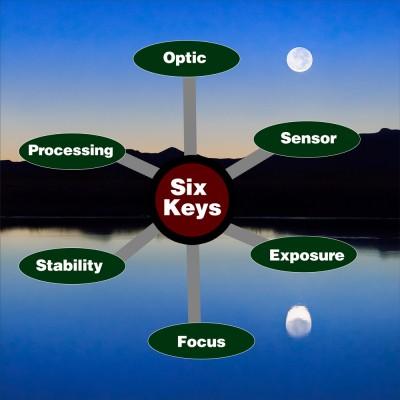
Now years back I discovered astounding quality of large format film and dug deep into better image quality with digital. I wanted to know what it was capable of and how to raise the bar. Next I wanted to lay it out in simple terms. I thought of inventing a cool acronym, but decided to get to the point and lay out Six Simple Keys to Image Quality. Whether you make portraits, pictorials or billboards, these principles are the same.
Now I’m talking serious quality stuff for those who are willing to work to make their images as good as they can be. A Facebook post or a tiny 5×7 print can get away with a lot. It’s small and the viewers expectations are usually low. But understanding the Keys will help you understand what quality means to you, to a wall print, to an art gallery, or to that submission to an agency. The Keys are given in the order they effect our images and every one is critical.
1. Optic:
It starts here and there’s no way out of this. If your lens is bad, your image quality is too. A $200 zoom is not giving you the same quality as a $2000 L series pro lens. The difference between cheap glass and great glass is huge. If you want great image quality need great glass. Are there variables? Sure. For example a Canon 50mm 1.4 lens is not that expensive (around $400 usd), but it’s known for quality. Some primes however are even more expensive than zooms and worth every penny. Do your homework and get the best bang for the buck, but don’t expect get off cheap when it comes to quality. For further study see my article on resolution.

2. Sensor:
What your sensor or film can do and how far you push it will effect your image. If you push a sensor to it’s max capabilities you’ll get lower image quality. It’s that simple. That’s not to say you never push it. Just know the consequences, know what your sensor can do. At what ISO does it fall apart? Does it get artifacts during long exposures?. How good is it’s pixels? If you have a 15 mp sensor on a phone and a 15mp sensor on an SLR, there’s no comparing them. The larger sensor will retain quality better. It’s pixels are less crowded and higher quality. Like glass, quality is what counts. But no matter what sensor you have, remember everything will have a consequence. Know the limits.

3. Exposure:
A perfectly lit scene will always give you better images because you’ll have to do less to compensate later. This is why I teach exposure and Zones so heavily *(You can watch a primer video on them on the EXposed Workshop page). Lets say you underexpose a portrait, or don’t wait for the right light in your scene. Sure you can compensate in post production, but at a cost. The more you have to recover in post, the more you lose in quality. For example, a perfectly exposed photo may have great blacks. A photo underexposed by one stop and fixed in post may be good image, but it will usually have more noise and artifacts. When you find the right light and then expose perfectly, there’s something about the light and the quality that you can’t get any other way.
4. Focus:
If you’re out of focus, you’re out of luck. Oh you can use filters or plugins and tricks to enhance a messed up photo. That’s good stuff to know, but it’s a fallback. Focusing your lens properly and having enough depth of field is critical. An autofocus is great, but I’ve missed some killer images because the AF got lost. I use AF when I need speed, but I manual focus whenever I can. When I have time I’ll lock down and set my composition. Then I’ll zoom the live view to 10X and make sure my focus and depth is really spot on. It pays in spades and helps be plan my images better to boot since I’m slowing down.
5. Stability:
Photographers love making excuses, but the truth is a tripod or mount matters. If you want the best quality you’ll generally use one. I understand it’s not always practical, but I do action and static work and there’s few situations I can’t make it work. Weigh the consequences, because not using supports WILL cost you something. Maybe you can use a monopod in a more active situation instead of a tripod, maybe it’s a hand rail, or even the ground. But look at your options and get the best stability you can. Using a tripod also gives us something else, but more on this below.
6. Processing:
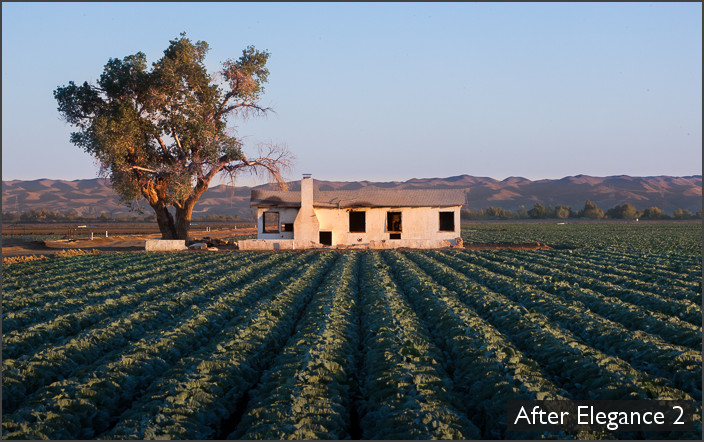
Did you notice that every other key was in camera. Processing is a big one, but it relies on the ones that came before. If great editing can make poor photo good and good photo great. Then it can make great photo truly incredible. Get it right in camera, then get it right in post. I can’t explain in a paragraph how to process perfectly, but if you want more check out the Retouching Magic Workshop. In brief, don’t overdo it. Don’t simply bump sliders because you can. Use tools that are quality (use make lots of them here). Don’t blow the highlights because someone said it’s a style. Consider what your main subject is (if you don’t have one start over). Consider how using editing, burning, dodging, color etc you can draw the viewers attention to your subject in an often subconscious, but powerful way. A great photo is not made by the editing. It is made first. Then refined.
 We were making presets here before selling presets was even hip. No one makes them like we do because we don’t just make presets, we’re passionate about quality and that’s why all our effects are