Should you use Capture One or Lightroom for your black and white edits? PLUS where does Photoshop for black and white fit in?
We’re going to test that in today’s video with direct comparisons. Taking the sale filed and editing them in each to see what gives us the best black and white in the least time. I’ll give you tips for all of them along the way.
Also, see my Lightroom vs Capture on 2022 video here for a general overview of these two great apps. For now, let’s watch today’s video and do some black and white tests.
Since I started digital photography 20 years I’ve seen just about every technique for Black and White in digital Some needless complex. some are just ugly. Simplifying that process led me to bypass plugins and create tools Like Silver 4 presets and Blackroom BW Actions.
Pure Capture One. While there are fewer BW sliders, you can make up for it with the more advanced color tools and get a stunning result.
Honestly we B&W lovers occasionally get a little snobby, so this question can be complex. But since we no longer have the chemicals we used to use in the darkroom the traditional color filters do not have the same effect. Today to take the same principle and make it work digital.
The best black and white conversions usually start for a color photo because with those color channels we can convert and extract the colors, much like we did with filters in the film days but with more detail. Darkroom like green filter, lighter reds, etc. If you bake black and white in camera, you lose all that power. That’s not to say your BW photos are wrong. Just that they are not as flexible.
So I usually convert on the raw file. In LR or C1. I use my SIlver 4 presets if Filmist. But whether you use creative presets to go further, or all manual. You don’t want to supply desaturate. Use those channels and the power of your RAW.
Watch today’s video above, because we’re looking at Lightroom VS Capture ON in a side-by-side level. Does one give you a better black and white conversion than the other and what are the advantages between Lightroom and C1.
After that, you can go deeper into your black and white edits..
If I’m going to edit my best work. I go beyond RAW. I’ll restore the color channels before going into Photoshop, leaving my other edits in place. Then I can go deeper with my black and white edits. But they are also more complex in Photoshop.
Sometimes it’s not even clear how you can make a better black and white in Photoshop. I use Blackroom to convert to a more complex BW because it always helps me find a way to improve the edit without stumbling around. That’s what it was built for.
Lightroom is a little more user-friendly compares to Capture One. But with Styles or presets, you can get your look fast in both.
In conclusion. Which is best? LR, C1 or PS
When it comes to Lightroom VS Capture One for black and white. I think Lightroom has the edge for ease of use and results that just work. Capture One with its other available tools can perhaps give you more options but with more work. Both are going to work great if you save presets or styles or Have a pack like Silver 4 or Filmsist on hand.
In the end, both are good and the results will be good.
But comparing both to Photoshop. Photoshop offers more options, but with a lot more time spent. Even if you use Photoshop actions to vastly speed up these more advanced edits, Photoshop should probably not be where you start.
Edit normally in Lightroom or in Capture one or another RAW-type editor. Then take the very best images you want to showcase to Photoshop to give them that edge that makes them win.
Lastly, plugins for black and white are heavily hyped. I used them when I all this starting out but native tools have improved a LOT since those days. As I mentioned in the video, a plugin adds another step and takes away control.
Yes, using presets and styles and actions help a lot because they make hard tasks fast. But they use the native app tools in Lightroom, Capture One, and Photoshop. So instead of a new file or a flat image. You just highly refined sliders, adjustable layers, and a totally transparent process. To be that’s a huger win.
Let me know if the comments what you think is the best black and white tool.
Gavin Seim
The detail in Photoshop is almost impossible to beat. Layers and details equal more refinement. So I still take by best photos here in the end after using a RAW style editor.Don’t be afraid to edit your black and white a little more. Whatever app you use. In the end, it’s all about shadow and contrast.
The best lens, Your best lens! What you should take on the plane? What should you buy next?
The twist here is I’m not here today to tell you the best lens model. We’re going deeper. The real answer to the best lens may not not your sharpest or most expensive lens. It’s the lens baht inspires YOU today! But in today’s video, we’re going to make some practical comparisons.
Here’s what they don’t tell you in lens reviews.
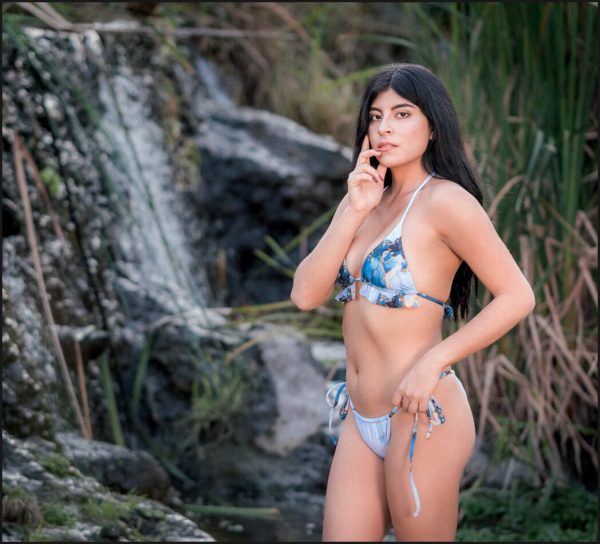
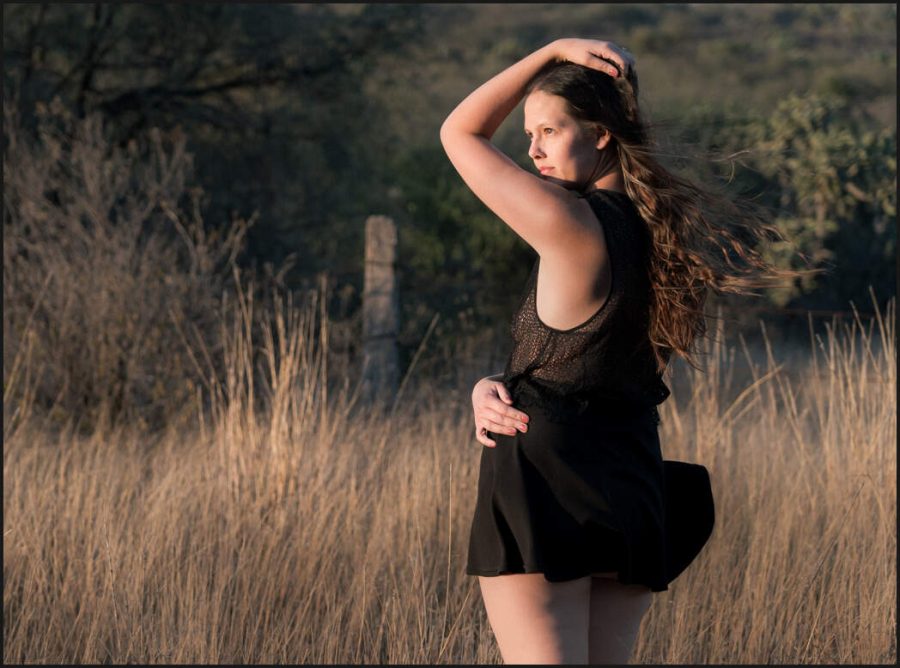
50mm on a Fuji crop sensor (85 eqiv) is a great people lens. A bit of PW7 presets and Speed Masks from elegance made an easy edit.
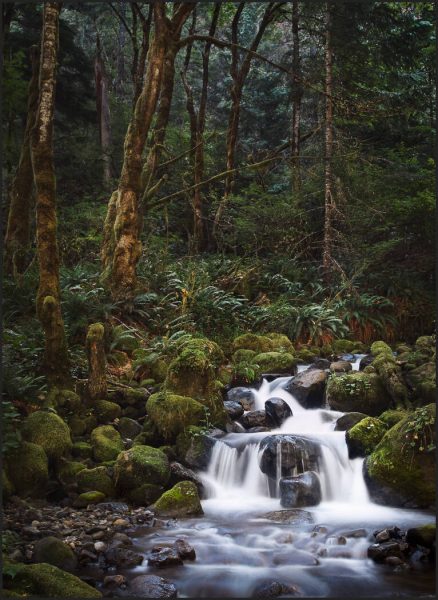
Maybe I’m out shooting landscapes on a razor-sharp 24mm like my Canon Tse V2. I see the frame, I know I can come back and get the look I need with a few tweaks from Natural HDR (free preset – styles pack here) and Alchemist to make it sing.
But what lens? The prime, the zoom. Wide or slow? Watch my video comparing foacl lengths and then we’ll come back. While I’m using Fuji primes here for focal length, this will apply to any lens you use.
I admit despite Zooms seeming more practical, I usually feel more in control and inspired with primes. But then sometimes you need to travel light, maybe you’re doing a shoot where you need video and fast changes.
Here are my personal favorite focal lengths (35mm equivalent) after over 20 years. Yours may be different of course.
Landscape and cityscape – 24mm
Street and lifestyle – 35mm
Weddings general use – 50mm
Portraits and fashion 80mm and 135mm
The 35mm is a great all-around lens and this process with SIlver 4 and Blackroom made this one shine.
It’s good to have a main AF lens kit that includes zooms or primes so you’re covered. But then try new things. An old 28mm vintage that cost 20 times less might give me the look I want over a $3000 landscape prime. My Fuji 90mm f2 (135 eqiv) is one of my favorite portrait lenses ever. But some days I will scrap it for an old Russian Helos 1-5 or a Classic Fujinon 50mm 1.4 that I bought off eBay for $50.
I have a lot of lenses. The same 4 or 5 are usually on my camera. But it’s often not my fanciest glass. I love small F2 primes on my Fuji Cameras for example because they are cheap, and optically sound and the way they handle makes me feel inspired to shoot. Solid metal, manual aperture rings etc. yes these things are subjective. But those details and how they affect our creativity can change a lot.
Wide angle or Telephoto lenses? It’s about compression and atmosphere.
Even if you bring a zoom like a classic 70-200. Maybe you pairthat with a 35-70 so you have nearly the huge range in two lenses for taking on a trip. Deciding focal length does matter and I made this video looking at a wide range of prime focal lengths for that reason. In it I compare the feel of a Fuji 16mm f2 vs a Fuji 23mm vs a Fuji 35mm f3 vs a Fuji 50mm f2 anda Fuji 90mm f2. But it does not matter if you’re not a Fuji user. This is not a sharpness test it’s about the aesthetic you get from each focal link on any brand.
It’s more than sharpness and focal length. This 58mm Helios (about 100m Equiv) is cheap and old. But the swirly bokeh and softness make a perfect portrait. All I had to do was finish with Porta 400 from Filmist
As photographers, it’s important to know that a wide lens is not just more view and a close lens is not just a short view, regardless of it;’s aperture. The way longer and shorter lenses compress your scene changing everything and you’ll see that in the video.
See what I mean. Even with the same light and aperture. It’s not the same. So deciding, wide, mod or tele is important. Just like deciding whether you want a sterile razor sharp lens or a vintage glass with a swirly bokeh like a Helios 2!
In the end, your best lens is what inspired you to be the most creative. I know if I shoot a razor-sharp lens UI can use actions like Blackroom or Lumst and create more atmosphere much as we did in the darkroom. I know if I use a softer vintage lens I’m more locked in it, but after my final edit, I can get a look that’s totally unique.
You will know your best lens when you start shooting with it. Fast glass is good, but worry less about that and more about the soul of the photos you create.
If I had to choose only one creative lens, it would probably be a 50mm as it’s so vertaile. If I had to choose one all-around travel lens, I would probably take a 24-70 or 35-70 Zoom. But I would miss my prime glass. In the end, pick the lesn that will inspire you to be creative Today!
Tell me in the comments what you think is your best lens!
The 85mm equivalent shines again allows easy separation and compression of the subject from the background without being unwieldy – FIlmist presets in LR.
Develop your photography style! You can have the best camera, presets, and software. But this will make it happen faster!
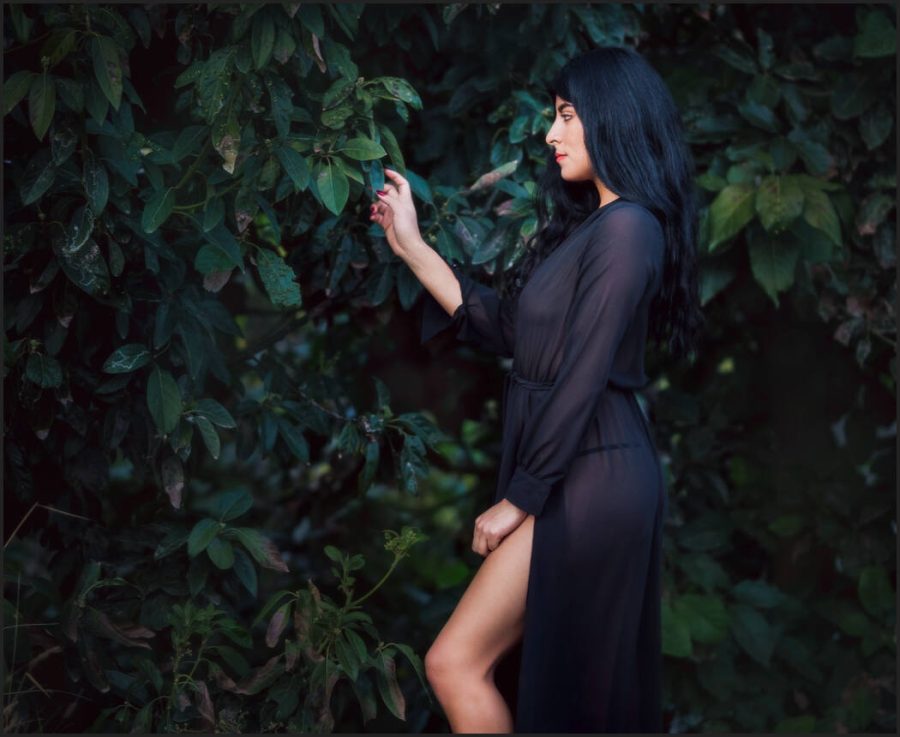
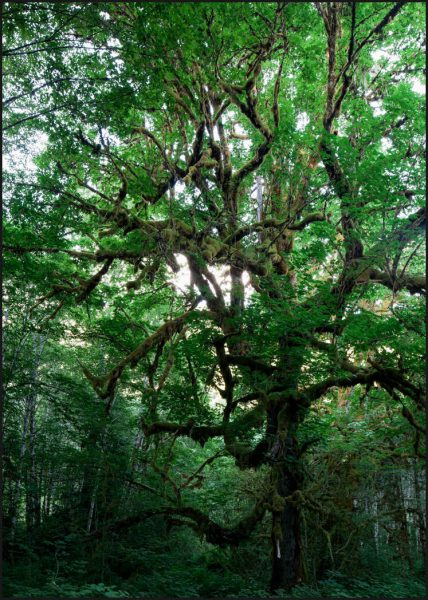
Deep shadows and low greens. When creating a look focus on the colors you want and reduce the rest.
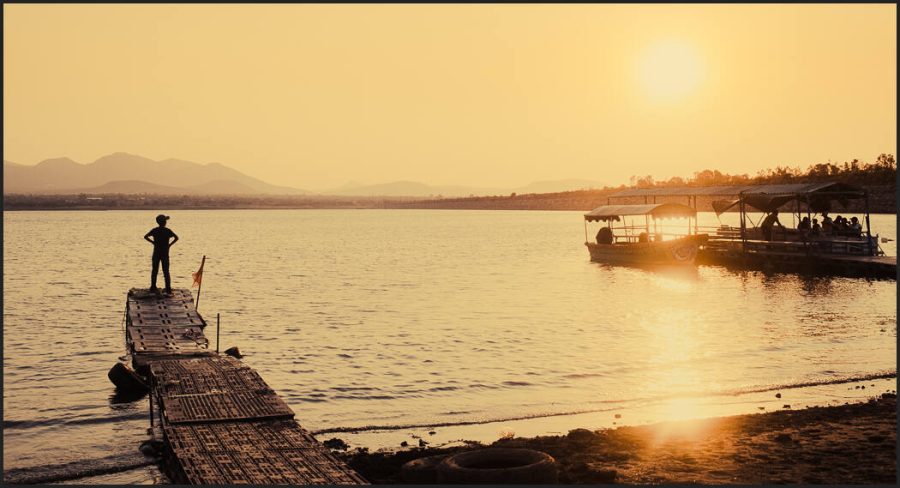
You just got home from a night of shooting the streets. Maybe a wedding? You’re dead exhausted!
You dump your card, you’re staring at photos on the screen that seem decidedly less amazing than what you saw on the back of the camera.
Even after 20 years I still feel this way, sometimes. But I have a system to edit simply, and find the style in every shoot!
Your own style starts in the camera, but what then? Users of my tools are often asking what they should use for their style. I’ll answer that. But today’s story goes way deeper.
For over a decade I’ve been hunting to create my style and make it stand out. I’ve stressed about it more than I should and I’ve learned things that you should know.
A style is something developed over a lifetime. Overwhelming right? But less so when you realize that each session or project has its own style and those build up for a refined personal style of your own. You already have building blocks, so let’s go.
1 – The shot matters. The edit also matters…
First, there’s no such thing as a non-edited or “natural photo”. So stop worrying about it. Next, if you shoot JPEG, you’re picking an in-camera preset, and your camera is just deciding for you and throwing away the rest.
Getting it right in the camera like we learned in Exposed is important. Your composition and perspective like we studied in Photo Perfect. But what comes after makes sit all work as one.
I don’t mean fake it. Don’t make a composite landscape from cloud brushes and drop a moon in, then pretend it’s a real scene. The first part of developing a great style is honesty.
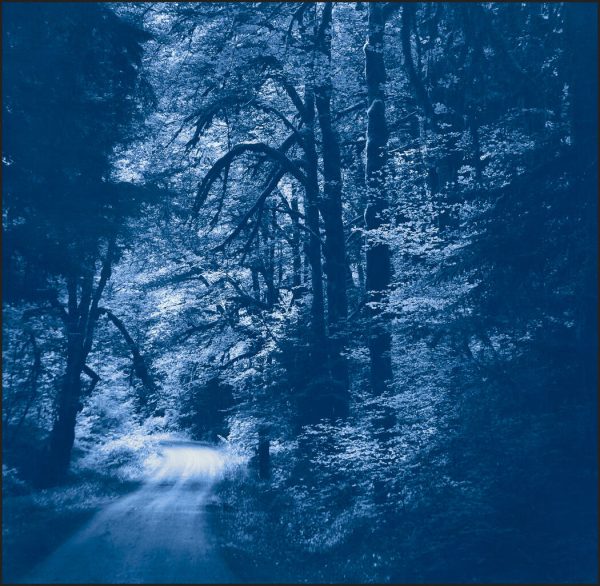
Each project can have its style and those combine into YOUR style. I said, yes, this works as a dark blue Cyanotype! That led me straight to Emusion 3 actions to make it happen. I knew I had the tool and that it would work.
I remember making presets and actions back the first version and Lightroom. I eventually expanded into LUTS for video and photo, as well as Capture One presets. Sure I was trying top p[ay the bills. But what I wanted was to make the process of editing faster and while putting the creator in control.
And what format, Raw vs JPEG (watch this video) Should my edits just be from a preset? Should I use masks or should I go to Photoshop and use actions and layers?
Today I’m going to share editing tips. But this is more about creating a process that will make your styles of photography more defined, more YOU! Also in each photo I’ll share my thoughts about why I did it the way I did!
If you apply this, your process and style will take a leap forward!
Now, Last week I made this video about how to commit and more decisive in your edits (I’ll add it below). Today I’ll give you the formula I use to decide what kind of edit I need.
If you know me from the pro Photo Show days, you know I was always hunting for ways to make the process better. I was the one at midnight staring at a screen with 1500 photos from my latest wedding and saying. Now what I asked? It was often hard to be excited.
What you need is a process to decide what kind of edit you need and what is best for each step. Yes, I will reference my own preset styles and actions of course – But if you have your other favorites you can apply that same formula. Confidence starts to bloom!
I edited this focusing on the colors I wanted and reducing greens and anything that would distract. Starting in FIlmist, I then when to Photoshop and used Alchemist actions and some manual touch-ups because I knew it was one of my best from the set.
Having tools / presets/ creative guides etc is NOT about giving yourself the style of those software creators. It’s about having a tool that’s lets YOU be confident in your work so your own style gets stronger.
2 – The key thing is to make a simple framework.
Having this in your mind as a guide for how you edit doe snot lock you in. It lets you focus on creativity because you will be more confident in your base process. Here’s how I do it…
My entire group of images from today’s work. Edit in batches and filter to bests photos.
Subsets . Bride and groom toast set – My client posing in the brick ruins set. – Girl on street playing in a puddle set
The very best. This is the top 1%. The ones I will print, will go on my page or enter in competition.\
Now, here’s how I handle each phase in this 1,2,3 process.
1: Lots of photos from an entire shoot or project. The entire shoot needs to look good. First start with a preset or style or whatever your app uses. You will get a faster edit and you see more this way. I add a simple preset for batches. I like a Super batch from PowerFlow or a versatile film look like Fuji 400H preset from FIlmist. Combine with a fast grid edit for exposure and now everything looks consistent. For a video overview of this fast edit process, see my video edit 100 photos in 60 seconds.
Committing to shadows and a little blue tone from the Power Workflow creative presets lets the subject pop.
2. Separate Best sets from a shoot.
After the basic edit. I take my 5 star photos. Next, because I did step one, everything is edited and ready to show. For example, if I shot a wedding, I can safely show the client these edits and be confident. But now I can confidently take the top 10% or so. In these I’ll get to add more specific looks. I’ll use things like Portra from FIlmist or looks from Belladonna.
Let’s say I have a poster goup, or 5 from sunset on the street look great in Black and White. I start applying looks from Silver 4. In phase 2 I might edit the sliders manually after the preset, then copy and paste to all the photos in that group. If it’s sunset portraits or landscapes or dynamic night scenes. I will go to Natural HDR to really bring out every ounce of light. I might also find a good Speed Mask from Elegance 4 to enhance the subject or background.
Next I paste everything from my favorite edit in the set. That key here. If I have a group of 5 similarly themed images, I will usually process them the same as constancy shows confidence and prevents distraction. At this stage, my entire session looks amazing.
3. Signature layer edits to finish up.
Next, refine your best photos. Because you were efficient in editing the groups using presets and batch edits, you have time left over. The ones for print, for sharing, for artwork. I usually won’t leave those at only a preset masks and slider sliders. These are the best photos that define our style.
It’s about going all in more than any tool or software. When I saw a gold Chrome Process worked here, I committed. bold processes can really skyrocket your style confidence. DOn’t share both, take the one your gut says is good and run with it. Then let time show if you had it right.
In these best images, I will go beyond. Take my time manually adjusting Lightroom or Capture One/ I micro-adjust sliders and add masks after a Lightroom presets or Styles in C1. I do things specific to THAT best photo. I will then open in Photoshop or another pixel editor. This is where I’ll use Lumist to manage my light in detail. I’ll use Alchemist for the atmosphere or Blackroom and Emulsion 3 for more artisan black and white.
3 – The more confidence you have in your edit, the more your styles will come out in the camera and visa-versa.
Finally. It’s easy to think these fine details don’t matter because we can do so much in Lightroom. But what you can do with actions using layers in 1 minute will surpass any level of editing in Lightroom. And it gives you the same as hours of manual Photoshop layering and refinement.
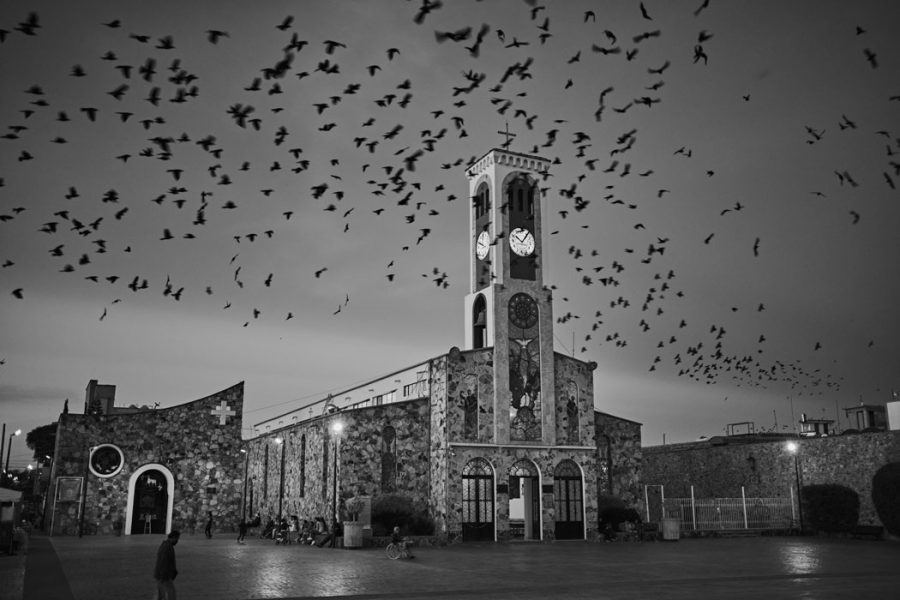
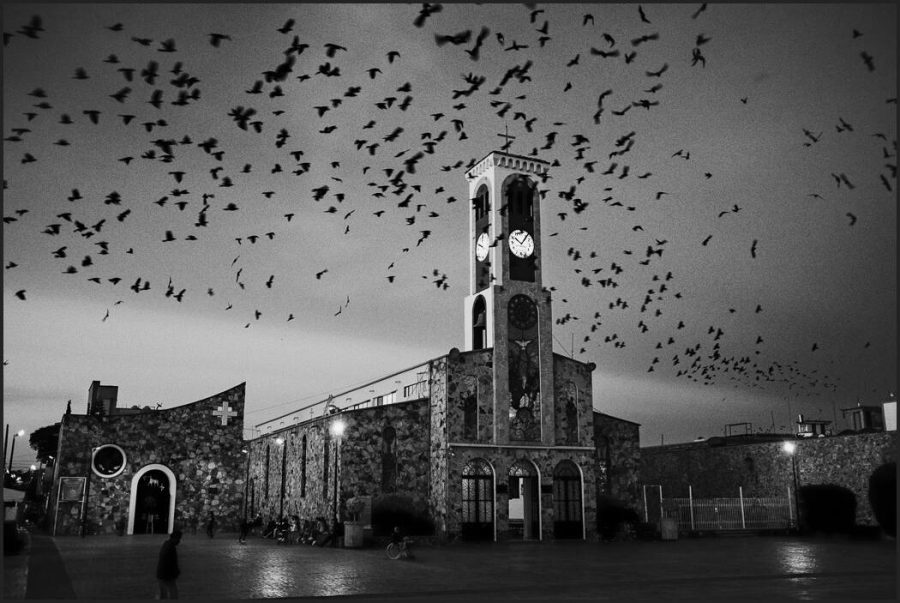
My photo in Centro of the birds and the church looked good. But I knew it was a winner so I took the time to go to Photoshop, use Lumist and Blackroom and layers, and really refine it more for this final shot.
Also using the right tool for the Right job is gives you results faster and better and equally as important. If gives you consistency. Like I showed in last week’s video, deciding what you want and going for it makes your photos better unlike any other technique.
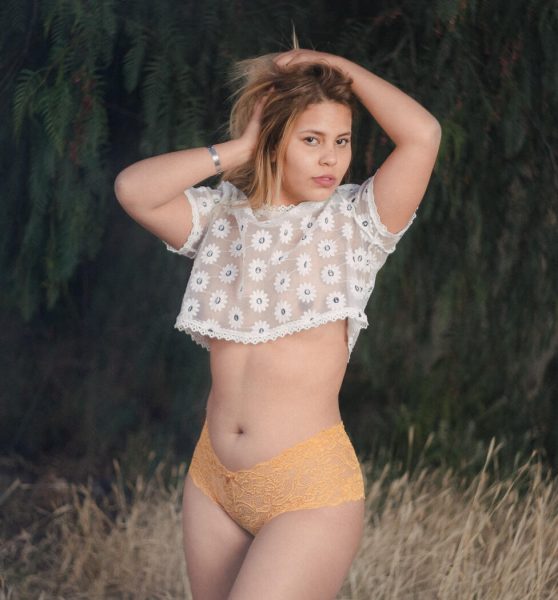
I embraced shadows in this Boudoir photo. Edited with SIlver and letting the entire thing stat low keep gives a moody look that works. If I go to print I’ll take it a little further in Photoshop.
Without fail the people telling you real photographers don’t need presets, plugins, actions etc are the ones who actually have no style and confidence of their own. Their edits are all ove the place because they have not learned to find the tools that help them work better and carve their own style.
Try new things every time.
Maybe you’re one of those people that makes their own tools and that’s fine, but the main thing is that your tools are ready in your kit every time. If you do use my tools I hope this guide also helped you get an idea of how each can be used to optimize your creativity.
Adobe all. Keep creating! Visualize what you want in the camera and then try and edit for that. If it does not work try something different. That’s the beauty of having a good system of Lightroproom Presets, Capture One Styles, Actions, and ofter software tools in place, You can adapt on the go and the more you try things and the COMMIT to one edit, the better your process will get and the more you will see your own personal style revealed.
Gavin Seim
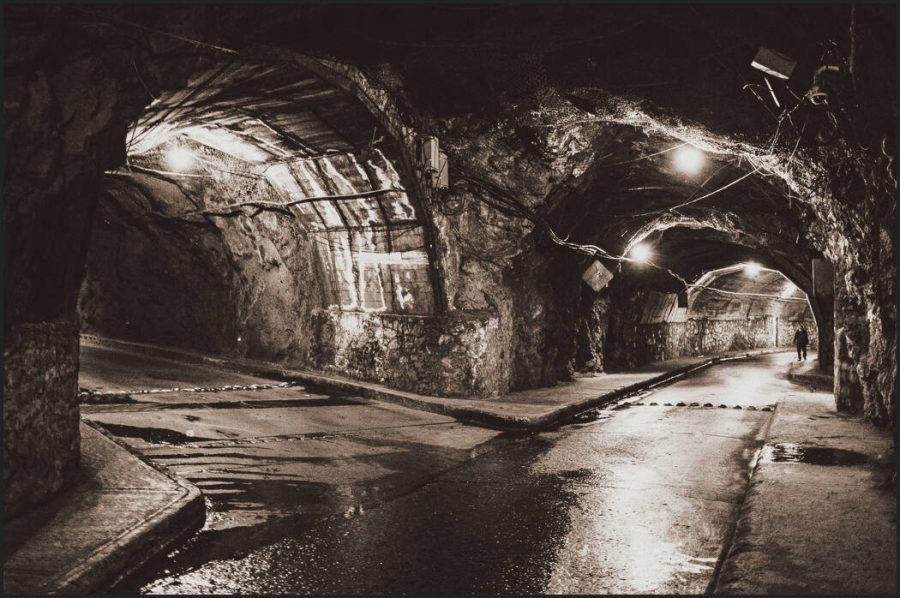
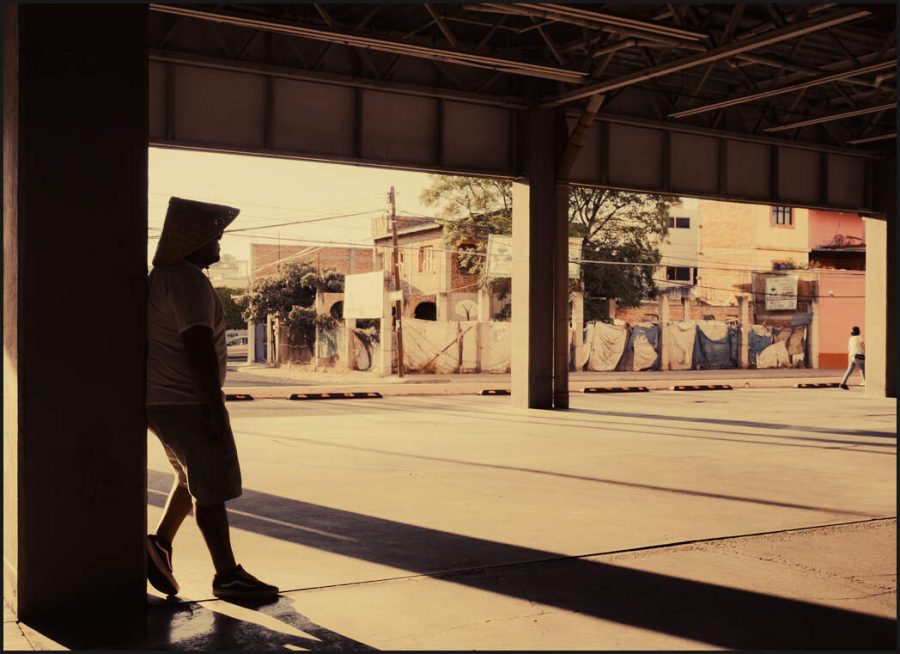
There’s always going to be more than one direction you can take. Pick one and stick with it and you will see your photographer transform. – The Guanajuato tunnels in Mexico, platinum process from Emulsion 3.
Presets, photo editing software, and gear. We have the tools in 2022. But I want to change how you think about your photos.
I’ve been a photographer for over 20 years. I watched digital be born and the entire industry change. I’ve run the gamut in everything from street and wedding photography to fashion photography of Models in Mexico and fashion photography.
I saw photography go from a technical creative art to something mostly driven by internet marketers and “Ai” tools. But I always see the same mistakes that make photos ordinary no matter how good the software gets.
I don’t need to second guess. People either like my photon or not. A clean Natural HDR 4 process made it look good and that’s a wrap.
Sometimes digital is so easy, that we lose an opportunity. Trends come and go, but in the end, photography will always be about emotion, inspiration, and creativity. If you learn to discover shadows and souls with confidence, your photography will always get better regardless of the tools you use.
Confidence is not always easy. I’ve learned a lot as a street photographer. You can have all the software. You have the best camera, and download the best Lightroom presets (yes I have those for you) But what you need is to see as no one else sees. That’s what I want to show you today.
You’ll find the presets I use here on the site – They do matter because they make completing your vision easier. You can get my free lightroom presets and film styles like Filmist and Natural HDR.
Most photographers edit wrong, but not for the reasons they think!
In this video, we’re going head to head with the mistake that nearly every photographer has made, and may are doing every day. If you can get past this, it changes more than just how you edit. It’s going to change your photography mentality.
As I showed in the video. The perfect capture and the perfect edit are a myth. That’s what makes photography so amazing. There’s always something we can improve that will affect the emotion of your photo, or the lack of it.
Knowing how to edit, starts with knowing what you want. Presets and styles are invaluable because they help me find my look without wasting brain cells.
Black and white, color, contrasty, soft. Deciding does not have to be hard. here I used Filmist and Elegance 4 to give more depth and that’s it. You can get my free lightroom presets and film styles on the FIlmist page.
I usually start with Filmist because it works so well. But there’s something more important than what you edit with! That’s knowing what you want to create with your edit. An actual vision.
Ansel Adams taught this way back with visualization techniques and using Zones in our exposures. Something we studied at length in my Exposed Master Class and in Photo Perfect.
IN the end making the craft of your photography second nature, finding your confidence, even if you know it won’t be perfect. That is what will transform your photography. The tools you use just, are just things to help you get there.
I’ll explain it all in detail in the video. You can also watch it directly on my photography channel here
Enjoy and we’ll see you next time – Gavin Seim
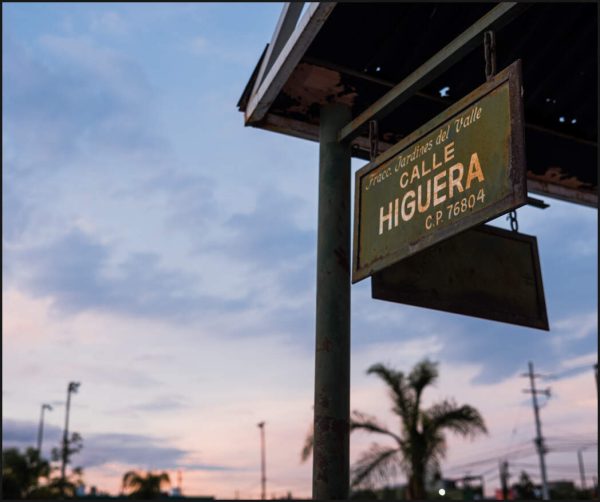
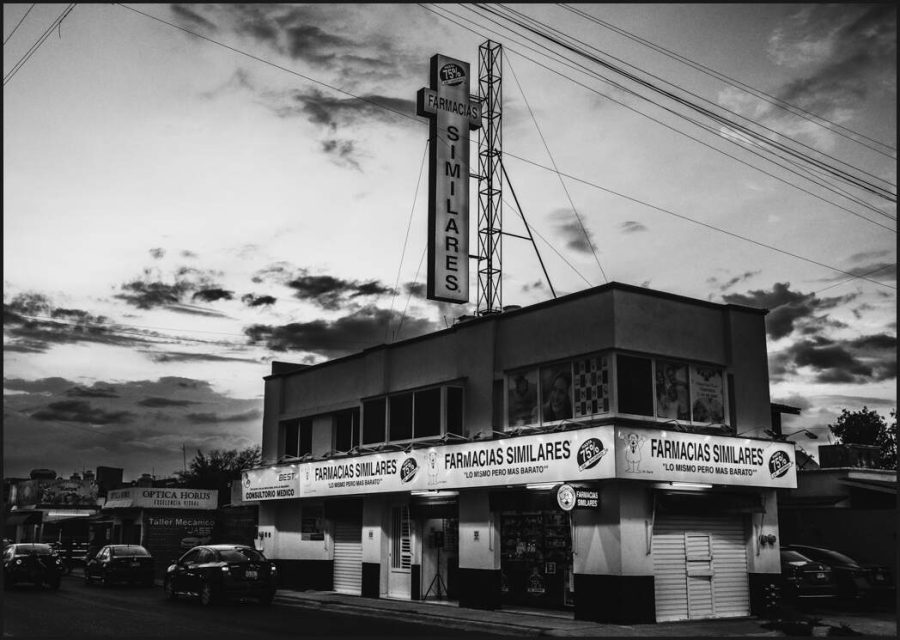
I like capturing things people don’t even think about like the corner drug store because in 20 years everything will change and then simple photos like this will matter. But here it was easy, this was all about shadows and sunset. Using Silver 4 and Blackroom was a no-brainer.The full gold chrome look that I talked about in this blog post. Decide your look hand and commit to it. It will change your perfective on every image you publish.
I made a blog post the other day where I showed you the new Filmist 1.7. It has better Portra presets and my new Fuji Classic Chrome preset for Lightroom and as a Capture One Style and a video LUT.
Classic Chrome is a Kodachrome-inspired simulation popular in Fuji Cameras. I wanted a Classic Chrome Preset that worked on any camera.
Even if you don’t like the Classic Chrome look. You’ll find this video useful for your own editing as I’m going to share secrets about how to make more nuanced color edits that work across all kinds of photos and cameras.
Even if you don’t like the Classic Chrome look. You’ll find this video useful for your own editing as I’m going to share secrets about how to make more nuanced color edits that work across all kinds of photos and cameras.
NOTE: If you have my Filmist film presets pack, the latest Classic Chrome-like preset is included in. But in today’s video, I’ll show you the recipe so you can make your version if you prefer.
VIDEO: How to create a match of the look as a Classic Chrome preset.
Why use the preset over the Classic Chrome camera profile…
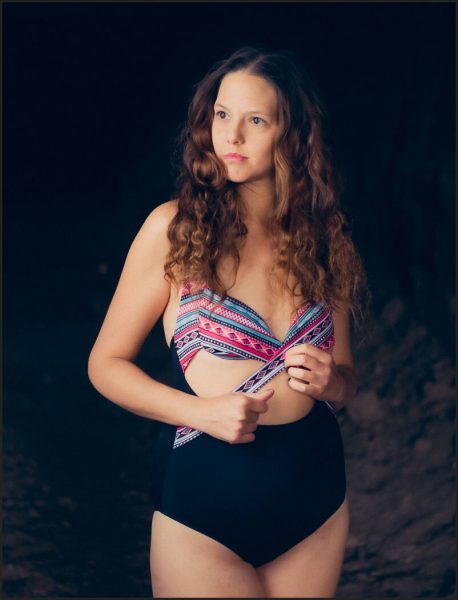
Balanced greens are still vibrant but not over the top. Bring that slide film feel even applied to a Canon RAW file like this one.
Simulations in-camera can be beautiful. But to get all the options you have, you have to bake them into a JPEG. This means throwing away information for a color recipe. Custom simulations can be made too, but they only work on the baked-in JPEG also.
The other option is to shoot RAW. Most cameras will then allow you to apply that look as a camera-specific profile. Fuji is one example of this. In Lightroom and Capture One you can select Classic Chrome to look as a profile and it will look very similar to it’s baked-in JPEG counterpart.
I wanted a Classic Chrome Preset that works on everything. I apply the Classic Chrome from FIlmist, I can do it on any file regardless of what camera it came from giving me a consistent look. And I can see every slider that’s been affected, adjusting it as needed.
Classic Chrome look in LIghtroom applied to a Sony RAW file. It produces those nice sift colors with rich tones inspired by Kodachrome
In Lightroom and in Capture One I can even adjust the intensity of the Classic Chrome preset. I can’t with a baked-in profile.
So In this video, I want to show you how the new Classic Chrome look stacks up with the Fuji version of this Kodoachrome-inspired look (hint it’s almost perfect). Then we’re going to rest in it non-Fuji file to get the Classic Chrom to look on Sony, Canon etc.
And in case you don’t have my Filmist pack and don’t want to buy it, I’m also going to spill the beans, showing you my settings and channels in case you want to make your own variation of Classic Chrome.
I hope this was helpful. Let me know in the comments if you have any questions. And subscribe to my YouTube channel for more videos like this.
Gavin Seim
While I can use camera-specific color profiles on Fuji files like this one from an XT3, I find it easier to just use the Classic Chrome preset or capture one and have the added control.