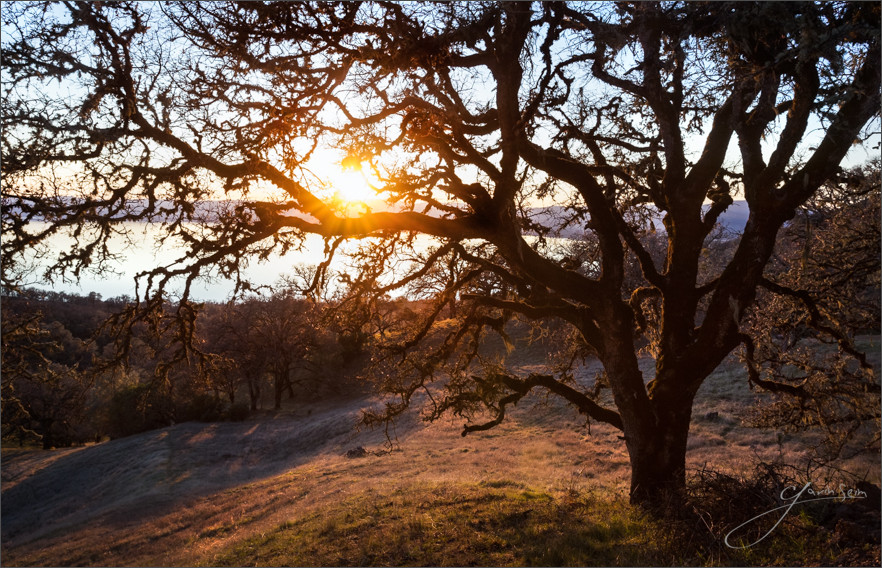
The Perfect Sunset, Above Clear lake CA, Winter 2013 by Gavin Seim
There is nothing quite like sunset in the forest above Clear Lake. Here lies small group of towns nestled around the water in the remote hills of California. There is nothing like it. Driving up into rolling high hills to camp, each sunset is a wounder of color and shadow, storybook trees and glowing foliage. Perhaps it’s partly the warn memories of camping here with my family combined with the fresh air and quiet atmosphere. Whatever it is, this place represents as perfect a sunset as I can imagine.
We’ve camped up here a few times and even did some scenes here for our new PHOTOGRAPHICS film. This beautiful view is actually just off the forest read leading up. Each night the sun falls behind the hills that circles the valley and fades into the magenta hues of rolling shadowy hills. I rarely shoot into the sun because it’s rare I find a situation that it really works in. But I timed this image just before sunset to maximize the glowing light and this is was it feels like to stand here and watch the sunset. It will make a beautiful print.
Release details: Prints Available. Order Open Edition originals above.. Master prints and Signature Limited Editions are listed below and can be ordered by contacting gallery.
Released prints….
55 inch Master Original on Canvas – Limited edition of, 1 (contact the gallery)
46 inch Signature Canvas – Limited Edition of, 50 (contact the gallery)
38 inch Signature Metal – Limited Edition of, 75 (contact the gallery)
by Gavin Seim: Hey folks. I’ve decided to share some archives and post all the recordings from my LIVE Lightroom Power workshops. These cover nearly every critical facet of Lightroom, in order, from start to finish. Last year I hosted this online series and it went well, so I figured you would enjoy them.
Bear in mind these were live shows, so there’s questions and small interruptions mixed in. If you want faster more structured lessons, check out my studio recorded, LR Ninja Series. It’s chapter divided by topic and polished like my other video collections – Either way, whether you use LR already or are just getting started, you’ll get something from these videos.
I’m adding all five videos below. Also direct links should you want to bookmark them to watch later. Each is about 1.5 hours long. Note, that these were recorded using LR3. But while a few features have changed, the significant tools and concepts behind using LR are the same.
This is a total freebie. If you like what you see please share check out the the homepage for my editing collections like Power Workflow 3 and my other workshops like EXposed, a new video series about light that is seriously like nothing else you’ve seen. Check out the trailer below and get the download it here or DVD here. But without further adieu, lets hop to Lightroom videos. Enjoy… Gav
[like]
Want more? Watch the trailer and see why Gavin’s EXposed workshop is getting such rave reviews.
[xyz-ihs snippet=”newsletter”]
The videos – 5 segments, approx 1.5hr each – Follow links to view in HD.
Please share this post – View Gavin’s art & projects on his homepage. And follow his art studies in the Light Letter.
Workshop #1 – Lightroom Essentials. Getting into basics, catalogs and managing images.
– What is Lightroom all about –
– Understanding the Catalog –
– Importing Your Images –
– The Basic Grid Edit –
Workshop #2 – Everyday Lightroom. Getting into folder, develop module, presets and more.
– Folders, collections and V copies –
– Develop Module Essentials
– Leveraging the power of presets –
– Image exporting & watermarks –
The Forest Pool - In this split, we see the base toneapped merge and the final edited burns, dodges and detail work side by side. Not all images are this extreme, but tone control used well will always give your image that finishing touch.
by: Gavin Seim. Tone mapping and image processing without tone control is like having a lens without focus. It’s nothing new. Good shadows & contrast make an image. Without them we often get what I call the Flickr HDR. And trust me, you don’t want that 😉
Leveraging tone to keep the subject the subject and the supporting cast, supporting, is critical. Good tone control is what separates the men from the boys in the world of imaging and we can’t talk about it too much. I think we sometimes get distracted with the latest techniques. But generally they’re not really that new. They’re just new ways of doing things people have done on film for decades. Take HDR. On film, every image you made was HDR if you managed your light and processing well.
So then HDR. It’s not a style and it’s not judged on how many images you use, or whether you tonemap in Photomatix or Nik. It’s simply the management of a high range of light. You can do that with film, layers, tonemapping, channel mixing, brushes or in the camera.
In this example of a three exposure tone mapped image, you can see how much work I had to do to reign in the tone values. A tonemapped merge shows this more than a single file would. It tends to push everything to mid tones. After which, those tones have to be managed. Either that or you have mid-tone chaos. This is one reason I often manage dynamic range manually with layers, rather than tonemapping, but both are fine as long as you have a plan.
What I’m getting at is that an image must have a subject. Just one. Everything else needs to support that and it doesn’t matter if you have a single RAW or a tonemappped HDR with loads of range. Tonal control helps the eye focus. Without that focus you’ll nearly always have an image failure.
I’ve studied tone for years now with the legendary Ken Whitmire and even more on my own. It’s taught me to see light. Not simply that there is light. But what it’s doing for me. I see a lot of potentially great images that fail without any tone control. It generally means no cohesive subject. No one is talking much about tone. But if you do it right, the viewers eye is lead right to the subject, every time, no matter how many elements are in the scene.
Using the Zone System really helps with this as it quickly teaches you to manage tones better and make things as good as they can be in camera. See this article. On the editing side often a burn & dodge, brushes, or layering of lighter and darker frames makes the diffence. The bottom line is that while there is no rule on how we control tone, it must be done if we want a focused image that draws the viewers eye and showcases our subject.
This is something I go into at great length in my Lights & Shadows workshop and my EXposed DVD. But the main thing is to keep working with it. Cameras, the latest software and the latest techniques are useful things to study. But tone control is timeless and is never superseded. Without it we can expect our images to fail or to be little more than snapshots. Every time.
Happy tones… Gavin Seim
King of the Valley - Valley of the gods Utah, Spring 2012. A gentle tone controlled single exposure. See more of Gavin's American Pictorials on f164.com
by Gavin Seim: Taking the time to watch the histogram is invaluable. Left is dark, right is light on a histogram. But beyond that you can better understand and work the highlight and shadow detail your way, before exporting to Photoshop, printing etc. And it’s not hard.
I recorded this video and hope to do more soon. In it we analyze what the histogram tells us about an image and how we can learn to better understand our images using it.
Starting with presets is a great way to get an image going, but don’t be afraid of those curves sliders to move things around. You can control tone and dynamic range beautifully on the RAW file without losing contrast. Just watch for artifacts or noise if you push things far (see the Six Keys).
Get comfortable with your histogram. It can tell you a lot, both in camera (trust your histogram more than what you see on the camera screen) and in post (just about everything you need to know). Powerful stuff indeed. Lets take a look…
Right cut. Original RAW file desaturated in LR. Left cut, same file with the Dynamic Silver III preset from Silver Shadows 2 applied in LR.
Just a few quick observations today. One reason I stay in a RAW as long as possible is that quality and dynamic tonal control is at it’s highest on an original RAW file. Once we leave that environment, we can certainly still work with tonal values, but we throw away some of that precious information.
On the right is a sharpened and desaturated original file from Sunset’s Hidden Falls. On the left, the same file with nothing more than applying Dynamic Silver III from my new Silver Shadows 2 toolkit. This effect pulls out dynamic range without flattening the shadow and contrast too much. It could also be done manually of course.
Once I have the dynamic range under control, then I’ll move on to external edits as needed. I don’t hesitate to go into Photoshop (though I try to stay in 16bit mode) for detail work. I did plenty of that on the final version of this). But getting my basic tonal range managed before I leave the RAW file behind gives me better results and helps me maintain that quality as high as possible for my wall prints. It’s a better wokflow and a better image.

 by
by 


