January 16, 2023

Curves are how most pros and quality presets control the detailed tones in a photo. But in today’s short video, I’ll show you a better way to use your curves. We’ve been using S Curve in photography since the dawn of digital. But this is the F Curve!

Why did I stop using the S Curve in my Photography?

Because after years of editing, and studying dynamic range. Creating popular editing packs like Natural HDR and Silver black and white. I realized the S curve was often overdriving on our edits.

So I started creating the F curve in my recipes. It gives contrast control, without giving you a crunchy, overly processed look. It does this because it’s based on chemical film processing and is more flexible.

In this video, I’ll show you how to use the F Curve!

If you want Lightroom presets or Capture One Styles you’ll find great examples of the F curve in the free sampler packs of Filmist Film presets and Silver 5 presets.

Also sub my channel for more videos like this one.

How to use the S curve in Photography today!

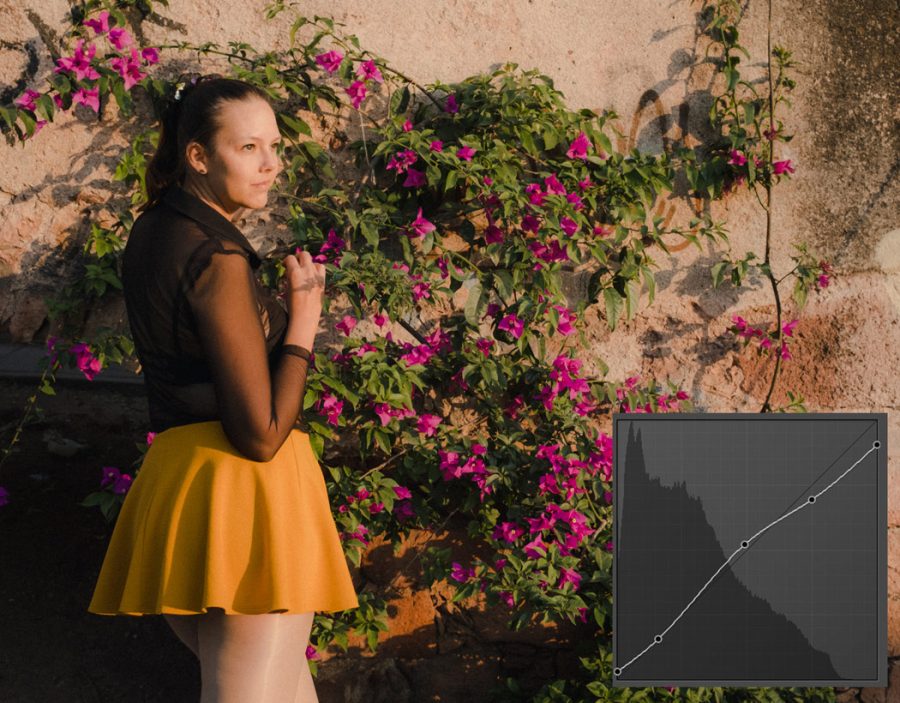
It’s easier to add fine control to an F curve because we’re not always looking for that S shape. A film-like curve is useful not only for recipes that require a film-like feel. It simply works on nearly everything.

It might feel like an S curve when you start. But don’t stop there. Pull down the highlights and then lift a little in the middle, pull the shadow area a bit down and the black a bit up. You can vatu this any way you want. Just keep the curve smooth and maintain that highlight drop as needed.

I didn’t have a name for this, I just knew this simple course was giving me results that felt better in most situations, and I started using it a lot. It was only after years of applying this that I realized how simple it was and started calling it the Filmic Curve, or the “F” curve.

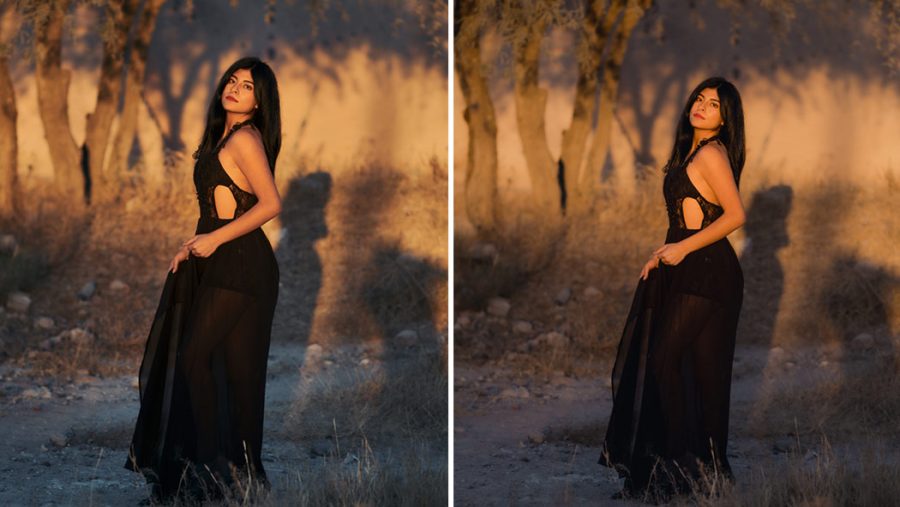
Gradually, I started using the normal photography S Curve less and applying variants that merged it into F curve. I watched as my own presets and edits got smoother, with better highlights and even better shadows and contrast.

It’s a simple tweak that transforms your edits.

Notice how the Filmic presets curve rolls off far more than a photography S Curve
An F curve can start like an S curve. But the way it drops on top is the key factor in the result. You can then mix shadow lift and drop.

But without Shadow, your curves mean nothing!

When I started developing Filmist film presets years ago, I realized that Film has a softer highlight roll-off than digital has a hard sensor. Contrasting lenses and easy-to-move editing soldiers were getting over-curved. especially with the traditional digital photography s curve.

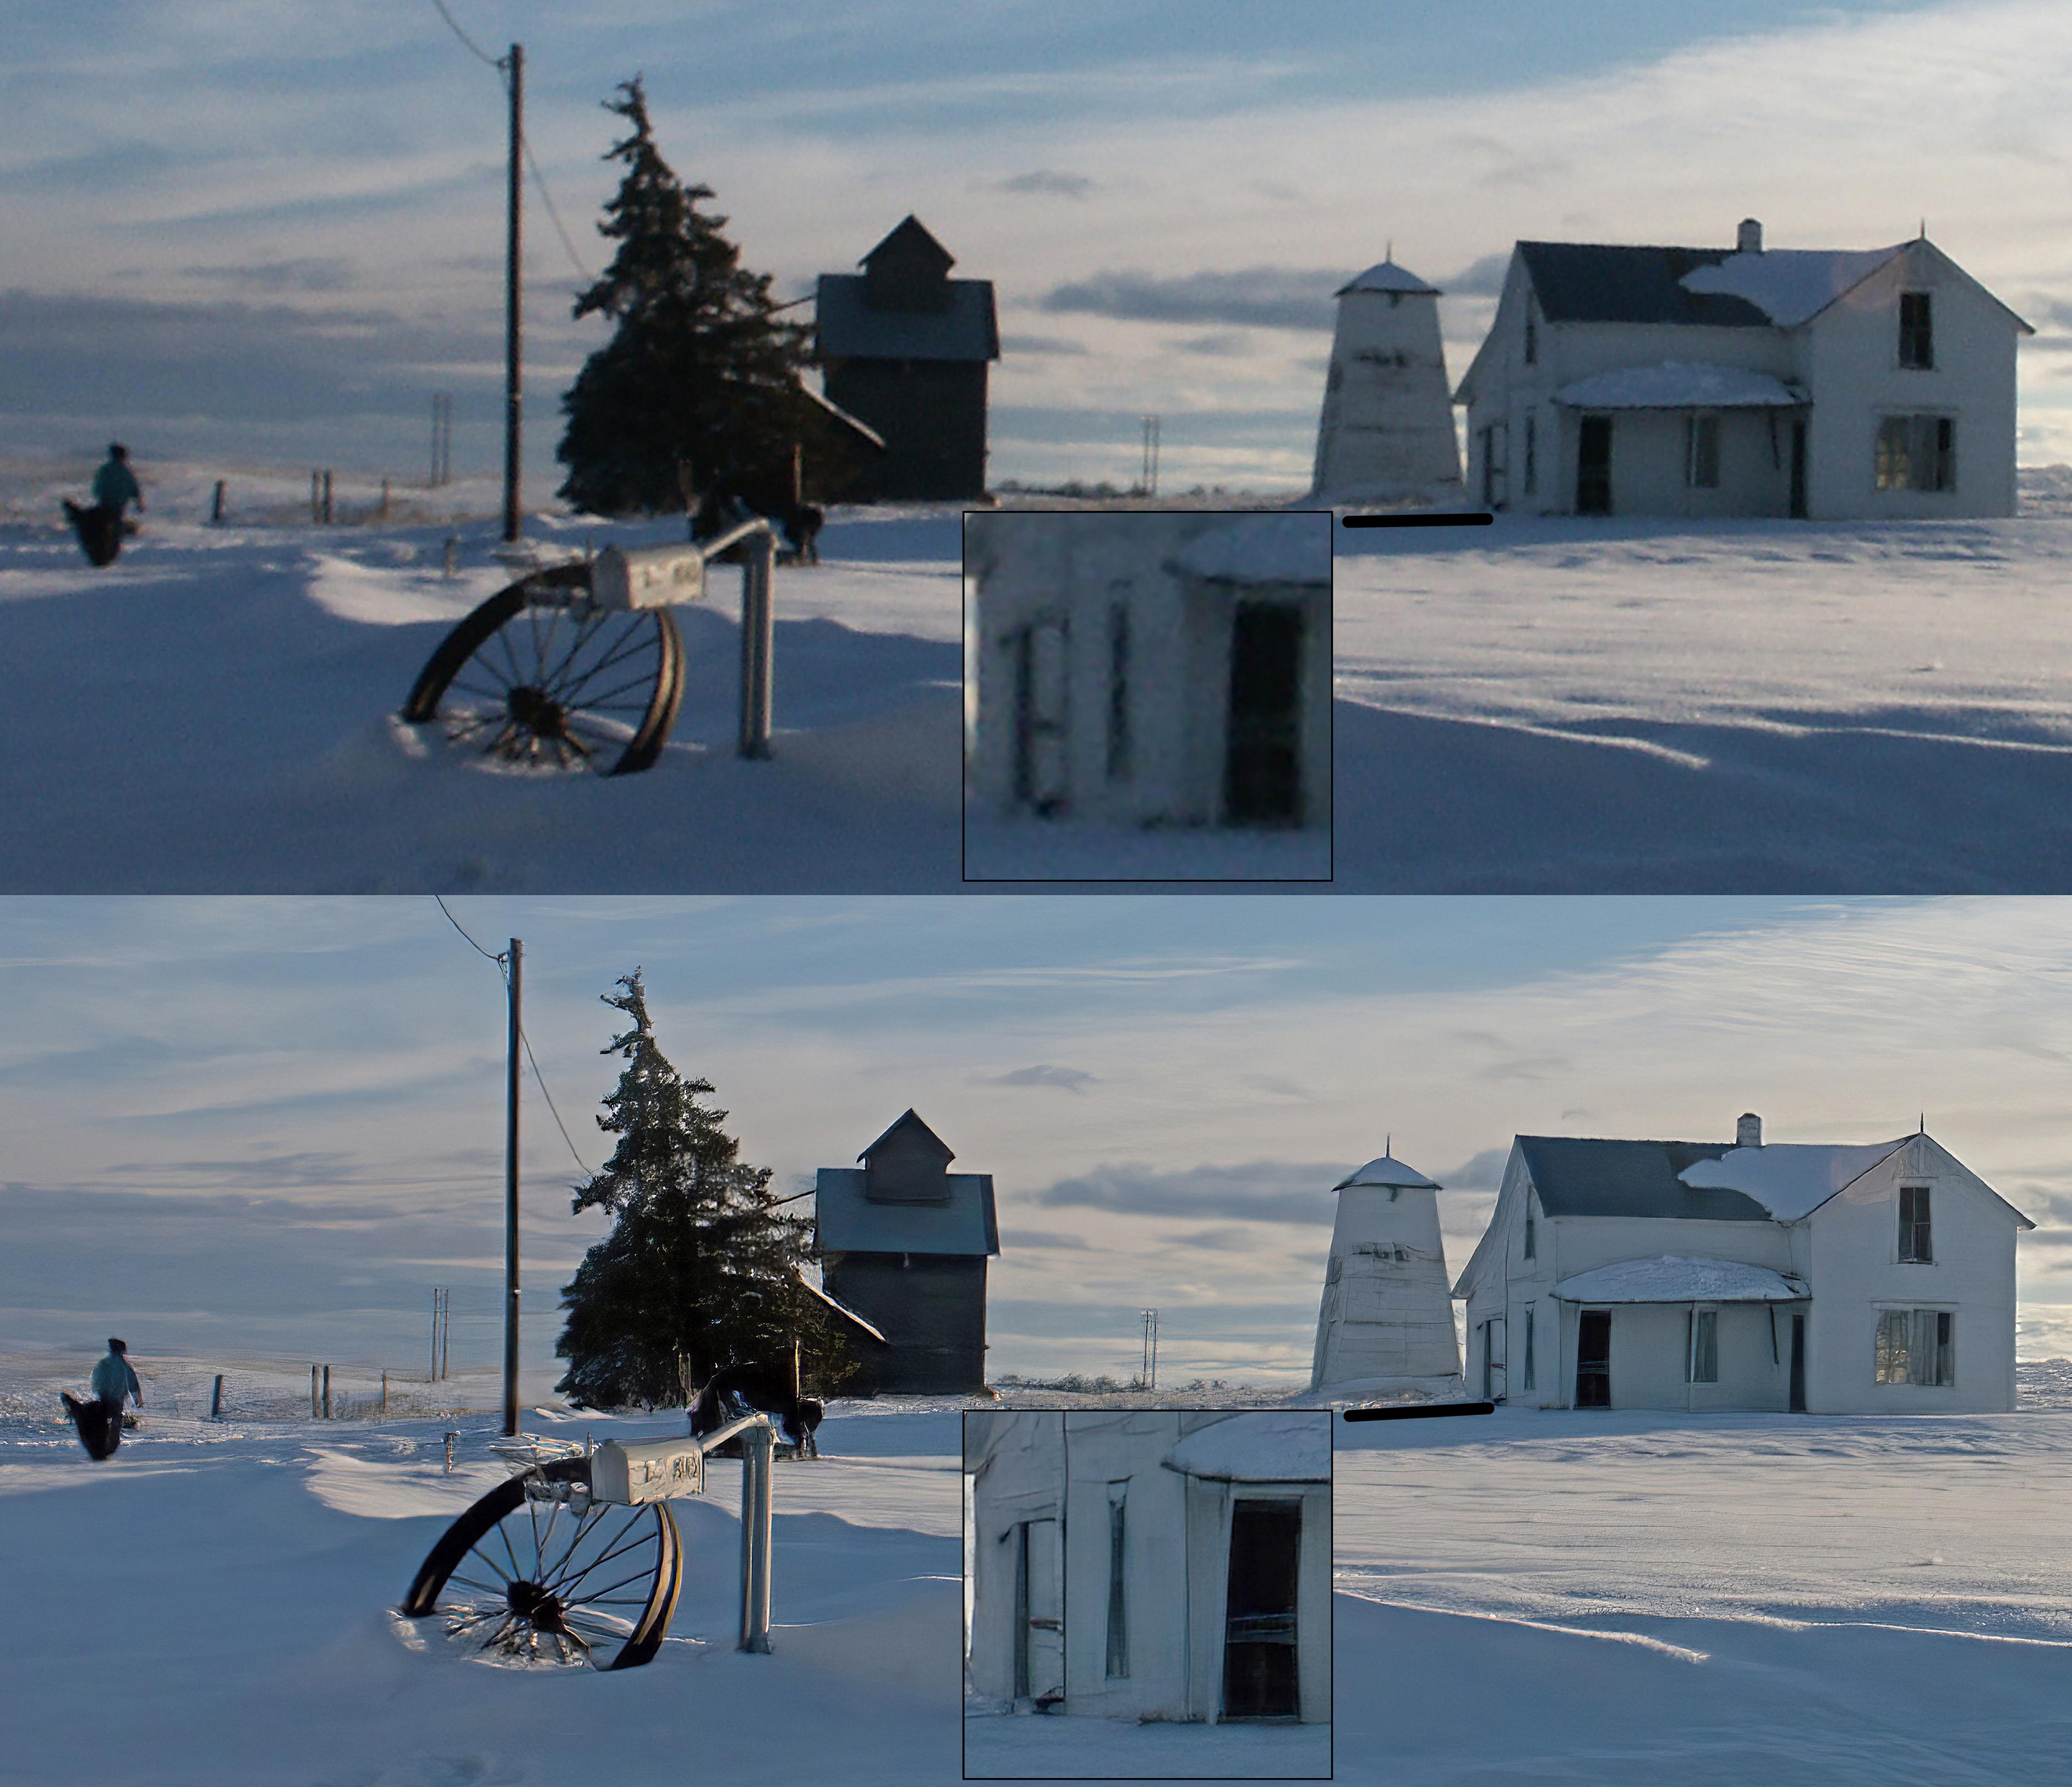
A curve can add or remove your shadow. The S-curve in photography can quickly pop highlights or put some punch into shadows, and often it works well. The problem is that it tends to do the same thing to every photo, and while it boosts contrast in the edit, you lose fidelity in the roll-off details.

Tone roll-off is a big deal. And what most don’t realize is that you don’t always need to push up highlights because they are actually very perception based.

That highlight will seem BRIGHT depending on the tone of the shadows that surround them. To learn more about shadows watch this video on my channel. In short, combining smooth highlight roll-off with organic feeling shadow gives you a rich result.

A subtle Ektar based F curve is a lot like the S Curve in Photography but distinct
In this Ektar recipe from Filmsit the F curve is already part of the process giving a subtle highlight rolloff like film.

The F Curve will replace your S curve crutch!

So instead of the S Curve in your photography, us the F curve because you better control the shadow dimension and how that relates to your highlights as they roll off perfectly, just as they did with Film!

You also won’t always feel like you have to create that S shape will open up how you use the tones in each photo.

I hope you found this useful and will spread it around because the F curve really is better than the S Curve. Please spread this around and let me know what you think in the comments.

Gavin Seim

The s curve in photography works fine, but my changing to a filmic curve you improve everything like in this P\ortra look
A strong double drop at the top of this F curve softens the specular highlights that were a problem in the portrait processed with a Portra look.
Read More

June 20, 2022

The topic of Lightroom VS Capture one comes up a lot.

I am a little bit of an expert since everyone one of my Lightroom Develop Presets Packs also comes, and a Styles Pack for Capture One Pro and I’ve been using both for many years.

I’ve compared various things about Lightroom and Capture One and I have the main video for 2022 that compares Lightroom VS Capture One in a wide sense so you can decide which one is best for you.

YOu can even try the edit yourself with the RAW file below and the free lightroom preset and free capture one style I’ll link below. You can also share your results on the Shadow Hunters group post for this.

Try it – Download the RAW file for today’s test here.

So today is about a simple portrait edit. BUt not really an easy one because of the tricky light. This is a perfect test to see how we use Lightroom and Capture One in the real world for a great portrait edit and which one offers the best features.

Both edits are clean and have gentle differences from Lightroom to Capture OnePro

Download the Portra 160 Preset/Style I use in the video for FREE in the FIlmist Mini Pack.

Watch the video and see side-by-side edits and some tips for editing great portraits in both.

Lightroom is a little more initiative and has better Ai tools. Capture One is more nuance and control. They are close!

In the end, both are good and both have their advantages. But watch the video and I’ll show you some ups and downs. Whether you use Lightroom Classic, CC, or Capture One Pro 22, you can get great results and we’ll see them in today’s video.

Let me know which one you like best and why, or if there’s another app you favor for your RAwe editing, I’d like to hear about it in the comments.

Read More

March 29, 2019

This is not regular sharpening or interpolation.

“Enhance that image” she said, as the tech on a 1999 486 clicked a his button and made the perp appear from the muddy shadows down the alley. Data that was never there appeared like magic!

Most photographers have seen this many times and laughed thinking of what unsharp mask actually does. For me my everyday tools, software, presets and actions are the simple mainstays of being a photographer. But what if we could have something that could save images we screwed up or that were missing information?


Today we’ll look at two products from Topaz, Sharpen AI and AI Gigapixel. to see if we actually can MAGNIFY and ENHANCE in 2019. Don’t forget to go full screen or watch on YouTube in 4k so you can see what a day ago, you might have thought was impossible.

Also here’s a couple high res examples so you can see just how much is being done before and after. Click on the images to view them large.

— Gav


Read More

July 26, 2013

by Gavin Seim:

Day One: I’m going to get brutal with the reality of how the new LEAP Motion handled REAL WORK. If you want to save time here’s my initial impression.

LEAP does NOT leap out of the box and work well – Maybe that will change in time, but this feels like pre-beta and does not make my work easier.

leapI pre-ordered early and my LEAP finally came today after what must have been more than a year. It had been so long it was almost like magic just to hold the box. WOW, I thought. I can now control my computer just by waving my hands. Minority Report, here I come.. I’ve not actually seen that movie. Is it good?

Anyways that a little voice inside said “Gavin! Though shalt not count thy leaps before they hath jumped” But I still rushed to my studio to try it out. “The waiting will pay off” I thought.

Well, LEAP worked. Sort of. It reminds me of many an encounter with voice recognition software. It looks great in the promos. Then you use it.

I could talk like a hot shot and say how amazing it is and how high tech I am. Because the idea really is cool. But the reality seems to be that LEAP is mostly useless for me right now.  The first thing I realized was how they made it look really pretty, but barely indicated what I needed to do actually use it in the real world. Perhaps that was because there was little practical use. The goofy games hold little interest for me. I want to get something done.

On my production studio desk nothing gets real estate that does not do it’s job. From my precision corded laser mouse to my Medium Wacom tablet. A device has to do something well, or it goes in a drawer.

Once I finally got calibration to work (not pretty on my Mac), I Installed Better Touch (an app that allows for custom commands). Sadly I could not even make it “practical” for the simplest of movements.

First Test: I started with a hand gesture for right and left arrow keys, thinking it might be useful for sorting images in Lightroom. Nope. Unless I held my fingers just right it did not even see the gesture. Trying to think about your hand, while also holding it in the air becomes very tiring VERY fast. It’s mentally and physically frustrating. In practice I ended up waving my hand slowly, then furiously over the device just to browse images with poor results. Not a good sign. Back to the keyboard.

Next Test: I wanted to control the mouse in hopes of using Leap’s touted precision to do things I do with my Wacom, or even basic Finder work without my mouse. Since Leap gave no indication during setup that this was even possible, it took a few minutes to realize that I needed a free app called Touchless. I installed that from Airspace (the app store for Leap) ran orientation and it started to look good. Reality soon set in.

Again I started simple, hoping to use Leap to control the mouse for simple but precise painting, burning and dodging in Photoshop. I got little functionality in Basic Mode so I switched to advanced and got a working curser where I could touch and engage the click – Sometimes. That was when it was not doing random zooming, window switching and the like. I even managed some basic painting and burning. But it was totally unreliable. Sometimes the click would engage and the tool would work, sometimes not. Sometimes it would change the window or do something else. Sound like something else? Here’s looking at you Voice Control.

I know it’s new and I will spend more time with it. But the truth is a great device usually works from the start. If they had simply given us solid reliable mouse/touch integration it would have been a GREAT start. But the reality is this is not even comparable to a mouse or a tablet in ANY practical sense. Since it lacks that, it’s little more than a gimmick with a few games and trinkets attached. So far.

After a year of waiting. Leap is essentially useless for me in any practical sense – I hope this changes, but if they could not give us BASIC functionality after all this time, I fear we’re in trouble.

I know I’m being harsh. But it’s the reality of it for today. I’m trying to be a beta tester. I paid for this. The potential seems real. But I waited, hoping they would get it right. They did not. This looks like another piece that will end up in the drawer. That said I will keep trying for awhile and see if it gets better. If I have a new revelation, I will update this article.

Read More

July 11, 2013

Video_ Selling Wall Art – Photos as Fine Furniture-1
It’s road trip season. Check out Gavin’s road trip article for a huge list of resources.

Click To Listen>> Photography Podcast. PPS #93

Direct Podcast FeediTunesPodcast Alley

Today’s Panel… Gavin Seim Bary HowellScott Jarvie

This week Gavin and Barry talk about the latest topics and then dig into some stories of past photography adventures.

This episode brought to you by the Seim Effects and the award winning EXposed Workshop.

PPS #93 Forum Discussion HERE.

Main Time Indexes:

  • 00:00 Introductions.
  • 01:40 Barry Speaks
  • 17:55 A bit of video discussion
  • 24:30 News and LR5 talk
  • 34:30 The Stolen Facebook Photo Fiasco
  • 52:20 It’s Story Time
  • 1:18:47 Picks and Fishing
  • 1:37:25 Scott Jarvie Joins in

LINKS…

EXposed Workshop win’s a hot one award.

Gavin Road Trip Journal

Gavin’s road trip article with a list of gadgets.

VIDEO: Selling Photos as Fine Furniture.

Canon C100

Graphene Camera Sensor.

The Stolen Facebook  Photo Fiasco.

Jarvie’s Faith in America Project.

Picks…

GAVIN –

SLR Pro Dot

Bucket Boss Jumper Cable Bag.

Epic 25ft Jumper Cables

Barry –

Stool with tool storage.

Air Display – iPad

Rapela Scatterrap.

Scott –

Jumper Power  Box
(Here’s a heavier duty version)

Read More