January 25, 2019

Lumist is one of the easiest tools you’ll use in Photoshop. But designing it pushes both Photoshop and my brain to the limit. It’s a strange beast because it’s adding a feature to Photoshop that should have existed years ago but does not. The ability to see and control luminosity perfectly. The goal is to make the process of our one of a kind tone system work as if it was meant to be part of Photoshop.

Behind the scenes, however, it’s the most complex set of actions you can imagine. Every time I do major updates on Lumist it’s a battle of math, functions and usability going on in my head. This update does not change a lot on the surface of Lumist but I’ve spent days puzzling out how to make things do what I need.

Lumist 2.2 is a big update. First I resolved a pesky bug that was causing Zone section to be incorrect when more than one Zone was selected. I’ll spare you the details but suffice to say your Zone selection should be perfect now as you select and edit in real time using the Live Map.

Nex,t I totally revamped the Total Scale. Both of them. That’s the numbers scale that shows you each zone and the colors that it corresponds to in the map. The ends of the scale show pure highlight and shadow clipping that is also shown in the map.
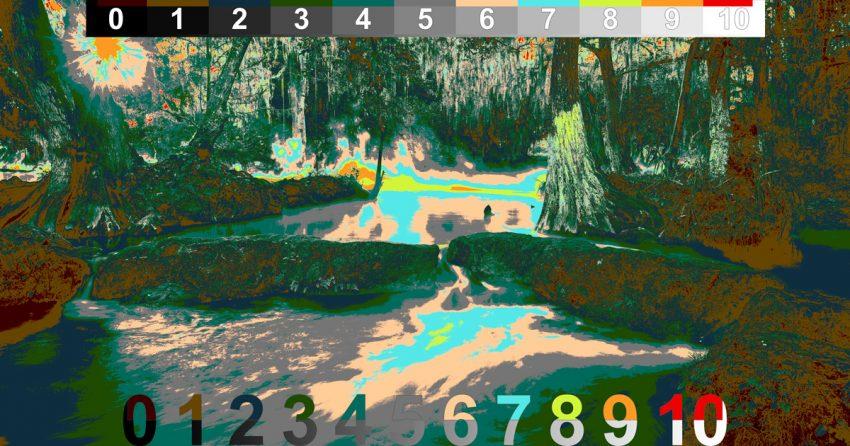
A brand NEW Scale!

This will the an obvious change, in 2.2. Speed is always something we’re looking to improve. The problem was the Total Scale has to build every time you run the map. So we made a new scale that’s cleaner and FASTER (bottom). The top half of the numbers show the color of a Zone on the map while the bottom shows the grey scale zones they represent. It’s clean and it runs a lot faster. That said you can still ad the newly revamped Classic Total Scale (top) using the button at the top of Lumist. If you really hate the new scale you can even switch back to classic by simply switching the names of the actions “Seim Total Scale” and “Seim Total Scale2” down at the bottom of the Lumist set.

There’s no need to resize the scale on lower resolution images anymore.

It should place perfectly when you run the map automatically. This apples to both the new and the old style scale.

So that’s Lumist 2.2. You can delete old versions and install this. All the features are updated on both the CC version and the CS5-6 versions of Lumist. And if you’re still using Lumist V1, what are you waiting for. Grab you upgrade code and start enjoying V2. If you can’t find you upgrade code email us, effects@seimstudios.com


Read More

June 16, 2017

 A lot of you asked for more videos that show all the crazy stuff you can do with Lumist. This is the first of that video and there’s a couple more to come.

In this video we take a deep look at the Basics of Lumist that are easy but go way beyond basics. This is tone control technique here that people spend a lifetime learning as we dig into the Simple Toolbox module in Lumist and learn how much it can actually do. It the next video we’ll dig deeper into the effects modules of Lumist. If you don’t have Lumist yet you can download it HERE.

Enjoy — Gav

Read More

December 15, 2016

For our Christmas Photo Craft I wanted to do something special, so I made you all a mini set of  cinema-inspired Photoshop actions for free.

Just download’em and load into your PS! The Ice and Fire action is a highly adjustable combination of warm and cool tones and the bonus action adds a classy understated glow effect that can be used in any image. This tool focuses on complementary colors and you’ll find its vert versatile. Merry Christmas.

NOTE: There was a glitch that caused the action problems on Windows. This should be fixed in the current version (162) so just re-download if you have problems.

— Download Actions —

  • There are three more cinema themed actions in this month’s Photokit.
  • Also, check out our Alchemist Action Collection a complete retouching collection.

ice-and-fire-action

ice-fire-2

ice-fire-5


Read More

April 17, 2012

Seim Effects is all about quality tools, education and service. Gavin’s complete editing collections and video workshops are second to none. But there’s also lots of freebies to get you started. You’ll find them all the freebies category of the blog, but this list represents many popular freebies in one place. You can get a lot of good editing tools for free, starting right here. Enjoy.


Adobe Lightroom Freebies:

Apple Aperture Freebies:

Adobe Photoshop Freebies:

Education and More:

That’s all for now, but I’ll continue to update this list, so stay tuned. You can also check the freebies category of the blog for the latest free goodies. Enjoy… Gavin Seim

Read More

May 16, 2009

by Gavin Seim: There’s plenty of info and a video on each  product page of this site, but I wanted to make a post giving an overview of how I use Seim Effects in m fast photo workflow and what each collection is best for. I’ve found that having your workflow nailed down makes all the different in creative efficiency.

power workflow lightroom presets

Power Workflow2: This is my starting editing tool, but certainly not the only one I use. Lightroom used with PW2 is the key to those fast 3hr wedding edit sessions I do. PW2 is a set of about 60 highly refined and organized presets that can be applied with a mousclick to one or thousands of images.

There’s categories, starting with the batch correction Super Series presets. I start my workflow by adding these to large batches of images from my session. This get’s me the basic but essential stuff like exposure, contrast and tone under control. There’s various Super Series presets depending on the shooting situation. Basically I pick the one that looks best for a batch of images and off I go. No rocket science yet. I may still have to do a few tweaks on a few images since no auto tool is perfect, but it get’s me close.

After the auto correction I sort down my images with a 3-5 star rating system. 5 being the best. I’ll then go over my favorite images and add other effects from the set. The Super Series is just the beginning. There’s lots of color and B&W effects to choose from and soon I have a nice variety.

black and white presets

MonoChromatix: Black and white can be so powerful. PW2 takes has some great monotone effects, but MonoChromatix takes  it to the next level with a complete set of all monochromtic effects that perfectly complements PW2. When I think an image just looks great in B&W and want to get something really remarkable I’ll try some effects from this set until I find one that’s perfect. There’s everything from classic black and white to sepia, to infrared. I use these to get some really cool B&W looks, and it saves me the time of having to use a plugin in Photoshop.

Creative Essentials: Essentials is a great tool for someone who does not use Lightroom, but also for someone use mainlines in Lightroom and then does those special tweaks in Photoshop like I do. It’s simple and straighforward with some poerful tools.

Once my primary edits are done in LR I head to PS with a few of my favorite photographs. There’s things I can do in PS that just can’t be done in LR. Essentials is a great starter set of actions that includes a nice range of effects from tonal changes to really nice color tones, shatpening and softening effects.

hollywood effects photoshop actions

Hollywood Effects: The set that started it all. It’s been thru some tweaks, but the name still says it pretty well. Hollywood and Essentals complement each other really well and when I head into Photoshop I use them both.

In Hollywood you’ll find plenty of cinematic glows, color modifiers and mood setters. Some of them can be intense, but since with my actions I make standard practice of having layers, masks and details, you can easily adjust the way an effect changes your image to get a totally unique look.

I keep a main workflow action set where my actions (as well as favorites from others) are saved in one set. Easy to manage and easy to backup. Then I put the action pallete into button mode and it’s like a console of photo tools a mouse click away.

__

That about sums it up. As I work everything stays saved back into LR and when I’m done I just export the final results. Event those not using Lightroom can still move their workflow along much faster by having both action sets loaded and ready to fire.

It’s a complete workflow for Lightroom or PS users that does an important job. Giving us more creativity while making us faster. I’m always working to devise new workflow ideas and improve effects so stay tine. You’re also welcome to contact me with feeback or ideas… Gavin

Read More